
Despite the crazy hot weather, I've been festooning my abode with pun'kins! Every year I make Jake buy me these insanely expensive fairy tale pumpkins (as opposed to the much more reasonably priced carving pumpkins) to decorate the house. I rationalize it by saying that if we buy them in September I can leave them out until the day after Thanksgiving and we're set for our entire fall decorating scheme.
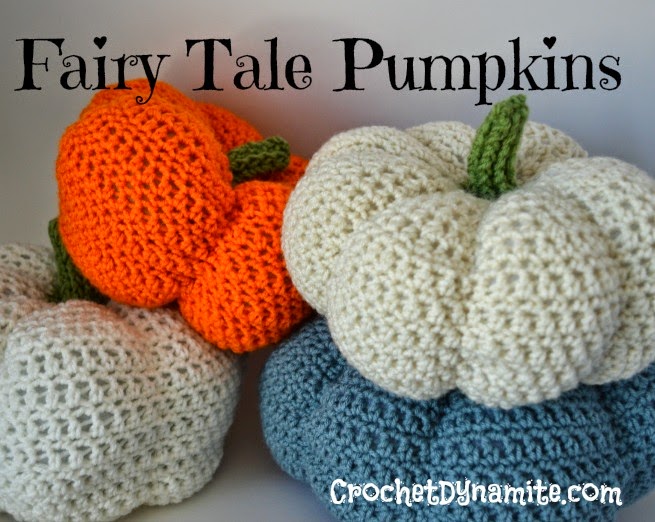
However, this year I've decided to crochet my own pumpkins! For a girl that is used to paying $15 each for the real-life suckers, this is quite a steal, since I was able to make 2 pumpkins from one skein of Super Saver. Plus, I can snuggle with them on the couch, which real pumpkins don't enjoy very much.
I saw some gorgeous blue pumpkins on Pinterest (don't you just adore Pinterest?! I'm on there, like, 18 times a day. Pinterest is my Facebook... but I digress...) so I had to make myself a blue pumpkin too. It's a little darker than a real life blue pumpkin, but I'm claiming creative license here and adoring it anyway.

I'm really happy with the way that the stem of these pumpkins turned out. It's hollow, so you can bend it and it stays in place. So cool! The ridges make it look like a real pumpkin stem, which makes me giddy every time I look at them. I was able to do it by using front-post half-double crochet, which I abbreviated to fphdc (so when you see it in the pattern, that's what I'm talking about).
If you'd like to make one (or twelve) too, here's how I made mine:
FAIRY TALE PUMPKIN
(to make one 9" pumpkin)
Supplies:
180 yards of worsted weight yarn for pumpkin body (for my pumpkins, I used Red Heart Super Saver in Soft White, Aran, and Pumpkin, and Caron One Pound in Azure for the blue pumpkin)
Small amount of green for pumpkin stem (I used Red Heart Super Saver in Tea Leaf)
Size J crochet hook
Polyester Fiberfill Stuffing - I used approximately 10 ounces
Yarn needle
(use main body color)
R1: 9 hdc in a magic loop, pull loop tight, sl st to first hdc to close round. ch 1 (9 st)
R2: 2 hdc in each hdc, sl st to first hdc to close round, ch 1 (18 hdc)
R3: (2 hdc in first st, hdc in next st) 9 times, sl st to first hdc to close round, ch 1 (27 st)
R4: 2 hdc, (2 hdc in next st, hdc in next 2 st) 8 times, 2 hsc in the next st, sl st to first hdc to close round, ch 1 (36 st)
R5: (2 hdc in first st, hdc in next 3 st) 9 times, sl st to first hdc to close round, ch 1 (45 st)
R6: 2 hdc, (2 hdc in first st, hdc in next 4 st) 8 times, 2 hdc in next st, 2 hdc, sl st to first hdc to close round, ch 1 (54 st)
R7: (2 hdc in first st, hdc in next 5 st) 9 times, sl st to first hdc to close round, ch 1 (63 st)
R8: (2 hdc in first st, hdc in next 6 st) 9 times, sl st to first hdc to close round, ch 1 (72 st)
R9: sc in each st around, sl st to first sc to close round, ch 1 (72 st)
R10: hdc in each st around, sl st to first sc to close round, ch 1 (72 st)
R11-26: repeat rows 9 and 10 (72 st)
R27: (hdc 2 st tog, hdc in next 6 st) 9 times, sl st to first hdc to close round, ch 1 (63 st)
R28: (hdc 2 st tog, hdc in next 5 st) 9 times, sl st to first hdc to close round, ch 1 (54 st)
R29: (hdc 2 st tog, hdc in next 4 st) 9 times, sl st to first hdc to close round, ch 1 (45 st)
R30: (hdc 2 st tog, hdc in next 3 st) 9 times, sl st to first hdc to close round, ch 1 (36 st)
R31: (hdc 2 st tog, hdc in next 2 st) 9 times, sl st to first hdc to close round, ch 1 (27 st)
R32: (hdc 2 st tog, hdc in next 1 st) 9 times, sl st to first hdc to close round, ch 1 (18 st)
Fasten off, leave a long tail (like 2 yards)
Stuff the pumpkin! Stuff it very full, it will look lumpy and not very good at this point, but that's okay! Just make sure it's stuffed very tightly.
Attach stem yarn anywhere along the edge of R32, ch 1
R33: (hdc 2 st tog) 9 times, sl st to first hdc to close round, ch 1 (9 st)
R34-41: fphdc in each st around, sl st to first hdc to close round, ch 1 (9 st)
R42: fphdc in each st around, sl st to first hdc to close round (9 st)
Fasten off, leaving a 18" tail.
Using yarn needle and stem yarn, whipstitch top of stem closed. Fasten off and weave in end.

To make the ridges in the pumpkin I used a big yarn needle (trust me on this one, you need a big needle for this, the little ones will get lost in all the fiberfill). I threaded the tail end of Round 32, and poked my needle straight through the center, from the edge of the stem out through the bottom hole of Round 1.

Then I used a running stitch and wove the thread in a (mostly) straight line back up to the stem.

I pulled the thread snugly to create the side indentation, and made a little invisible knot at the base of the stem to hold the tension. Then I poked my needle back through the center and did the whole process again on the opposite side. At this point, it's going to look like a crocheted booty. Yes, I'm an emotional 3rd grader, because it makes me laugh.

Then I made indentations to create quarters. Then I made an indentation between each of those lines, ending with eight plump ridges.

I pulled my yarn through the center of the pumpkin one last time and fastened it off at the bottom of the pumpkin, weaving in my remaining tail.

xoxo
So cute!! Can't wait to make one (or three) for myself ... thanks so much for the pattern!
ReplyDeleteHow cute!! Great size too! Thank you!
ReplyDeleteLove them! Thank you.
ReplyDeletehi, i didn't see the pattern for the stem...is there one? I made the pumpkin and am stuck without the stem...
ReplyDeleteThe pattern for the stem is in with the pattern for the pumpkin:) I missed it at first too.
DeleteRows 33-42 is the stem
DeleteLove it I shall be making a few of these. They'll make great pin cushions x
ReplyDeleteThank you so much for the pattern, my pumpkin came out so cute. Can´t wait to make more.
ReplyDeleteThank you for the pattern
ReplyDeleteR4 is confusing me. I keep ending up with 35 stitches. Am I missing something? Is there a typo?
ReplyDeleteEvery row is a multiple of 9. I think there is a typo. Try 2 hdc, 3dc in next 2 st 9 times. Each row after that, the number of single hdc's in a stitch goes up by 1 until you're doing 2 hdc and hdc in next 6 sts. If you want a smaller pumpkin, stop at R5 and start R9 and R10 for the next 14 rows, then start R30 and finish the rest of the pattern.
DeleteMy phone auto corrected. 3rd sentence was supposed to read: Try 2 hdc, hdc in next 2 sts 9 times.
ReplyDeleteI found jack-o-lantern button sets at Joann's. There's three triangles, and the grinning mouth in one set. I'm going to use them on my pumpkin!
ReplyDeleteI recommend not using cotton yarn as it broke when pulling it to make the outside sections.
ReplyDeleteI recommend not using cotton yarn as it broke when pulling it to make the outside sections.
ReplyDeleteThank you for the cute and easy pattern! In doing the stem I noticed that round 41 and round 42 are exactly the same. Was 42 supposed to be different? Some kind of closing to the top of the stem? Not that it needs it, but I was wondering since it's odd to not have just written 34 to 42 instead of adding 42 as a separate row.
ReplyDeleteThe only downside to a double crochet is that the gaps between stitches will be bigger. And show more stuffing.
ReplyDeleteSafrat Cleaning Company in Riyadh
ReplyDeleteI made a bunch last year and they turned out great. Do I have permission to sell completed pumpkins? I’ve receiced a few requests.
ReplyDeleteSince no one has responded to you, in the US it is legal to sell any items made with any pattern despite what the pattern creator may claim. It is polite to request permission, but as you've not heard back from the creator, I say go for it! Good luck :)
DeleteWhat is a hsc?
ReplyDeleteI wondered the same thing but decided it must be a typo for hdc, so that's what I ended up doing.
DeleteThe abbreviation hsc in row 4 is a typo and supposed to be hdc.
DeleteBellísima,la haré gracias
ReplyDeletei used DC as well. depends on how tight you crochet and how much you stuff it. ive been told i have slighter tight hand work than most people do and i didnt stuff mine super tight, so i didnt really have any gaps in mine
ReplyDeleteThank you so much for your pattern! I made my first pumpkin with it and it came out great! AT first, I thought the string to make the indentations was crazy. But it realky did make the pumpkin look real. I'm going to go ahead and make other fallish colors. Thank you again!
ReplyDeleteI'm not understanding how many chain I need for the stem. Would kindly help me. Thanks
ReplyDeleteHad fun making this. Thank you!
ReplyDeleteThank you for this excellent pattern. My pumpkin is adorable.
ReplyDelete
ReplyDeleteشركة ركن الامانة للخدمات المنزلية تقدم لكم اليوم خدمتان من خدماتها المتميزة بخصم يصل 30% لخدمة المكافحة وتنظيف الخزانات بمدنية جازان الشركة لديها افضل معدات تنظيف وأفضل مبيدات حشرية يمكنك التواصل معنا عبر الروابط التالية شركة مكافحة حشرات بجازان
شركة تنظيف خزانات بجازان
شركة تنظيف بجازان
hey, i don’t know if you are aware of this but it looks like this pattern has been published in an e book by Carolyn Baskin called Halloween Crochet Creepy Costume Ideas. This person has plagiarised quite a few designers recently in this way.
ReplyDeletehttps://www.amazon.co.uk/Halloween-Crochet-Creepy-Costume-Ideas-ebook/dp/B08KW8WRP4/ref=sr_1_7?dchild=1&qid=1603385771&refinements=p_27%3ACarolyn++Baskin&s=digital-text&sr=1-7&text=Carolyn++Baskin
شركة تسويق الكتروني
ReplyDeleteعروض تسويق الكتروني
تسويق الكتروني السعودية
شركة تسويق الكتروني في السعودية
افضل شركة تسويق الكتروني
الأجهزة المنزلية
ReplyDeleteعروض الاجهزة الكهربائية
مكيفات سبيلت
متجر اجهزة الكترونية
اجهزة كهربائية للمطبخ
ReplyDeleteافضل شركات الشحن في دبي الامارات شركة بي بي سي لخدمات الشحن البري والجوي البحري من الامارات الى جميع دول العالم الخليج العربي بلاد الشام المغرب العربي اوربا افريقيا
شحن السيارات الاثاث الفرش البضائع بأقل الاسعار
شحن من الامارات الى العراق
شحن من الامارات الى لبنان
شحن من الامارات الى السعودية
شحن من الامارات الى الكويت
شحن من الامارات الى البحرين
افضل شركات نقل اثاث في دبي شركة بي بي سي لنقل الاثاث في الامارات توفر خدمات نقل وتخزين وتغليف الاثاث بأسعار منافسة
ReplyDeleteنقل اثاث دبي
شركة نقل اثاث دبي
نقل اثاث الشارقة
نقل اثاث ابوظبي
نقل اثاث العين
نقل اثاث الفجيرة
This is so beautiful. I adore those people behind this. hot water heater repair colorado springs co
ReplyDeleteLooking for Local Movers and Packers in Dubai Marina Near You? East West Movers UAE provides fast, affordable, and highly reliable moving services with expert packing and safe transportation for a smooth relocation experience.
ReplyDeleteLocal Movers and Packers in Dubai Marina Near You