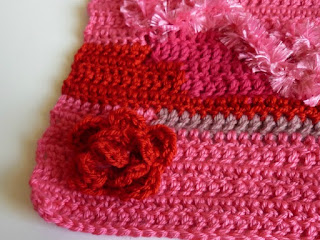
Today we're going to embellish the blocks that we made yesterday. I really like the funky, whimsical color changes, but I think we can make them even more fun and special.
So grab your giant tote bag full of all of your yarn colors, a crochet hook (I used a G hook to do ALL of my embellishing, but you're welcome to switch it up if you'd like), some scissors and a yarn needle.
Oh yeah, and grab a 'blank' block too:
This is the fun part. Attach your yarn, and crochet as your heart leads you. I like to add swirls and squiggles. You can use slip stitches (which will add an additional line of stitching that looks a little like a dashed outline), single crochet, and double crochet stitches (which add a nice flare to the lines). Switching the type of stitch that you do as you embellish your block will add more texture, and (repeat it with me:) More Texture equals More Visual Interest (it looks WAY cooler!).
 |
| You can weave in your ends right away after each color. No need to leave them out like I did. |
Now, grab another yarn color/texture and add some more!
This block needed a focal point, so I decided to add a rose to the corner. If you'd like to add a rose to your blocks, this is how I did it. Like all of my instructions on this project, try it my way, and then use it to jump off and experiment on your own!
Think Pink Rose Embellishment
Supplies:
Worsted weight yarn in any color that makes your heart happy
Size G hook
Pick the spot that you want to put your rose. Just go for it!
For the first petal:
Attach yarn, ch 1, 5 dc, 1 sc
You're going to want to made a circle of petals, so move to the next spot and go for it!
For the 2nd petal (and each additional petal):
sc, 5 dc, sc
Add more petals in the same manner, placing them so that they form a ring. Connect the last petal to the first petal with a slip stitch to finish the first "round" of petals.
Now, add a second (smaller) circle of petals in the center of the outer ring. There will be a little hole in the center, add a petal right in the middle for the center bud of the rose.
I would recommend doing an outer ring of 5 petals, a center ring of 3 petals, and 1 petal in the center. If you wanted to do a larger rose, made the outer ring 7 petals, 5 petals for the center ring, and 3 petals for the bud in the very center.
Now, look at your block. Does it need more? Are you done? How does it make you FEEL?
Mine made me feel like it needed more embellishment!!
Once I got those corner squiggles in, I assessed it again. It looked interesting and fun and complete to my artistic aesthetic. So I moved on to the other 3 plain blocks that I had made. Here are the before and afters for all 4 of my blocks:
 |
| Block 1 |
 |
| Block 3. I added 3 roses to this block. I experimented with leaf-like squiggles. |
xoxo
Want to see the rest? Click on the links below!
Think Pink Lapghan - Part 1
Think Pink Lapghan - Part 2
Think Pink Lapghan - Part 4
Think Pink Lapghan - Part 5


Very, very cool!!
ReplyDeleteThanks! It's not hard when you see how it's done!
Deletexo J
You, know, seeing the photo with Mim's laying on this in your previous post gave me an idea, you could make another one in equal size with just one of the dominant pink colors put the two together, stuff it and make it into a giant pillow for lounging on! It would work.
ReplyDeleteOh yeah, you could even make a liner to be sure the stuffing is secured.
DeleteOoh! I like that! That would be really fun! And Mims would really like it! Hmm... Holidays are coming...
Deletexo Jaime
Super-Cool! This is a major thing that crochet is just so much better at than knitting: being able to easily add embellishments like this onto a piece. Thanks for sharing how!
ReplyDelete:)
I agree! You can embellish your knits with crochet, but there's not really an easy way to embellish anything with knitting, unless you make yards and yards of I-cord and sew it on... :D
Deletexo J