Happy Thanksgiving Back Dynamos!
I'm taking a break today (and watching my fave, You've Got Mail on Netflix), between my first Thanksgiving feast and my second Thanksgiving feast, while Jake and Mimsey are out at what will be their 3rd feast of the day. Whew! It's our first year not hosting in FOURTEEN years, and we're excited to be guests at so many welcome homes!
I just noticed that I passed 5K Pinterest followers! Wahoo! I'm incredibly thankful for that, and for all of you who read and follow and subscribe and comment. I'm feeling very loved and grateful for all of your support and care. So to celebrate, (and to give you something to do while you're waiting in all of those Black Friday sales!) I'm declaring a Saint Spoilings weekend and making all of my books free starting TOMORROW November 28th through Monday, December 1st!
You can get them all HERE, and if you don't have a Kindle, they have FREE software (and apps!) to allow you to read Kindle books on your computer, phone, and tablets! I use the Kindle software on my phone and tablet and it works GREAT! So, if you haven't downloaded it, do it now and get your books! Treat yourself!!! And tell a friend!
**Make sure that the price for the ebooks is $0.00 or FREE, BEFORE you place your order. I don't have any control over when Amazon starts the sale, or ends the sale (I just tell them I want to do it!) so please make sure that the books are actually free. I can't refund your money, they don't allow me to credit anyone back. So make sure that they're free before you check out! I wish I didn't have to place this disclaimer, but there have been problems in the past, and I don't want any unhappy Dynamos. **
So have a happy holiday, happy shopping days, and let's get ready for the crocheting-est Christmas yet! LOL!
xoxo

Thursday, November 27, 2014
Wednesday, November 19, 2014
Merry Dot Garland!
So, I set up my Christmas tree last week for my post about Christmas Crochet. And since my sister bought a giant new house recently, she's determined to host Thanksgiving this year. Somehow those two things have combined in my brain and I've completely skipped Thanksgiving. I am all Christmas, ALL the time. The upside is, most of my shopping is done. The other upside, I'm not cleaning frantically to get ready for Thanksgiving company, which leaves me more time to crochet!
A couple of weeks ago the very kind people at Belkin sent me the coolest thing. It's their Portable Tablet Stage. It's designed to hold your tablet, and give you a clean white surface, so you can do presentations, or TUTORIALS (!) without trying to balance it with one hand and work with the other. So when I started working on my Merry Dot Garland, I wanted to see what my new tablet stage could do! Oh my goodness, it's so awesome!!! I was able to stage my pictures, and adjust them by looking at my screen, and once they were composed the way I wanted, I just snapped the picture. It couldn't have been easier, So often, with my camera, I have to take 6 or 8 shots, just to make sure that it's angled the right way, or centered the way I want it, I LOVED being able to fuss with my pieces until they were perfect, and then take exactly the shot I wanted.
 |
| Not only did I get the exact picture that I wanted, I didn't have to clean off my desk to do it! LOL!! |
I still haven't brought the ornament boxes up from the basement yet (there are spiders, and vampires, down there!) so my tree is still pretty bare. I really wanted to crochet a fun garland for the tree, but the only ones that I liked this year were not crocheted, they were made of felt dots in fun colors. I decided I could totally re-create that look, but in crochet! It was so easy, it took me about 2 episodes of So You Think You Can Dance (Season 11 on Hulu Plus. I stream it through my Roku!) to make the thing from start to finish (and that included stopping to watch the dancing, and then only crocheting through the critiques!)
If you'd like to crochet a fun new garland this year, here's what I did:
MERRY DOT GARLAND
approximately 10 feet long
Supplies:
Worsted Weight Yarn - It doesn't take much yarn to do this project, less than 50 yards for each of 3 colors. I used cheapy-cheapy acrylic in holly berry red, grinch green, and snowy white, because I wanted it to be cartoonishly bright (those aren't the real color names, btw. I think the actual color names are Red, Spring Green, and White). **I think that if it was made with more sophisticated colors, it could be exceptionally beautiful. I'm considering making a shades-of-blue garland to hang in Mimsey's surfer girl bedroom year-round.**
Size H crochet hook
Yarn needle

Large Circles:
(make 10 in white)
R1: Make 10 dc in a magic loop, pull loop tight, sl st to first st to close round (10 st)
R2: ch 2, 2 dc in each st around, sl st to first st to close round (20 st)
Fasten off. Weave in ends.
Small Circles:
(make 18 in red, make 9 in green)
R1: Make 10 dc in a magic loop, pull loop tight, sl st to first st to close round (10 st)
Fasten off. Weave in ends.

To Make the Garland:
Using white yarn, sl st across large white circle, (ch 6, sl st across small red circle, ch 6, sl st across small green circle, ch 6, sl st across small red circle, ch 6, sl st across large white circle) 9 times.
Fasten off. Weave in ends.
I made a short video tute to go with the instructions, which is a first for Crochet Dynamite. I know, it's about time, right?! The Belkin Tablet Stage made it so easy. I got to just crochet away, and pick stuff up off my floor (you'll see) and I didn't have to worry about the dreaded shaky camera, since it held my tablet securely in one place. I will say that I think my tablet camera had trouble with it's auto-focus, but that's something I can improve on in the future.


Mims liked wearing the garland as a scarf, she doubled it up and flipped it around her neck. I like it on the (super bare!) tree, It's fun and festive and a little silly, which I think should be my tree theme this year.

One last thing about the Belkin Portable Tablet Stage - the software that goes with the tablet stage lets you write on your pictures! How flippin' cool is that?! Very cool. I think I need a stylus, because my finger writing is clearly not up to par. LOL!! It makes me want to give a presentation!
xoxo
*Full disclosure, while I received the Belkin Tablet Stage for free to try out, all of the opinions about it are mine alone. It really is incredibly cool, and I loved working with it! If you'd like to check it out, or get on of your own, you can go HERE: http://www.belkin.com/us/
Tuesday, November 11, 2014
Christmas Crochet Blog Tour and Giveaway!
**The Giveaway may be over, but I'd still love to hear what your favorite Christmas Crochet projects are!**
I have a confession to make: I'm a Christmas Craft Procrastinator. I know, it's sad, but true. I chronically wait until after Thanksgiving to even start THINKING about Christmas projects. This means that every year I stay up way too late most nights, and still don't get everything finished in time.
 But not this year! The folks over at Storey Publishing sent me a copy of their new book, Christmas Crochet for Hearth, Home & Tree by Edie Eckman. Kids, Christmas is finally coming early for the Dynamite family!!
The first thing I wanted to make was some new stockings for the whole family. A few years ago tragedy struck and our beautiful, handmade stockings were lost. That year I just purchased some dollar store cheapies, promising that someday I would make us new stockings. Four years later, I've finally made good on that promise!
There were so many stocking patterns to choose from (9, plus many variations!) I couldn't choose just one. Mims got the Mix-and-Match Stocking (in Gryffindor house colors!). I got the Colorful Stripes Stocking. Jake got the Basketweave Stocking, which was my favorite to make out of all of them. The single color, but great texture, made it really fun to work on, and I didn't dread weaving in ends when I was done! I think they look so cute hanging from the mantle!


Isn't the mitten so cute? I set up our tree just to show you how adorable it is as an ornament!
By the way, seeing the tree up so early this year was shocking to Mims when she got home from school. "Woah. Um, Mom, you ARE going to put other ornaments on it, right?" LOL!!!

The little stockings are also super cute! The purple and white stocking on the left was made with Red Heart Soft, and the Red and White stocking was made with Red Heart Super Saver. I only mention it because the stocking is MUCH smaller with the Soft, which might, or might not be a good thing. For a gift card and candy cane, it really doesn't matter, but if you wanted to put something else in there, you might want to use a worsted weight yarn on the larger end of the spectrum.
I think that Christmas Crochet for Hearth, Home & Tree is a cute little book, full of projects to decorate your home for the holidays. It's just the right size to travel with you everywhere you go for the next 6 weeks! Don't Christmas Craft Procrastinate! Start your Christmas projects now!!!
Okay, so do you want to know the best part? The amazing folks over at Storey Publishing are letting me give away a copy of Christmas Crochet for Hearth, Home & Tree! If you'd like a chance to WIN your very own copy of this awesome crochet book, leave a comment below telling me your favorite projects to crochet at Christmastime along with a contact email address! The giveaway is open from now until 11:59 pm Sunday, November 16th! I'll use Random.org to draw a winner on Monday, November 17th!
Psst! If you'd like more chances to win, check out the other blogs on the book tour! They're all giving away copies of the book too!!! There are only a few more days left!
I have a confession to make: I'm a Christmas Craft Procrastinator. I know, it's sad, but true. I chronically wait until after Thanksgiving to even start THINKING about Christmas projects. This means that every year I stay up way too late most nights, and still don't get everything finished in time.
But not this year! The folks over at Storey Publishing sent me a copy of their new book, Christmas Crochet for Hearth, Home & Tree by Edie Eckman. Kids, Christmas is finally coming early for the Dynamite family!!The first thing I wanted to make was some new stockings for the whole family. A few years ago tragedy struck and our beautiful, handmade stockings were lost. That year I just purchased some dollar store cheapies, promising that someday I would make us new stockings. Four years later, I've finally made good on that promise!
There were so many stocking patterns to choose from (9, plus many variations!) I couldn't choose just one. Mims got the Mix-and-Match Stocking (in Gryffindor house colors!). I got the Colorful Stripes Stocking. Jake got the Basketweave Stocking, which was my favorite to make out of all of them. The single color, but great texture, made it really fun to work on, and I didn't dread weaving in ends when I was done! I think they look so cute hanging from the mantle!
There are so many great decorations in the book! I'm planning to make some cool crochet trees for the mantle, and there are a whole bunch of felted ornaments that I'm just dying to make with Mims. There's even a tree-skirt pattern, which I desperately need since I usually just throw one of those fake "snow" blankets around the bottom of the tree and call it good.
I think my favorite patterns in the book are for the crochet stocking and mitten Advent Garland. The little stockings and mittens work up so quickly (Oh, how I love simple, well written patterns!). However, I don't plan to turn them into the cute garland that they show in the book. I'm planning to use them as gift-card holders! I'm going to stick a candy cane (or a burt's bees lip balm!) and a gift card in them, which I think will make a great handmade present for Mim's teachers, my teenage cousins, and I'm even making backups for unexpected holiday guests!
Isn't the mitten so cute? I set up our tree just to show you how adorable it is as an ornament!
By the way, seeing the tree up so early this year was shocking to Mims when she got home from school. "Woah. Um, Mom, you ARE going to put other ornaments on it, right?" LOL!!!
I think that Christmas Crochet for Hearth, Home & Tree is a cute little book, full of projects to decorate your home for the holidays. It's just the right size to travel with you everywhere you go for the next 6 weeks! Don't Christmas Craft Procrastinate! Start your Christmas projects now!!!
Okay, so do you want to know the best part? The amazing folks over at Storey Publishing are letting me give away a copy of Christmas Crochet for Hearth, Home & Tree! If you'd like a chance to WIN your very own copy of this awesome crochet book, leave a comment below telling me your favorite projects to crochet at Christmastime along with a contact email address! The giveaway is open from now until 11:59 pm Sunday, November 16th! I'll use Random.org to draw a winner on Monday, November 17th!
Psst! If you'd like more chances to win, check out the other blogs on the book tour! They're all giving away copies of the book too!!! There are only a few more days left!
3-Nov Don't Eat the Paste
4-Nov Moogly
5-Nov Liberty's Yarn
7-Nov Rambling Designs
10-Nov Plus 3 Crochet
11-Nov Crochet Dynamite
12-Nov Jenn Likes Yarn
13-Nov Crochet Nirvana
14-Nov Yarning4aSmile
For even MORE information about Christmas Crochet for Hearth, Home & Tree, check these out:
For even MORE information about Christmas Crochet for Hearth, Home & Tree, check these out:
Facebook: Edie Eckman and Storey Publishing
Twitter: @EdieEckman and @StoreyPub
Instagram: @StoreyPub
xoxo
11/17/14 - - The giveaway is now closed! Thank you to everyone who commented! I LOVED hearing about all your Christmas projects!!!
I used Random.org to pick a winner:

xoxo
I used Random.org to pick a winner:
Congratulations to ajz! I'll be sending you an email very soon!
xo!
Saturday, November 8, 2014
Crochet Roses
If you follow my I Love Crochet board on Pinterest (and why wouldn't you?! I'm a pinning rock-star! LOL!) you have probably seen that I went crazy pinning crochet rose patterns a few weeks ago. I was crocheting a cadet hat for my sister, and I wanted to add a little extra to it, so I went looking for roses. The pattern that I liked the best (THIS one from Kati Crafts) was designed with small hooks and crochet thread in mind, but I wanted big, full blooms! I used a size H hook and some worsted weight yarn and POW! I got some giant roses!!!

I ended up using one on my sister's cap, and I LOVE how it turned out! It looks SO good in person. I got the pattern for the cadet cap HERE from Sick Lil Monkeys. It was so much fun to work up.

But THIS is what I'm the happiest about: I turned one of the roses into a giant pincushion!!

It's heavy enough to sit nicely on my sewing table, and the petals stick up nicely for me to poke the pins into easily. I adore it!!! I used to have a magnetic spot on the front of my old sewing machine, so I've never worried about pincushions before, but with my new machine I've been keeping my pins in a little dish which has resulted in more finger pokes than I like to remember! Now my fingers will be nice and safe, and my sewing table is extra fancy!
xoxo
I ended up using one on my sister's cap, and I LOVE how it turned out! It looks SO good in person. I got the pattern for the cadet cap HERE from Sick Lil Monkeys. It was so much fun to work up.
But THIS is what I'm the happiest about: I turned one of the roses into a giant pincushion!!
It's heavy enough to sit nicely on my sewing table, and the petals stick up nicely for me to poke the pins into easily. I adore it!!! I used to have a magnetic spot on the front of my old sewing machine, so I've never worried about pincushions before, but with my new machine I've been keeping my pins in a little dish which has resulted in more finger pokes than I like to remember! Now my fingers will be nice and safe, and my sewing table is extra fancy!
xoxo
Wednesday, November 5, 2014
Yorganza Ruffles!!
Howdy Dynamos!
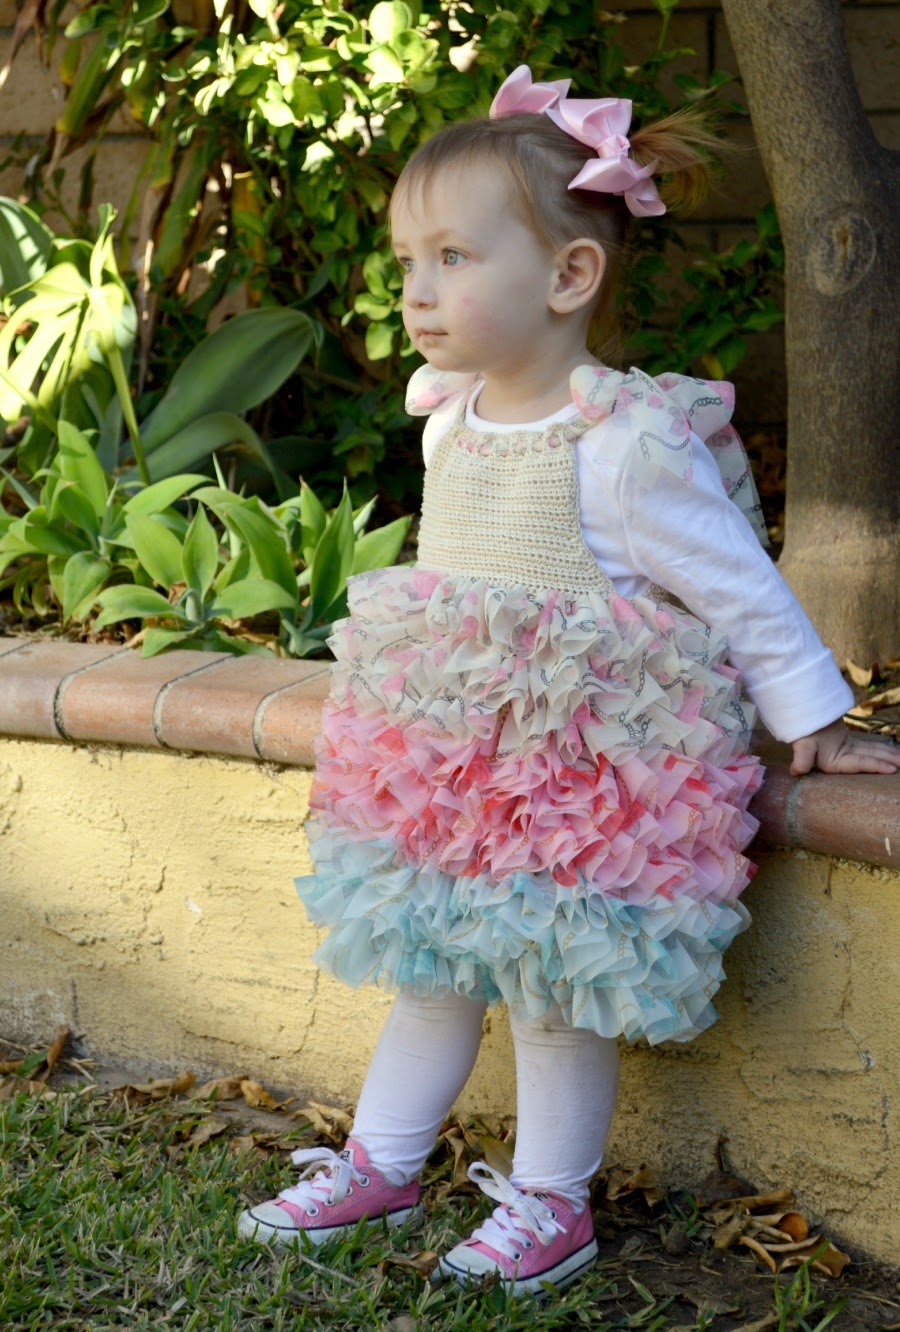
I just wanted to let you know that I just finished designing a project for All Free Crochet using Yorganza yarn! It's called the Frosted Rose Toddler Dress and you can find the pattern HERE! It's for sizes 18-24 months!

Lucky for me I was able to cajole my adorable niece, Katy-bug, into modeling it for me!
 I'm such a lucky auntie!!!
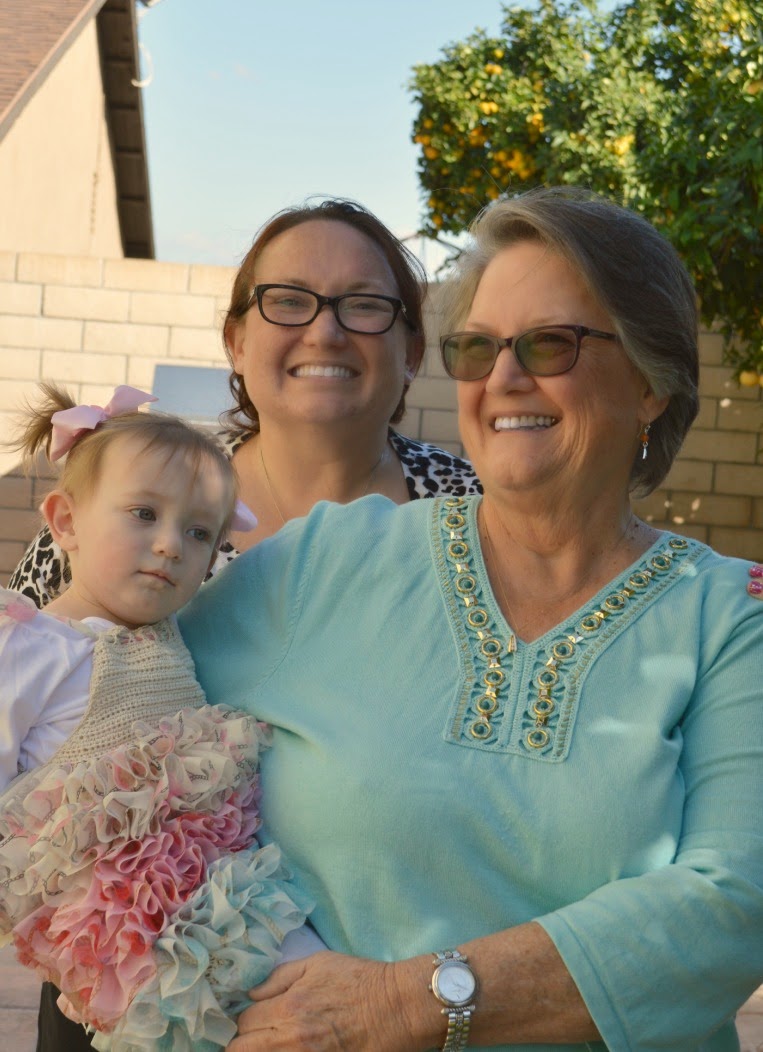 I even managed to get a pretty good picture of my mom and sister with the model! Three generations of cuties!

Talking about Mims, this is her Halloween costume this year. Every year we try to take a picture with my grandma (her great grandma!), so this is Mims, my sister Sandy, my mom, and Katy with my Mema. Sandy is dressed as French Toast! Mims and Katy are Elsa and Anna from Frozen. Really original, I know, but Mims desperately wanted to wear a matching costume with Katy. The highlight of the whole evening, for Mims, was when they went trick-or-treating and everyone thought she and Katy were sisters. LOL!
xoxo
I just wanted to let you know that I just finished designing a project for All Free Crochet using Yorganza yarn! It's called the Frosted Rose Toddler Dress and you can find the pattern HERE! It's for sizes 18-24 months!
Lucky for me I was able to cajole my adorable niece, Katy-bug, into modeling it for me!
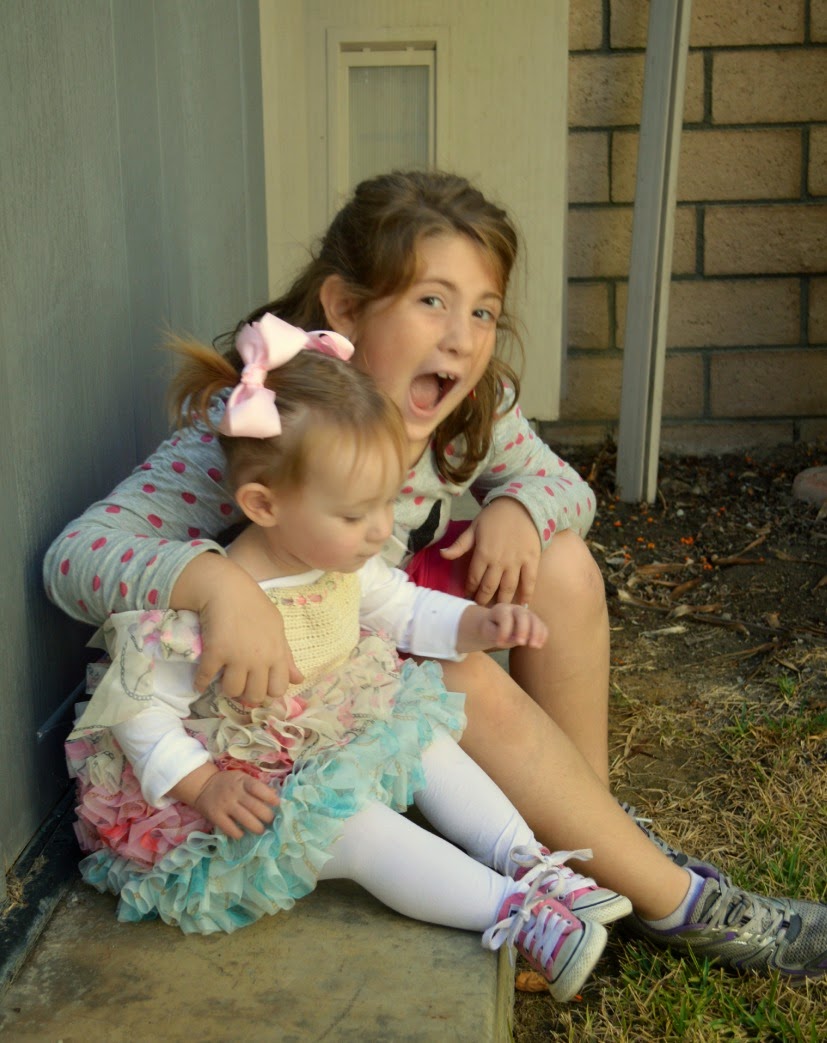
Mims was my awesome model-wrangler! She kept Katy laughing and facing the right direction, when they didn't need to sit for a break!
Talking about Mims, this is her Halloween costume this year. Every year we try to take a picture with my grandma (her great grandma!), so this is Mims, my sister Sandy, my mom, and Katy with my Mema. Sandy is dressed as French Toast! Mims and Katy are Elsa and Anna from Frozen. Really original, I know, but Mims desperately wanted to wear a matching costume with Katy. The highlight of the whole evening, for Mims, was when they went trick-or-treating and everyone thought she and Katy were sisters. LOL!
xoxo
Thursday, September 25, 2014
Pumpkin Love!
So, much like all the other white girls in yoga pants, I'm in love with fall! My world is flavored with pumpkin pie spice! I'm dreaming of the end to this heat wave in SoCal so that I can bust out my boots and cozy clothes. It's just not right to spend all of September in shorts... However, the water park near our house is staying open through October because of the heat, so maybe it's not all bad. It just doesn't feel like fall. More like we're in Summer Overtime.
Despite the crazy hot weather, I've been festooning my abode with pun'kins! Every year I make Jake buy me these insanely expensive fairy tale pumpkins (as opposed to the much more reasonably priced carving pumpkins) to decorate the house. I rationalize it by saying that if we buy them in September I can leave them out until the day after Thanksgiving and we're set for our entire fall decorating scheme.
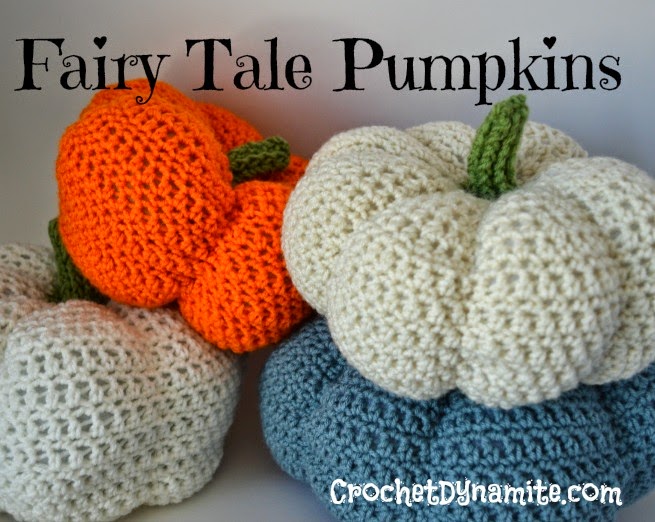
However, this year I've decided to crochet my own pumpkins! For a girl that is used to paying $15 each for the real-life suckers, this is quite a steal, since I was able to make 2 pumpkins from one skein of Super Saver. Plus, I can snuggle with them on the couch, which real pumpkins don't enjoy very much.
I saw some gorgeous blue pumpkins on Pinterest (don't you just adore Pinterest?! I'm on there, like, 18 times a day. Pinterest is my Facebook... but I digress...) so I had to make myself a blue pumpkin too. It's a little darker than a real life blue pumpkin, but I'm claiming creative license here and adoring it anyway.

I'm really happy with the way that the stem of these pumpkins turned out. It's hollow, so you can bend it and it stays in place. So cool! The ridges make it look like a real pumpkin stem, which makes me giddy every time I look at them. I was able to do it by using front-post half-double crochet, which I abbreviated to fphdc (so when you see it in the pattern, that's what I'm talking about).
If you'd like to make one (or twelve) too, here's how I made mine:
FAIRY TALE PUMPKIN
(to make one 9" pumpkin)
Supplies:
180 yards of worsted weight yarn for pumpkin body (for my pumpkins, I used Red Heart Super Saver in Soft White, Aran, and Pumpkin, and Caron One Pound in Azure for the blue pumpkin)
Small amount of green for pumpkin stem (I used Red Heart Super Saver in Tea Leaf)
Size J crochet hook
Polyester Fiberfill Stuffing - I used approximately 10 ounces
Yarn needle
(use main body color)
R1: 9 hdc in a magic loop, pull loop tight, sl st to first hdc to close round. ch 1 (9 st)
R2: 2 hdc in each hdc, sl st to first hdc to close round, ch 1 (18 hdc)
R3: (2 hdc in first st, hdc in next st) 9 times, sl st to first hdc to close round, ch 1 (27 st)
R4: 2 hdc, (2 hdc in next st, hdc in next 2 st) 8 times, 2 hsc in the next st, sl st to first hdc to close round, ch 1 (36 st)
R5: (2 hdc in first st, hdc in next 3 st) 9 times, sl st to first hdc to close round, ch 1 (45 st)
R6: 2 hdc, (2 hdc in first st, hdc in next 4 st) 8 times, 2 hdc in next st, 2 hdc, sl st to first hdc to close round, ch 1 (54 st)
R7: (2 hdc in first st, hdc in next 5 st) 9 times, sl st to first hdc to close round, ch 1 (63 st)
R8: (2 hdc in first st, hdc in next 6 st) 9 times, sl st to first hdc to close round, ch 1 (72 st)
R9: sc in each st around, sl st to first sc to close round, ch 1 (72 st)
R10: hdc in each st around, sl st to first sc to close round, ch 1 (72 st)
R11-26: repeat rows 9 and 10 (72 st)
R27: (hdc 2 st tog, hdc in next 6 st) 9 times, sl st to first hdc to close round, ch 1 (63 st)
R28: (hdc 2 st tog, hdc in next 5 st) 9 times, sl st to first hdc to close round, ch 1 (54 st)
R29: (hdc 2 st tog, hdc in next 4 st) 9 times, sl st to first hdc to close round, ch 1 (45 st)
R30: (hdc 2 st tog, hdc in next 3 st) 9 times, sl st to first hdc to close round, ch 1 (36 st)
R31: (hdc 2 st tog, hdc in next 2 st) 9 times, sl st to first hdc to close round, ch 1 (27 st)
R32: (hdc 2 st tog, hdc in next 1 st) 9 times, sl st to first hdc to close round, ch 1 (18 st)
Fasten off, leave a long tail (like 2 yards)
Stuff the pumpkin! Stuff it very full, it will look lumpy and not very good at this point, but that's okay! Just make sure it's stuffed very tightly.
Attach stem yarn anywhere along the edge of R32, ch 1
R33: (hdc 2 st tog) 9 times, sl st to first hdc to close round, ch 1 (9 st)
R34-41: fphdc in each st around, sl st to first hdc to close round, ch 1 (9 st)
R42: fphdc in each st around, sl st to first hdc to close round (9 st)
Fasten off, leaving a 18" tail.
Using yarn needle and stem yarn, whipstitch top of stem closed. Fasten off and weave in end.

To make the ridges in the pumpkin I used a big yarn needle (trust me on this one, you need a big needle for this, the little ones will get lost in all the fiberfill). I threaded the tail end of Round 32, and poked my needle straight through the center, from the edge of the stem out through the bottom hole of Round 1.

Then I used a running stitch and wove the thread in a (mostly) straight line back up to the stem.

I pulled the thread snugly to create the side indentation, and made a little invisible knot at the base of the stem to hold the tension. Then I poked my needle back through the center and did the whole process again on the opposite side. At this point, it's going to look like a crocheted booty. Yes, I'm an emotional 3rd grader, because it makes me laugh.

Then I made indentations to create quarters. Then I made an indentation between each of those lines, ending with eight plump ridges.

I pulled my yarn through the center of the pumpkin one last time and fastened it off at the bottom of the pumpkin, weaving in my remaining tail.

xoxo
Despite the crazy hot weather, I've been festooning my abode with pun'kins! Every year I make Jake buy me these insanely expensive fairy tale pumpkins (as opposed to the much more reasonably priced carving pumpkins) to decorate the house. I rationalize it by saying that if we buy them in September I can leave them out until the day after Thanksgiving and we're set for our entire fall decorating scheme.
However, this year I've decided to crochet my own pumpkins! For a girl that is used to paying $15 each for the real-life suckers, this is quite a steal, since I was able to make 2 pumpkins from one skein of Super Saver. Plus, I can snuggle with them on the couch, which real pumpkins don't enjoy very much.
I saw some gorgeous blue pumpkins on Pinterest (don't you just adore Pinterest?! I'm on there, like, 18 times a day. Pinterest is my Facebook... but I digress...) so I had to make myself a blue pumpkin too. It's a little darker than a real life blue pumpkin, but I'm claiming creative license here and adoring it anyway.
I'm really happy with the way that the stem of these pumpkins turned out. It's hollow, so you can bend it and it stays in place. So cool! The ridges make it look like a real pumpkin stem, which makes me giddy every time I look at them. I was able to do it by using front-post half-double crochet, which I abbreviated to fphdc (so when you see it in the pattern, that's what I'm talking about).
If you'd like to make one (or twelve) too, here's how I made mine:
FAIRY TALE PUMPKIN
(to make one 9" pumpkin)
Supplies:
180 yards of worsted weight yarn for pumpkin body (for my pumpkins, I used Red Heart Super Saver in Soft White, Aran, and Pumpkin, and Caron One Pound in Azure for the blue pumpkin)
Small amount of green for pumpkin stem (I used Red Heart Super Saver in Tea Leaf)
Size J crochet hook
Polyester Fiberfill Stuffing - I used approximately 10 ounces
Yarn needle
(use main body color)
R1: 9 hdc in a magic loop, pull loop tight, sl st to first hdc to close round. ch 1 (9 st)
R2: 2 hdc in each hdc, sl st to first hdc to close round, ch 1 (18 hdc)
R3: (2 hdc in first st, hdc in next st) 9 times, sl st to first hdc to close round, ch 1 (27 st)
R4: 2 hdc, (2 hdc in next st, hdc in next 2 st) 8 times, 2 hsc in the next st, sl st to first hdc to close round, ch 1 (36 st)
R5: (2 hdc in first st, hdc in next 3 st) 9 times, sl st to first hdc to close round, ch 1 (45 st)
R6: 2 hdc, (2 hdc in first st, hdc in next 4 st) 8 times, 2 hdc in next st, 2 hdc, sl st to first hdc to close round, ch 1 (54 st)
R7: (2 hdc in first st, hdc in next 5 st) 9 times, sl st to first hdc to close round, ch 1 (63 st)
R8: (2 hdc in first st, hdc in next 6 st) 9 times, sl st to first hdc to close round, ch 1 (72 st)
R9: sc in each st around, sl st to first sc to close round, ch 1 (72 st)
R10: hdc in each st around, sl st to first sc to close round, ch 1 (72 st)
R11-26: repeat rows 9 and 10 (72 st)
R27: (hdc 2 st tog, hdc in next 6 st) 9 times, sl st to first hdc to close round, ch 1 (63 st)
R28: (hdc 2 st tog, hdc in next 5 st) 9 times, sl st to first hdc to close round, ch 1 (54 st)
R29: (hdc 2 st tog, hdc in next 4 st) 9 times, sl st to first hdc to close round, ch 1 (45 st)
R30: (hdc 2 st tog, hdc in next 3 st) 9 times, sl st to first hdc to close round, ch 1 (36 st)
R31: (hdc 2 st tog, hdc in next 2 st) 9 times, sl st to first hdc to close round, ch 1 (27 st)
R32: (hdc 2 st tog, hdc in next 1 st) 9 times, sl st to first hdc to close round, ch 1 (18 st)
Fasten off, leave a long tail (like 2 yards)
Stuff the pumpkin! Stuff it very full, it will look lumpy and not very good at this point, but that's okay! Just make sure it's stuffed very tightly.
Attach stem yarn anywhere along the edge of R32, ch 1
R33: (hdc 2 st tog) 9 times, sl st to first hdc to close round, ch 1 (9 st)
R34-41: fphdc in each st around, sl st to first hdc to close round, ch 1 (9 st)
R42: fphdc in each st around, sl st to first hdc to close round (9 st)
Fasten off, leaving a 18" tail.
Using yarn needle and stem yarn, whipstitch top of stem closed. Fasten off and weave in end.
To make the ridges in the pumpkin I used a big yarn needle (trust me on this one, you need a big needle for this, the little ones will get lost in all the fiberfill). I threaded the tail end of Round 32, and poked my needle straight through the center, from the edge of the stem out through the bottom hole of Round 1.
Then I used a running stitch and wove the thread in a (mostly) straight line back up to the stem.
I pulled the thread snugly to create the side indentation, and made a little invisible knot at the base of the stem to hold the tension. Then I poked my needle back through the center and did the whole process again on the opposite side. At this point, it's going to look like a crocheted booty. Yes, I'm an emotional 3rd grader, because it makes me laugh.
Then I made indentations to create quarters. Then I made an indentation between each of those lines, ending with eight plump ridges.
I pulled my yarn through the center of the pumpkin one last time and fastened it off at the bottom of the pumpkin, weaving in my remaining tail.
xoxo
Friday, September 5, 2014
Summer Vacation is Over!
Holy Schmowzow, Dynamos! I don't know how it happened, but I lost control of this summer vacation. Whole weeks slipped by without my knowledge, lost to daily swim lessons and play dates and one delightful week with the cows and the redwoods in northern California.
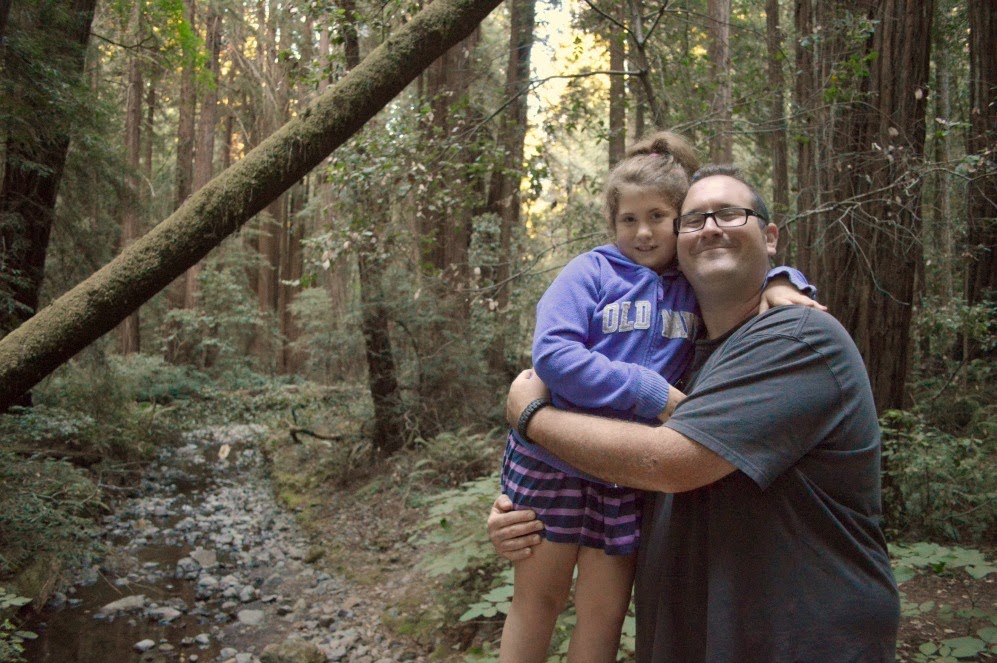
This is from our visit to the Muir Woods. It was so beautiful!
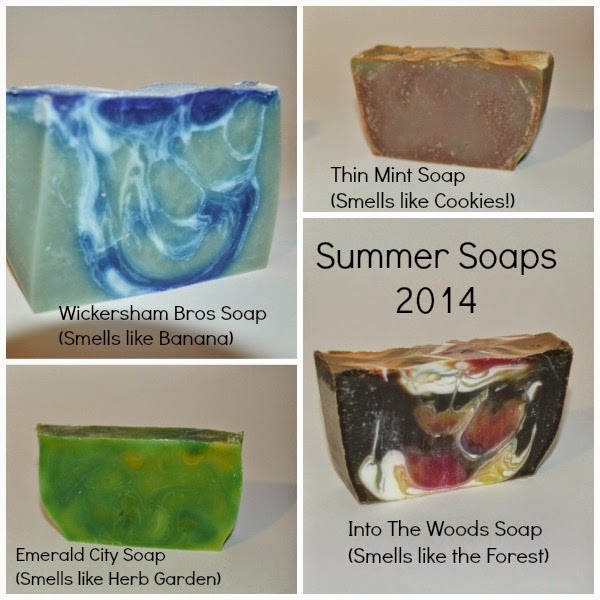
I made twenty-five pounds of soap before the weather got too hot, and I discovered that I passed my one-year soap making anniversary with a grand total of 85 batches (totalling nearly 400 pounds!).

My kid read everything in the house this summer. I found her in her room like this one day. It was pretty hilarious.
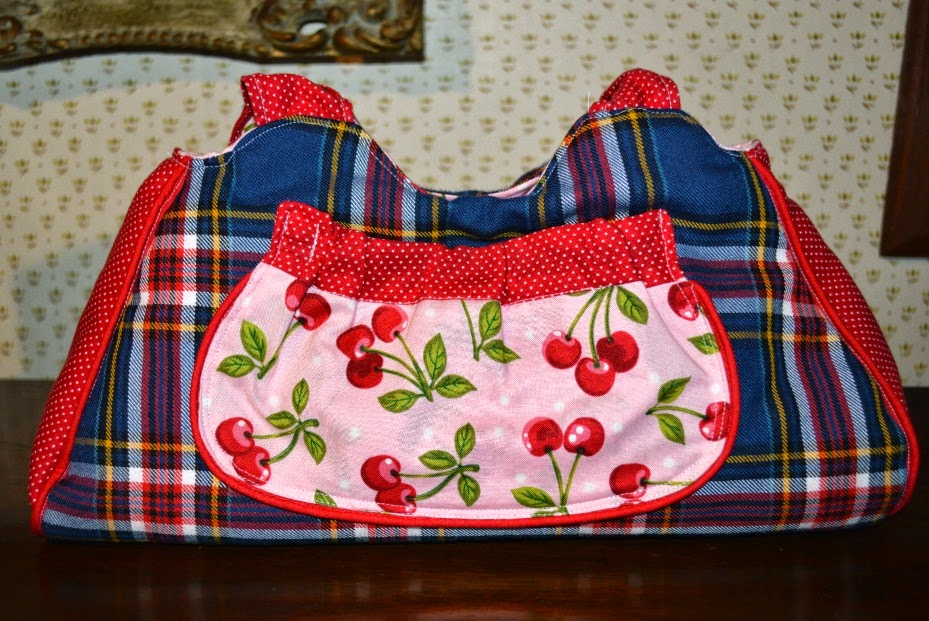
I did virtually no crocheting over the last 6 weeks. I know, sad face. But something about having the kid home full time, and the hot weather, and the beach calling my name EVERY SINGLE DAY (we didn't go every day, more like twice a week, but it still CALLED every day. LOL!) made it so difficult to get anything done that took more than an hour to complete. I did get out my sewing machine and whipped up some summer fun purses. My one bit of crochet was making the flower for my denim hobo bag. Yes, that's a Star Lord pin. Are you jealous? LOL! I know, you only get jealous over Groot...

This is from our visit to the Muir Woods. It was so beautiful!
I made twenty-five pounds of soap before the weather got too hot, and I discovered that I passed my one-year soap making anniversary with a grand total of 85 batches (totalling nearly 400 pounds!).
My kid read everything in the house this summer. I found her in her room like this one day. It was pretty hilarious.
I did virtually no crocheting over the last 6 weeks. I know, sad face. But something about having the kid home full time, and the hot weather, and the beach calling my name EVERY SINGLE DAY (we didn't go every day, more like twice a week, but it still CALLED every day. LOL!) made it so difficult to get anything done that took more than an hour to complete. I did get out my sewing machine and whipped up some summer fun purses. My one bit of crochet was making the flower for my denim hobo bag. Yes, that's a Star Lord pin. Are you jealous? LOL! I know, you only get jealous over Groot...
Recycling a pair of jeans that were too big! Win win!
The handles on this one are a little floppy. Next time I will use fusible fleece inside and they will be perfect! It's my favorite!
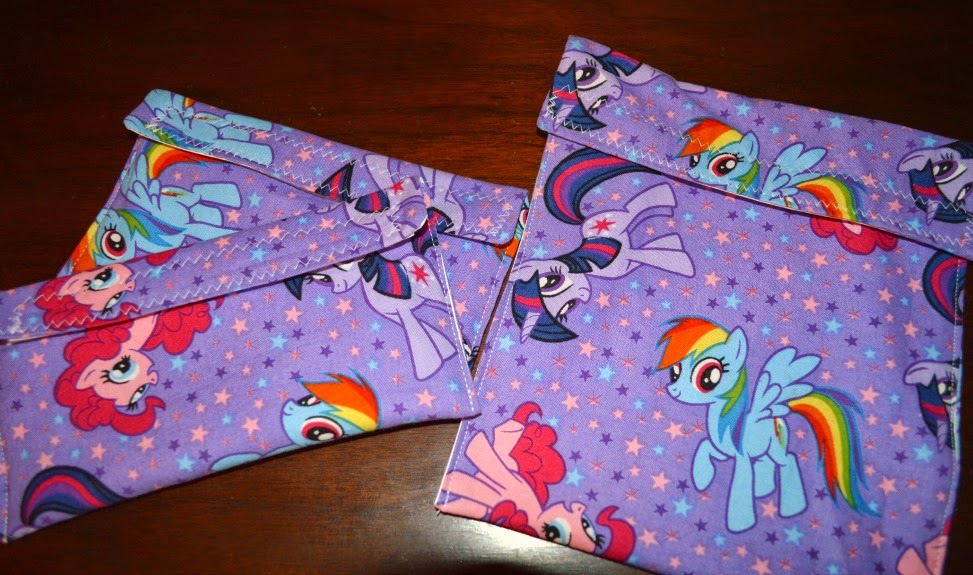
This was my one bit of back-to-school crafting. I used THIS tutorial to make some eco-friendly sandwich and snack baggies. It was ridiculously simple, and they turned out awesome. I didn't make the cute curved edge on mine, since I wanted to be able to "seal" them all the way across with velcro, so Mims's baby carrots and mini-crackers wouldn't roll out of the bag. She thinks they're cool, which is pretty good. I don't know how many more years my handmade stuff is going to be okay at school, but she's in second grade so I figure I'm good for at least this year. LOL!
How was your summer? Did you make anything cool?
Monday, July 14, 2014
Can't Win 'Em All...
So, in an effort to save some cash and get a little healthier, Jake and I have switched to only drinking water at home. Now, this may not seem like a big deal to most of you, but for us, it's huge. I am an iced tea-aholic (note: this does not mean Long Island Iced Tea, or Sweet Tea. I'm talkin' plain ol' Lipton here.). And I'm a LAZY iced tea-aholic, which meant that my morning didn't start until I was paying for my iced tea through a drive-thru window. Being the kind and generous wife that I am, this also included a tea for Jake. In our neck of the wood, this translates to $5 a day, or $150+ a month, on iced tea. When we finally sat down and did the math, we were horrified (although the iced tea was our compromise after we did the Starbucks math a year ago...). So now we've switched to plain water, and we're pretty happy with our choice (especially now that our caffeine withdrawal headaches have gone away). Plus, the money we've saved has paid for Mims to go to swim lessons all summer! Score!
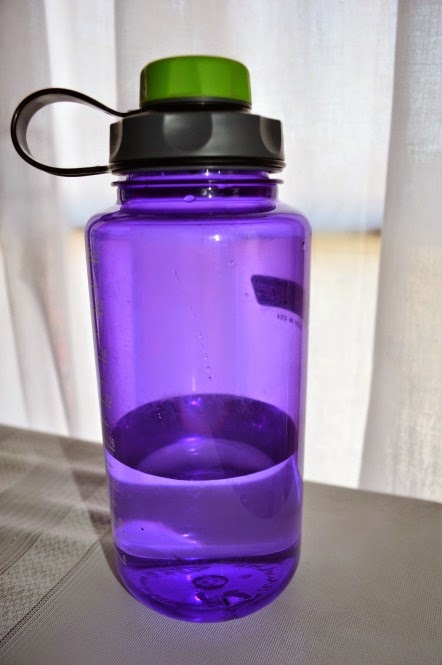
Now that we're water drinkers, we are completely obsessed with our Nalgene water bottles. I've become such a water bottle snob. It's hilarious, and completely ridiculous. I love my water bottle so much, I don't go anywhere without it. It's got a wide mouth top so I can add ice easily, so, of course, I ONLY drink ice water. I know, I'm a nut.
However, I'm completely annoyed at the condensation that accumulates outside the bottle because of my ice obsession. I constantly have a damp ring on my jeans from resting my bottle on my leg, and the front of my shirt is damp because of the bottle dripping condensation as I take a drink. Annoying!
"Hold on a minute!" I thought to myself the other day, "I can crochet myself a solution to this minor, but immensely irritating problem!" So I crocheted a sleeve for my beloved water bottle. It was shimmery and gray and beautiful. I slid it on the bottle, and it was perfection! It absorbed the excess moisture. My bottle looked so pretty! I was a happy, happy girl!
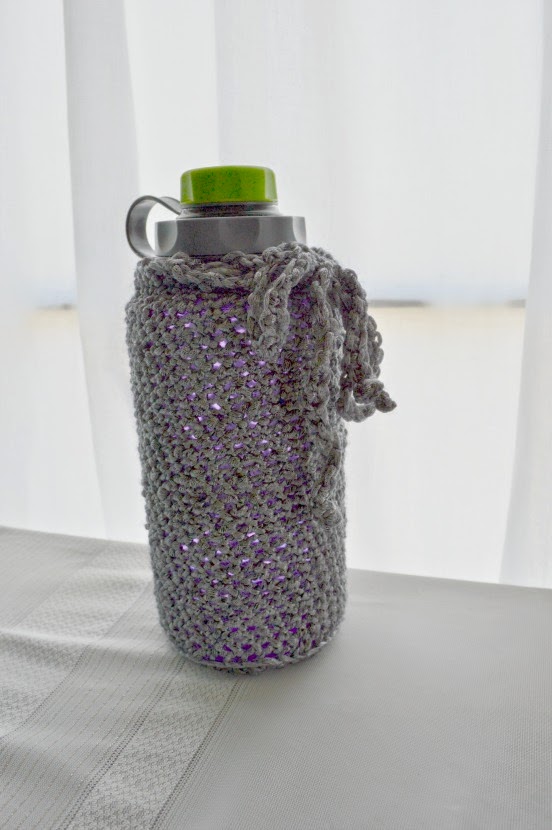
...until I tried to drink out of my covered bottle. The crochet stretched (as it is known to do!) and the cover started to slide around the bottle. The dampness of the yarn made the bottle so slippery I wasn't able to maintain a solid grip around it, so as I took my sip, I suddenly discovered that I had 32 icy ounces of water rushing towards my face in an uncontrollable waterfall. I doused myself, and half of our new couch. Crochet fail!!!
So you will not be getting a pattern for a gorgeous one liter water bottle cover from me.
You're welcome.
xoxo
Now that we're water drinkers, we are completely obsessed with our Nalgene water bottles. I've become such a water bottle snob. It's hilarious, and completely ridiculous. I love my water bottle so much, I don't go anywhere without it. It's got a wide mouth top so I can add ice easily, so, of course, I ONLY drink ice water. I know, I'm a nut.
However, I'm completely annoyed at the condensation that accumulates outside the bottle because of my ice obsession. I constantly have a damp ring on my jeans from resting my bottle on my leg, and the front of my shirt is damp because of the bottle dripping condensation as I take a drink. Annoying!
"Hold on a minute!" I thought to myself the other day, "I can crochet myself a solution to this minor, but immensely irritating problem!" So I crocheted a sleeve for my beloved water bottle. It was shimmery and gray and beautiful. I slid it on the bottle, and it was perfection! It absorbed the excess moisture. My bottle looked so pretty! I was a happy, happy girl!
...until I tried to drink out of my covered bottle. The crochet stretched (as it is known to do!) and the cover started to slide around the bottle. The dampness of the yarn made the bottle so slippery I wasn't able to maintain a solid grip around it, so as I took my sip, I suddenly discovered that I had 32 icy ounces of water rushing towards my face in an uncontrollable waterfall. I doused myself, and half of our new couch. Crochet fail!!!
So you will not be getting a pattern for a gorgeous one liter water bottle cover from me.
You're welcome.
xoxo
Sunday, July 6, 2014
Mini Amigurumi
I'm not an amigurumi person. I know that so many people are, but I've just never gotten into it. However, I am VERY into crocheting in miniature, and my seven-year-old is very into tiny dolls, so when I went looking for some tiny projects to occupy some of my time this summer, Mini Amigurumi by Sara Scales seemed like a great fit for stretching my crochet muscles.
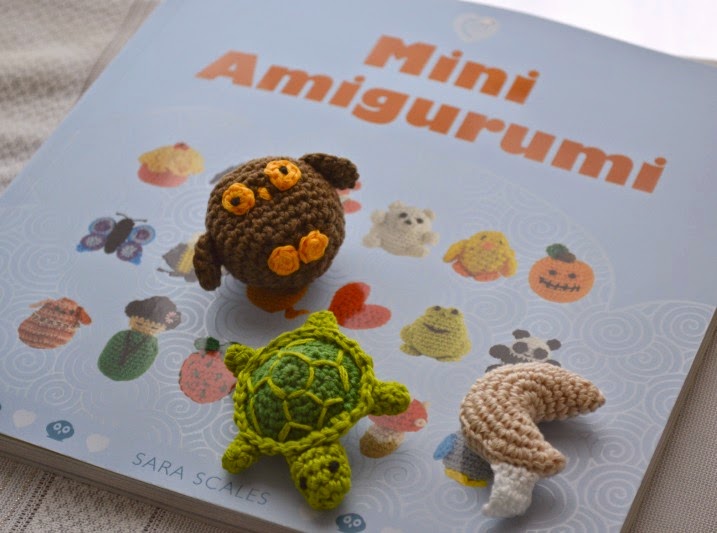
It took WAY TOO LONG for me to figure out that all of the instructions were written in British crochet terms, but once I finally read the patterns correctly, the instructions were clear and easy to follow. I used embroidery floss and a size B hook and my projects all came out perfectly, adorably small!
Because they're all so small, I was able to work them up pretty quickly, and was able to turn them into some very fun last minute gifts for Mims and some of her friends. Tiny crochet is a big hit with first graders.
And after a got the feel for amigurumi, I was inspired to try a project on my own.
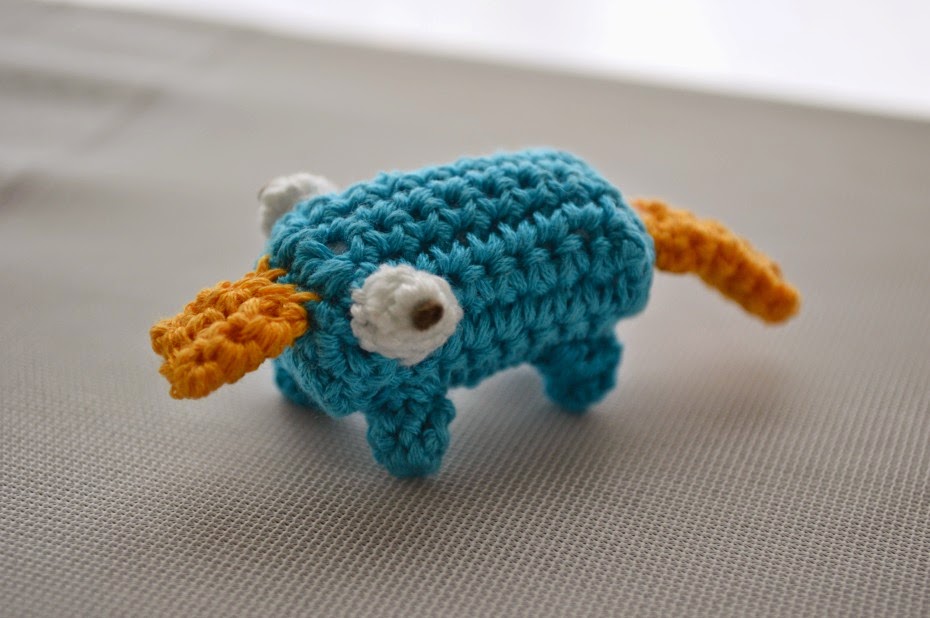
It's Perry! We love P&F around here, so it was kind of a no-brainer for me. He's about the size of a quarter. Mims wants me to turn him into a necklace for her, which I will probably do, if I don't turn him into a keychain for me! LOL!
xoxo
It took WAY TOO LONG for me to figure out that all of the instructions were written in British crochet terms, but once I finally read the patterns correctly, the instructions were clear and easy to follow. I used embroidery floss and a size B hook and my projects all came out perfectly, adorably small!
Because they're all so small, I was able to work them up pretty quickly, and was able to turn them into some very fun last minute gifts for Mims and some of her friends. Tiny crochet is a big hit with first graders.
And after a got the feel for amigurumi, I was inspired to try a project on my own.
xoxo
Monday, June 30, 2014
Crochet Wedding Dress Round-up!
My friend Jaime is getting married soon! She is on the lookout for the perfect crochet wedding dress (or skirt, if that's all we can find...) because, drum roll please, SHE'S MAKING HER OWN DRESS!!! I know, it's awesome! So she asked me if I knew of any patterns, so I thought I'd put together a round-up of my favorites!
1.


1.
Okay, so use your imagination and picture this in white. Completely adorbs, right?! I love the vintage style. The pattern is only $3.50 usd HERE.
2.
This Chanel Style Dress is a free pattern! Gorgeous! You can find it on Ravelry HERE.
found via Moogly
3.
Okay, it's a little short. But so was Priscilla Pressley's dress, and it became iconic. There's something about this one that I just adore. You can find the pattern HERE for $11.72 aud.
4.
I love the elbow length sleeves, the flirty ruffled skirt, and the empire waist of this dress. Imagine it in white, but with a ribbon at the waist (instead of the belt). It also looks a little on the short side, but I imagine that an extra row or two of the ruffles would make it respectably tea-lengthed. It would be cute for an informal wedding, but it's much too casual for a formal affair. The pattern is $9.50 usd HERE.
5.
I love this dress. The stitch pattern is pretty, but doesn't look too difficult, or like it would take a long time. I ADORE the flower corsages on the shoulders. I think it's so delicate and feminine, and not too vintage-y. You can buy the pattern for $3.20 usd HERE.
6.
I would wear this dress everywhere. I am completely smitten with it. I would wear it to weddings, I would get married in it, I would wear it to church or to the theater. It's such a perfect, all occasion dress. LOVE IT! And the pattern is only $1.99 HERE!
7.
I love that this dress is so formal, without having to be floor length. I think the back is very sexy, which might, or might not, be a good thing at a wedding. The pattern is only $1.99 usd HERE.
8.
I like the little keyhole feature of the back of this dress. It's a little less sexy than the backless dress above, but I think it's perfect for a spring wedding. I also think that this pattern wouldn't take a long time to make, which is a big plus in my book... And the pattern is only $1.99 HERE.
9.
I think that this skirt is really lovely. I think the length is so flattering. It's certainly fancy enough for a wedding, but it would be so wearable after the wedding too. Lovely. The pattern is HERE and it's $6.00 usd.
10.
I think this skirt pattern is also gorgeous, and perfect for a wedding (and for years after as well!). The pattern is a $5.99 download from KnitPicks.
If you have any favorite crochet dress patterns that you want to share with Jaime, please leave a comment! I'm sure she'll appreciate all of your great suggestions!
xoxo
Tuesday, April 22, 2014
My despicable niece is ONE!
Whew. Last week went by like a blur! Spring break is rough on blogging mamas! Mims was home all week, which was so much fun, but I had completely forgotten how much free time I DON'T get when she's not at school. It's taken me a day to recover from her vacation!
My niece, the famous Katy-bug, turned one AND got baptized on Easter. It was so much fun. We spent the morning at church, and then for the after party, her mama (my sister), threw her a Despicable Me birthday party. I got to make her a minion costume.


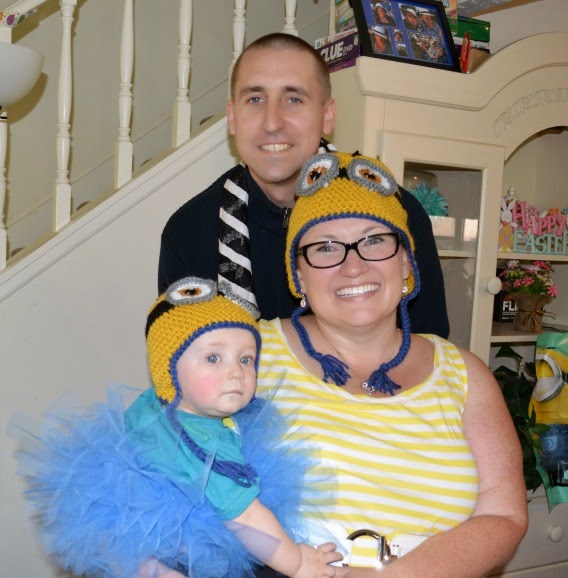
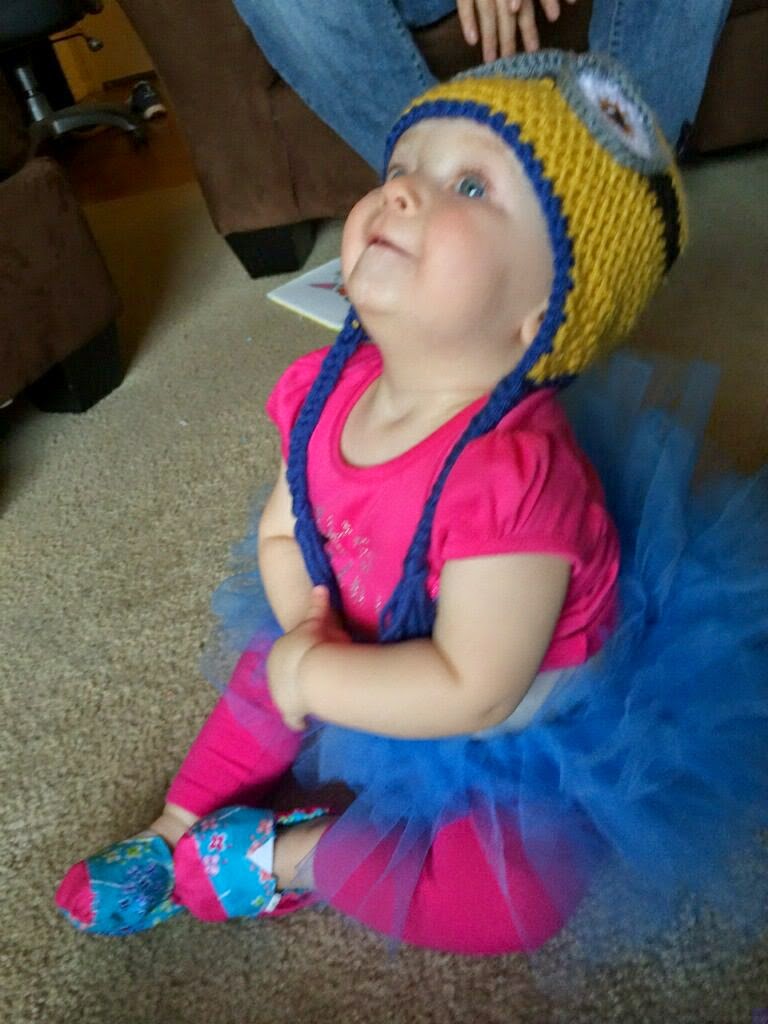
My niece, the famous Katy-bug, turned one AND got baptized on Easter. It was so much fun. We spent the morning at church, and then for the after party, her mama (my sister), threw her a Despicable Me birthday party. I got to make her a minion costume.
While I was at it, I made hats for the rest of us as well. My dad wanted a blue eyed minion hat...
I used the minion hat pattern over at Repeat Crafter Me, and adjusted it for the variety of head sizes in my family. I like her hat patterns a lot, but they always need a little tweaking to get the right fit for us, but isn't that the case with any pattern? LOL!
Sandy and Katy went as minions. Katy's dad, Doob, went as Gru. He even did the voice. It was very impressive.
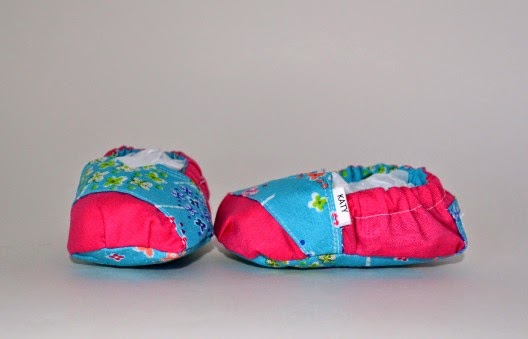
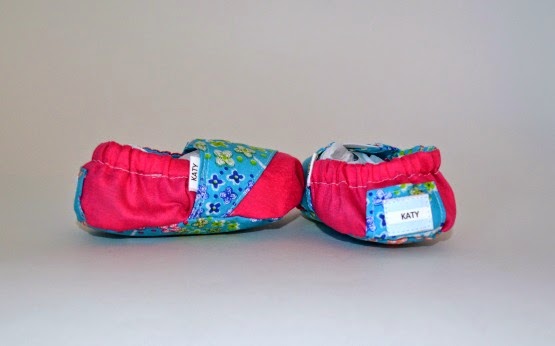
And then, as part of her present, I found this adorbs pattern for making a personalized pair of baby TOMS (or in my case baby KATYs!) over at Homemade Toast, and I just HAD to make some for Bug. I don't know if my sewing skills are to blame, but I found the tutorial pretty challenging to follow. I'm not complaining, because I know how hard it is to think of everything, but a supplies list would have been very helpful (and would have saved me an emergency trip to the fabric store to get 1/4" elastic). I swear, I read through the instructions TWICE before I even started, and I still missed it.
Still, they turned out so cute that I'm going to make her a couple more pairs. Mims LIVED in little shoes like this until she was about three because they were they only type of shoe that stayed on her feet. I think I used to pay about $40 a pair for them, so this was a HUGE savings... Even if they were a little challenging for my brain! Now that I've got it figured out, the next pair should be much easier.
xoxo!
Subscribe to:
Posts (Atom)