Google+
Showing posts with label DIY. Show all posts

Wednesday, August 29, 2012

Memo Board

While I was pregnant with Mims I got very into quilting.  I really enjoyed the idea of quilting, but there is a personality that quilting is really suited for and I am just not that type.  But, dang I tried really hard to become that type.  Unfortunately, I am just not that exacting and precise, even when I am trying my hardest.  

I ended up making several freeform quilts, which gave me the quilty good times with out the frustration for cutting the fabric in the wrong direction, sewing it with an incorrect seam allowance, and never ironing enough.  I also made a couple of small art quilts.  I hung one in Mims' nursery, and one I hung by the side of my bed.  It had a pocket, and I figured I could slip stuff I wanted to keep close in there.  Heh.  It never worked that well (it was just too small and everything falls out when there is the slightest breeze), so now I just use it as a place to stash needles and pins when I'm working at night in my room.  

It occurred to me that I needed an upgrade.  So, today I'm doing a crochet DIY!

Memo Board
Supplies
Worsted weight yarn in assorted colors
Size G hook
Yarn needle
An 8"x10" wrapped canvas
Small binder clips (optional)

I crocheted an 10 1/2" granny square out of worsted weight cotton which is large enough to wrap around the canvas.  


I laid the canvas on top of the granny square, and then used a long piece of the green yarn to weave in and out between the final row open spaces.


I pulled it snugly and tied the yarn in a knot.  The loose ends are in the picture, but I just snipped them off.  **If you get canvas board instead of a stretched canvas, you could use the loose ends to make a hanger by stretching them across the back and tying them to the other side.**


This is what it looked like when I first put it up.


I tied on a couple of binder clips using embroidery floss.  Since they're just tied on, I can move them if I need to.  For now, I like them where they are.  Once I actually put it up in my room (the pic was taken in the bathroom, since it has waaay better lighting - Jake works at night so we keep our room in constant blackout status so he can sleep during the day), I took all the straight pins, yarn and sewing needles off the quilt and poked them through the stitches up the side of the board.
(That's my fave family photo from this year!  The photo booth at Ro's wedding rocked!)


I like that this I could change out the colors on this as quickly as I can crochet a granny square.  I like that there's nothing permanent, and if I wanted to paint the canvas I could.  For now, I'm digging it.

xoxo

Thursday, July 5, 2012

Sprite Bangles!


I've got a fun project today that uses strips from 2 liter bottles to make super awesome bangle bracelets.  I used the 3/4" strips that were left over from when I made my Recycled Yarn Holders.  You could just cut strips from a 2 liter bottle, if you didn't need another yarn holder (Who am I kidding?!  Everyone needs another yarn holder!).

Sprite Bangles
Supplies needed:
3/4" strips cut from a Sprite (or any other) 2 liter bottle - cut around the bottle, not top to bottom.
Small amount of size 3 crochet thread (I used Aunt Lydia's Fashion Crochet Cotton)
Size D hook
Yarn needle
Scissors

Use your scissors to make sure that your strip of plastic has smooth edges.  You don't have to get crazy and sand them, just make sure that there aren't any jagged edges that might scratch you.  Trim the short ends of the plastic strip so that they're straight, if yours are cut wonky.

Sprite Bangle Cover
(make 2)
ch 7
R1: sc in 2nd ch from hook, sc in each ch sp across (6 st)
R2-60: ch 1, sc in each sc across (6 st)
Fasten off.  Weave in ends.  Being careful not to twist the cover, whipstitch the short ends together to make a ring.

Place one cover around the outside of the plastic strip.  Place the other cover into the center of the strip. There will probably be an inch or so of overlap on the ends of the plastic bottle strip.  This is a really good thing.  It will allow your bracelet to slightly stretch when you put it on and take it off.  Whipstitch the sides of the cover together to fully encase the plastic.

If you'd like to make the Hostess Cupcake Bangle use the color Coffee for the outer cover and use the color Natural for the inner cover.  Whipstitch the covers together using Coffee.  Using Natural, make a chain of 75 stitches.  Using the photo (or a cupcake!) for reference, stitch chain to the top of the bangle in loops.  ** note: The loops will not go all the way around the bangle, it's just a top covering, like on the cupcake.  If you'd like the loops to continue around the bracelet, make your chain longer.**

What I really like about these bracelets is that they're a great project for using up scraps from other yarn projects. Recycling at its best.  And they're PRETTY!!!!  I couldn't help myself, I had to make a bunch.  In the interest of full disclosure, you might not be able to stop either.  It's pretty addictive.  But, they would make great gifts, and your niece and girlfriends are going to want a bunch when they see you wearing them!!!  So maybe it's good that you're going to want to make a ton of them... LOL!!!

xoxo

Tuesday, July 3, 2012

Recycled Yarn Holder

Recently, Jake and I discovered two of the greatest things known to man.  Sprite Zero and the Market Pantry Cherry Limeade water enhancer (Target brand, in the Kool Aid section).  Do you know what combining those two things makes?  A really, really good Sonic Cherry Limeade clone!  And it's sugar-free, but it doesn't taste sugar-free!

Please don't notice that the Sprite bottle is empty... LOL!!!
Here's the 'recipe':
Fill a quart sized mason jar (or any other big ol' summertime cup) with ice.  Pour in Sprite Zero to cover ice. Add two squirts of the Cherry Limeade flavoring.  If you happen to have a wedge of lime, give it a squeeze and then toss it in too, because it's extra awesome with a wedge of lime... Stir with a straw, and then take it outside to enjoy while you watch the kids play in the sprinklers.


This has left us with an abundance of 2-liter bottles that we have to recycle.  There's a little recycling center about five hundred feet from our house (don't ask, it's weird) which we regularly take our cans and bottles to, but there's something that I really like about the Sprite Zero bottles.  They're really clear, and they've got cool texture, and grippy parts.  I can't explain it.  I just dig the design.  So, I thought I could make something crafty and yarn friendly with these cool bottles, and recycle them in a different way.

I am always on the lookout for cheap (but cool?) yarn holders.  So I went on a search to find the best soda bottle yarn holder out there.  I discovered some really great ideas, particularly this article by Teresa Gunderson, but none of the bottles were pretty.  I mean, I don't need it to look like it's not a empty bottle, but I was looking for some flair!  By the way, read Teresa's article, the idea of storing yarn in the bottles to keep it dry and clean is brilliant by itself, but then adding that she throws the bottles into her project bag for on-the-go crafting?!!  Did you hear that noise?!  My brain just exploded.  Why, oh why, has it never occurred to me to use two liter bottles when I'm traveling with my crochet projects?  My spindles are rad, but they are heavy and not appropriate for travel...  Yet my yarn still wants to roll around on the floor.  That cinched it.  Now I had to make a yarn holder.  And I knew just the bottle I wanted to use...


I peeled off the Sprite Zero label and discovered that underneath the bottle was segmented by little ridges. Perfect!!!  I cut the bottle apart, using the ridges as guidelines so that my cuts were straight.  I cut the bottle at the top ridge and at the middle ridge, which gave me three pieces to work with: the top, the bottom, and then a little 3/4" strip from the middle.  I set the middle strip aside and focused on the two big parts.


You're going to need a 14" or longer zipper for this project.  I used an 18" zipper, because that was what I had.  The circumference of the bottle is 13" so we're going to have to customize the zipper, like how I showed you when we made the Work-In-Progress Bag.  But first, we're going to hot glue!

Hot glue the zipper to the bottom section of the bottle (quick reminder, it's really hot! Be careful, Dynamos!).  You want to try to get the teeth fairly near the edge of the bottle, so that it's neat and lined up.  When you get close to the end (beginning!) stop a half an inch or so before you reach the teeth where you started.  Give yourself a little bit of space, maybe a quarter of an inch, and then sew across the zipper teeth to create a new end to your zipper.  Snip off the excess, and melt the edges to keep it from fraying.  If you want to get fancy schmancy, you could crochet a little end cap for this flappy, slightly unsightly, end of the zipper.  Otherwise, let's just move on.
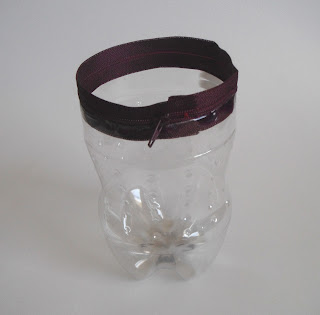
Now you're going to hot glue the other side of the zipper to the top part of the bottle.  This is slightly trickier, since you will have to unzip the zipper to glue it in, and so your zipper to hot glue ratio is going to be a little worse.  Be extra careful.  But on the bright side, it doesn't matter where you start gluing, since you don't have to line up sides or anything.  Yippee!  Try not to get glue on the zipper teeth.  This is important, since the first couple of times you zip/unzip the zipper it's going to be tough anyway. Hot glue on the zipper track just makes it that much harder.  I got one little bonus blob of glue that completely bogged down the works until I snipped it off with some tiny scissors.  Learn from my mistakes, Dynamos!  Take care of your teeth!  LOL!
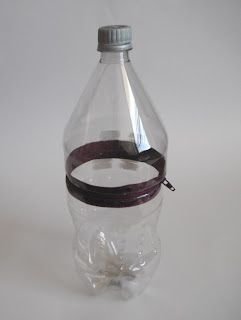

Hmm.  So we got the bottle together, but now what?  The hot glue and zipper don't look especially good at this point, so I think we should crochet something to cover that part up.  There's not a word, or even a phrase, that I can come up with that adequately describes what that piece is, so I'm kind of at a loss as to what I should call the pattern.  For now, I am going to call it Bottle Flair.  I toyed with Zipper Edging for a few minutes, but Bottle Flair won out.  ** If you have an opinion, feel free to express it in the comments below.  Let your voice be heard!  I will also accept other naming suggestions.  I don't expect that this will be the only time that I make these, and I'd love to have a name that we all agree on.  Dynamo votes count double!** 

Supplies: 
Small amount of worsted weight yarn (I used Lion Cotton in Purple)
Size G hook

Bottle Flair
(make 2)
R1: ch 44, sl st to first ch to join round (44 st)
R2: ch 1, sc in each ch space around, sl st to first sc to join round (44 st)
R3: -do not chain- (skip 1 sc, 5 dc in next sc, skip 1 sc, sl st in next sc) 11 times 
Fasten off.  Weave in ends.

Slip your Bottle Flair onto the bottle with the straight edge towards the zipper.  Hot glue the Bottle Flair in place.  **Bottle Flair feels very fancy, maybe Zipper Edging would have been better... It's not too late, place your votes now!**

This is what your finished Yarn Holder should look like.  Unless you used a different color, in which case, your Yarn Holder is going to look different - but similar - to this.

The Yarn Holder in action!  I am very happy with how it turned out.  I think I'm going to make several more, since they will be perfect for multi-colored work.  And, most importantly, my yarn isn't going to roll around on the floor of the car when I go to the drive-in now. 

xoxo

P.S. Don't throw away that 3/4" strip of plastic from the middle of the Sprite bottle.  I've got a project that uses it coming up on Thursday.  In the meantime, have a happy 4th of July!
xo Jaime


Sunday, July 1, 2012

July DIY!

Happy July!

I'm getting ready to host our annual 4th of July barbeque this week, which has been dramatically scaled back this year due to my grandma's health.  Still, it's going to be a fun day with yummy food and lots of fun.

I got it in my head that I wanted to put decorated lights around the patio.  I blame Pinterest.  I saw this and this and decided to mash them together to make crochet-paper-covered lights.  Cute idea, right?  I was planning to pull out our Christmas tree lights and make them all crochet-y and festive.

The basic concept is this: using scrapbook paper (or in my case, a scanned copy of some granny squares I made) and some cheap plastic cups you can make cute little lampshades for your patio/Christmas/fairy lights.   You cut one of the cups apart to use as a template, and then trace around it onto your paper.  I was able to get two cup covers out of each sheet of paper.  Then you can Outdoor Mod Podge them to waterproof them, or as I did, just tape them on because I hadn't fully committed to the project... Ooh, the embarrassing truth just slipped out there...

This is how far I got.

I couldn't bring myself to print out more than 3 pages of "granny paper" because it was so saturated with printer ink that it just looked like a waste of money to me.  I thought about getting color copies made, but they're a buck apiece, and I'm just too cheap to want to spend $50 for something that looks like I made it for free.  No thanks.  ($50 was determined by dividing my 100 lights by the 2 covers I would get from a $1 color copied paper.  I'd rather spend my $1 here... or here... Shameless plug!!!)

But I'd already made 4 covers, which now seemed like a huge waste of energy, until I thought "Duh, flip them back over!"  The lampshades were made from cups, so why couldn't I just use them as festive party cups?!  Done!  And while I was at it, why not make matching plates?  So I did.


I just cut out a circle that fit the bottom of my plate (disposable clear Chinet that I got on sale at Target), and then taped it the paper to the bottom of the plate!  I think this would look super cute for bringing cookies to a party, and who cares about the plate afterward.  I'm already thinking of doing this again in red and cream to use at Christmas.

So, I guess my total craft fail turned out okay after all.  Oh, Pinterest, I can never stay mad at you...

xoxo
Related Posts Plugin for WordPress, Blogger...