Google+
Showing posts with label Headband. Show all posts

Saturday, August 25, 2012

Boho Hairstyle

Okay, so when I'm not hanging out here, I'm on Pinterest.  A lot.  It has digitized my hoarding tendencies, which I guess is kind of a good thing, since they're not manifesting as much in my actual real life anymore.  LOL!!!

I was clicking around Pinterest, searching for a new haircut, when BAM! I started finding the kind souls who do hairstyling videos.  Have you ever watched any of those videos?  I realized that Kate from The Small Things Blog has hair close enough to mine that I can rock her styles, and Mindy from Cute Girl Hairstyles has daughters with hair the same length as Mims.  So instead of cutting our hair, I'm learning how to style it.  I know, I know, I should have learned this in Junior High.  But I didn't.  So, thanks to Pinterest and YouTube, Mims and I have been looking ah-mazing!

My new-found hairstyling confidence has led me to try other styles as well.  In particular, I'm really attracted to boho styles involving head-wraps and headbands.  I keep seeing THIS and THIS style pinned almost daily, and after the 40th time of seeing it, I decided that I needed to try something like it myself.

Of course, I don't have any cute scarves to use for this style, but I know where I can get an even cuter headband...  I can make it myself from leftover yarn that I have laying around!  Recycling!  And fashion!  And a cute hairstyle!  Win, win, win!

Okay, so this pattern is ridiculously simple.  I feel a little weird writing it out.  But, I'm going to anyway...

Boho Headwrap - Multi-stripe
approx. 37" long x 1.5" wide
Supplies:
Worsted weight yarn (I used leftover cotton yarn in 5 different colors, you can use whatever you've got too.  If you want a summertime-beachy look, use cotton.)
Size H crochet hook
Yarn needle

ch 115
R1: sc in the back loop of the 2nd chain from hook, sc in the back loop of each chain across (114 st)
R2: change color, ch 1, sc in each sc across (114 st)
R3: change color, ch 1, sc in each sc across (114 st)
R4: change color, ch 1, sc in each sc across (114 st)
R5: change color, ch 1, sc in each sc across (114 st)
Fasten off.  Weave in ends.

This is Mims.  She's working as my model today.  She's getting paid in My Little Ponys...


First I sectioned off the front of her hair and pinned it out of the way.


Then I wrapped the headband around her head, and included it when I wrapped the rubber band around the ponytail (instead of tying it! A neat trick I'm going to use even when I'm not doing this style.)

I separated the ponytail into 2 sections with each side getting one of the headband tails.  I twisted the sections and then wrapped them around the headband as many times as it took to get the ends woven in and lookin' cute.


Her hair is pretty long, and the headband is not as light as a silk scarf, so I had to use some bobby pins to keep the wraps in place.


I unpinned the front and separated her hair at her part.  I twisted the side and wrapped it around the headband.

I used a bunch of bobby pins to hold it back and in place.


I sectioned the other side into 3 sections.  I twisted each section, and then wrapped it around the headband, pinning everything in place.


My little boho baby!  At this point we were both getting a little silly, so getting her to smile and be happy for the camera required some very crazy questions.  This picture was her thinking about the best ice-cream in the world that hasn't been invented yet...


She loved this look.  I loved this look.  It softened a little over the day, despite the cloud of hairspray that I used.  But that made it look even a little more hippie-baby, which was awesome.  She especially loved having her hair off of her neck (this is a big deal, she loves wearing her hair loooooong!).


So, Mims and I wish you a super happy weekend!

xoxo

Sunday, May 27, 2012

All Runner Girls need Wonder Woman Tiaras...


I am a runner.  I am a slow, chunky runner, but a runner none the less.  I know this because last year Jake and I did a 5k turkey trot.  And even though I got passed by some very fit octogenarians and a lot of people pushing strollers, I finished.  Therefore, I am a runner. I have a picture to prove it.  I wish it showed my race number...

While I was training for this event I got very into the runner headband scene.  There are several companies that make specialized running headbands that supposedly don't slip and help keep the sweat out of your eyes.  My experience is that all headbands slip, unless they are so tight around your noggin that it gives you a headache.  But a headband that helps keep sweat and sunblock out of your eyes is worth it's weight in gold.

So, it's about time to start training for this year's turkey trot.  I need some new headbands because of my awkward length hair, and also to keep general yucky-ness out of my eyes.  I wanted something cotton and washable, but something that would be fun.

I love Wonder Woman.  Jake reads the comic books, apparently Brian Azzarello is doing a good job on this current run, but my heart belongs to the Linda Carter version from tv.  I watched re-runs of The New Adventures of Wonder Woman after school.  I adored her.

Aha!  I needed a Wonder Woman tiara headband.

I can't guarantee that this headband will give you super powers, but I can guarantee that you will feel like you're running faster.  I think if I had had this tiara last November I would have shaved at least 3 minutes off my (agonizingly slow) time, even if its only because my hair wouldn't have been in my eyes...

Wonder Woman Running Tiara

Size 10 crochet thread in yellow and red
Size 3 crochet thread in black (you only need a little, embroidery floss would work well too)
Size 8 steel crochet hook
Yarn needle
1/8" elastic
Sewing thread to match yellow

Tiara:
With yellow crochet thread ch 166.
R1: hdc in 2nd chain from hook, hdc in each ch space across, ch 1, turn (165 st)
R2: hdc across all stitches, ch 1, turn (165 st)
R3: 50 sc, 32 hdc, 3 hdc in next st, 32 hdc, 50 sc, ch 1, turn (167 st)
R4: 53 sc, 30 hdc, 3 hdc in next st,  30 hdc, 53 sc, ch 1, turn (169 st)
R5: 59 sc, 25 hdc, 3 hdc in next st, 25 hdc, 59 sc, ch 1, turn (171 st)
R6: 62 sc, 23 hdc, 3 hdc, 23 hdc, 62 sc, ch 1, turn (173 st)
R7:86 hdc, 3 hdc, 86 hdc, ch 1, turn (175 st)
R8: 87 hdc, 3 hdc, 87 hdc, ch 1, turn (177 st)
R9: 88 hdc, 5 hdc, 88 hdc (181 st)
Fasten off.  Weave in ends.
 
Star:
Use red crochet thread.
R1: 10 sc in magic loop, sl st to first sc to close round (10 st)
 
R2: ch 1, (2sc in next st, sc) 5 times, sl st to first sc to close round (15 st)
R3: sl st,[(hdc, dc, trc, dc, hdc) in next st, 2 sl st] 4 times, 
(hdc, dc, trc, dc, hdc) in next st, sl st.
Fasten off. Leave a long tail and sew star to the front of the headband.
Use the black crochet cotton, or embroidery floss to outline the star. 
 I used 1/8" elastic to close the back of my tiara.  You could use thicker elastic if you had some on hand.  I pinned one side in place, and then tried it on, holding the elastic tight to get a good fit.  Mine ended up needing about 2" of elastic, but I have kind of a big head.  Try it on and adjust it before you sew it in place.
I sewed mine with the sewing machine, because it was out and I was doing some other sewing for my grandma. You could totally hand stitch the elastic in if you didn't want to bother with a machine.

Jake and Mims want me to point out that this headband is the Sleeping Beauty Tiara if you leave the star off.   

xoxo

Wednesday, April 25, 2012

A Return to My Favorites

So, it's been nearly two weeks, and my Minor Awards Ceremony headband is still my favorite accessory, probably since it doesn't slip off, and it does a great job keeping my awkward length hair out of my eyes.  I have also trimmed two inches off the bottom of my hair (I don't know how else to word that, but I do realize that it would be ridiculous to trim anything but the bottom of your hair.  I guess I should change it to "I cut my hair") so now all of it is a similar length.  It still pulls back into a ponytail, but it's about as long as Julia Louis-Dryfuss's hair in Veep... Yeah, I'm going to need more headbands.
Both of these are made out of fine weight crochet cotton, the size 3 Aunt Lydia's kind, but the black one I used with a size D hook, and the ivory one was made with a size G hook for a lacy look.  They're both just as amazing as the bronze one I fell in love with, but neither are as stretchy, since cotton isn't a stretchy yarn in the first place, so I would highly recommend you chain a little loosely, and then work that first row in the back loop of the chain, since you don't want to end up with one edge of your headband that's super tight (not that I know that from personal experience with the black one, ahem).  The blue flowers I just tied into the black band, since I wasn't sure I was going to like them (they're not centered, they sit jauntily off to the side), but I may go back and stitch them on more permanently, now that I know that I'm comfortable rocking the look.

I've also been keeping busy with my jar cover coaster thingies.  I want to call them Jar Socks.  Is that too lame?  My sister requested one for her birthday, so I've made her a The Night Circus themed one. I'm planning to get her a copy of the book to go with it.  I might also crochet a rose for the top?  Have you read the book? What do you think?
Okay, you caught me, I haven't woven the ends in on this one yet, but  I didn't realize it would show through the jar so obviously.  I may redo this picture.  Well, you get the point.  Black and white, with a touch of red, I think she's going to love it once she's read the book.  And if you haven't read the book either, I highly recommend it.  I hope you will fall in love with it the way I did.
This is the collection of Jar Socks (hmm, not sure I'm crazy about that afterall) that I've done in the last couple of days.  My sister's Night Circus jar, a green and pink one for my mom for Mother's Day, and then the crazy checkered one is mine (protecting my Pepsi Max) which matches the top that I made for my previous post about the jars.  I like the way the finer gauge crochet cotton looks, and it seems to be as absorbent as the worsted weight cotton, but it doesn't get saggy and heavy like my previous one did.  I'm still working out a lid system, but overall, I feel like this is becoming something I'm pleased with.  I think I like the look of the single crocheted ones better than my cover which I used half double crochet stitches on.

My vase.  I love the idea of my vase so much, but lordy, I am having a challenge figuring out what to do with the idea now that I know it works.  I'd like to create vases that would be art pieces, or would be appropriate for selling in high-end boutiques, and worsted weight yarn was just not doing it for me.  They looked thick and clumsy and, worst of all, serviceable. Not the Gift-For-Someone-Who-Has-Everything I wanted.  So, I tried size 10 crochet cotton with a size 6 steel hook.  This bowl represents two days of my life: 
That's not even the worst part. This is the worst part:

I look at all those threads to be woven in, and I see another two days of my life.  I don't think this one is going to make it to full vase shape. Maybe I will seal it up and use it to hold M&Ms, or keys, or something precious and amazing, because I just can't bear to finish it or to throw it away...  Do you know what I should do with it, my Crochet Dynamos?
xoxo

Friday, April 20, 2012

Fancy Pants and Quiet Tissues

I got to go to an awards ceremony last weekend.  It was very fancy-shmancy with a red carpet and minor celebrities and everything.  Ooh la la!  I knew what I was going to wear (ahem, not an evening gown), but my hair is at an awkward stage.  It doesn't exactly do 'styles' right now.  What was Crochet Dynamite to do??

I guess the picture was a spoiler alert, but I made a headband to hold my Used-To-Be-Bangs back, and the quasi-french twist in place. Crisis averted.

But wait! Who could have ever guessed that it would become my favorite accessory this week?  I have since then worn it to the beach, and to Target, and around the house, and I have looked fabulously stylish.  So thank you, awkward length hair, for requiring some crocheted awesomeness.  Not having to push my bangs back a hundred times a day has been amazing.

Okay, so the pictures don't really do it justice.  It's subtly sparkly and bronze, instead of a brownish rust color. Trust me, it would look awesome in any color though.  I am going to make some for Mims with buttons and flowers for when she starts Kindergarten in the fall.

If you'd like to make one too, it was really easy.  I have been inspired by Mary Jane Hall recently, with her stretchy crochet techniques, and her garment shaping using stitch sizes.  She has several headband patterns, but none that had the vintage-y pinup look that I wanted, so this is what I came up with.

Minor Awards Ceremony Headband
Supplies:
Vanna's Glamour (or other fine weight yarn)
Size D hook
Yarn Needle for weaving in ends

Chain 151.
R1: Starting in 2nd ch from hook 2 sc, 3 hdc, 5 dc, 3 hdc, 17 sc, 10 hdc, 70 dc, 10 hdc, 17 sc, 3 hdc, 5 dc, 3 hdc, 2 sc, ch 1, turn.
R2-3: (working in back loops only) 2 sc, 3 hdc, 5 dc, 3 hdc, 17 sc, 10 hdc, 70 dc, 10 hdc, 17 sc, 3 hdc, 5 dc, 3 hdc, 2 sc, ch 1, turn.
R4: (working in back loops only) 2 sc, 3 hdc, 5 dc, 3 hdc, 17 sc, 10 hdc, 70 dc, 10 hdc, 17 sc, 3 hdc, 5 dc, 3 hdc, 2 sc.
Fasten off. Weave in ends.

 Wear to a Minor Awards Ceremony and look fabulous!

I think you could also add a few more rows to make it thicker and it would still look super cute.  You could also turn it around so the sassy knot is in the front.  In fact, combine those two ideas and you've got a rockabilly head wrap worthy of your victory rolls! Wait, do you wrap up the back if you pin up the front? Okay, well even if that's not really a style, trust me, it would be cute.

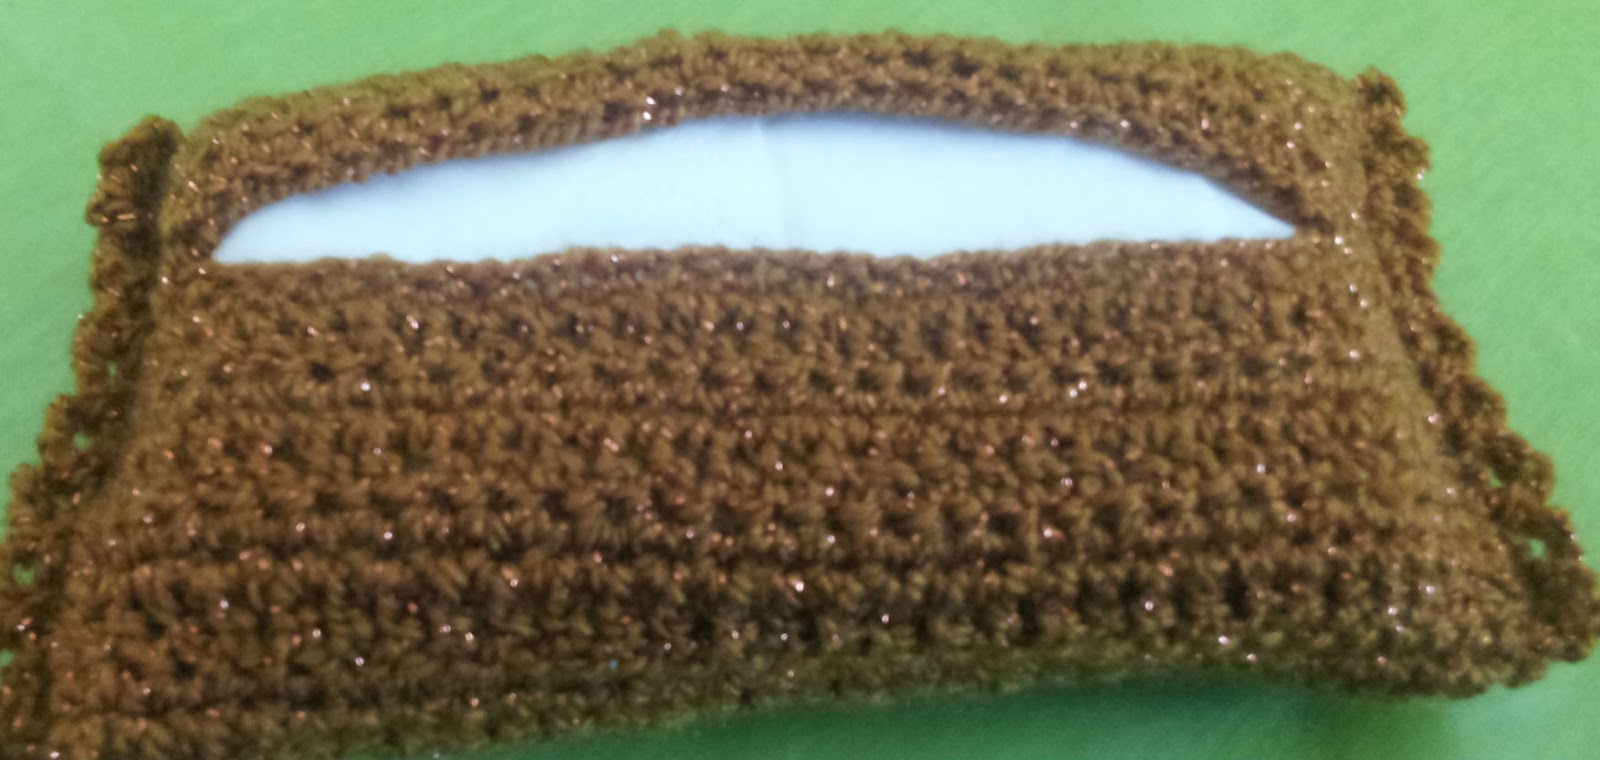
One more note about the awards ceremony, where I waited in line for the valet behind  Martin Kove  (who you would know as the evil sensei, John Kreese, from the 1984 classic The Karate Kid) and walked past Kristin Bauer van Straten (known exclusively in my circles as Pam De Beaufort from True Blood), which I selflessly attended despite the fact that I was at the tail end of a cold.  I needed tissues at the ready, because my runny nose waited for no appropriate clapping moment to dig tissues out of a crinkly plastic packet.  I needed them fast and quiet.  Thus, the Quiet Tissue Cover.

Why yes, my tissues do match my headband! How delightful that you noticed.  I pulled the plastic wrapper off my pocket pack of tissues and snugged them into their Minor Awards Ceremony-worthy case.  Worked like a charm.  Fancy? Yes. Quiet, so as not to disturb those around me? Yes as well!  Runny nose problems? Well, yes, but nothing that a couple of stealthy tissues couldn't solve.

All in all, I would call the evening a success.  And there was nothing so sweet as getting the car back from the valet and whipping my heels off.  I mean, fancy is good, but comfortable is so much better...
xoxo
Related Posts Plugin for WordPress, Blogger...