Google+

Sunday, April 28, 2013

Argyle Crochet: Travel Hook Case


After I finished making the case for my new set of Clover Amour crochet hooks, I started to feel sorry for my other case-free hooks.  And I realized that if I had a little case that would hold just a few hooks, but all the other supplies that I need when I crochet, that would be really, really convenient.  I take my crocheting with me everywhere, and it's terribly frustrating to find myself at a "Fasten off." without a pair of scissors.  Or a yarn needle.


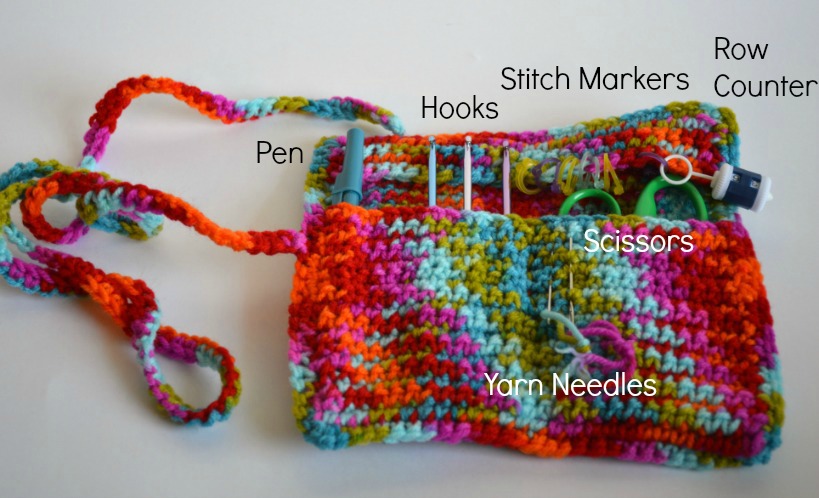
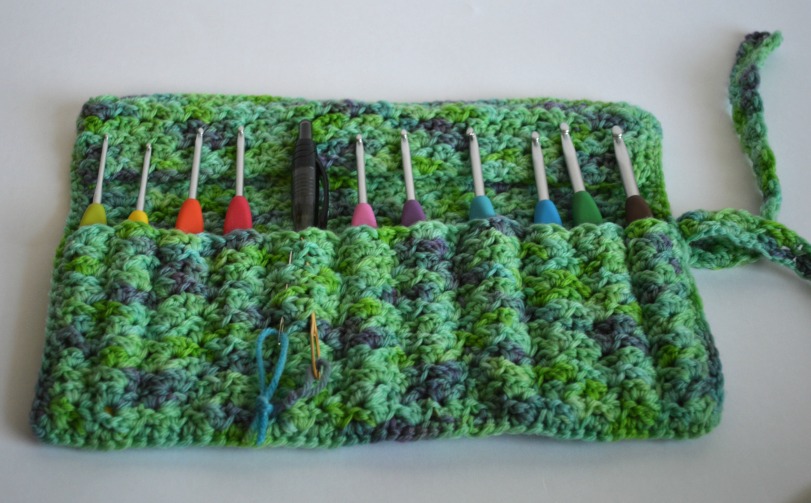
So I made a small travel case, that would hold all of the things that I need for a short jaunt out in the world with my crochet.  It will never take the place of my big tool case (cases!), but it's just the right size to fit in my purse with a ball of yarn, so that if a doctor's appointment takes too long, or Mims gets out of school a little late, I can squeeze in a little extra crochet time.


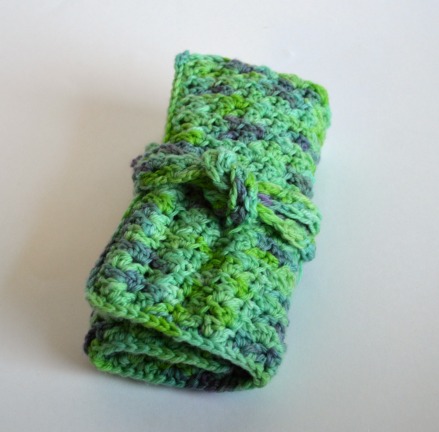
Folded up, it's 7.5" tall x 4" wide.  I made a very long strap to wrap around the case, instead of messing with a button.  I just wrap it around about 4 times, and then tuck the end under the wraps. All of the wraps keep the case from opening and dumping all of my tools into the bottom of my purse, which is a mighty fine quality in a closure! LOL!!!


I made this case using the Argyle Crochet technique (for more information, you can check out my book, Crochet Dynamite: Argyle Crochet available on Amazon.com in the Kindle store - free software is available to read it on your computer, smartphone, and tablet).  All sizes are approximate.

Argyle Crochet: Travel Hook Case
Supplies:
Worsted Weight Variegated Yarn - approximately 100 yards (I used Craft Smart Value Yarn in Fiesta)
Size E crochet hook
Scissors
Yarn needle
Pins (to pin pocket and top flap in place, this is purely optional)


Back:
Make a swatch of argyle, using a single color pattern length. Keep going until the piece measures approximately 6.5" tall.
Fasten off.  Weave in ends.

Pocket:

Make a swatch of argyle, using a single color pattern length. Keep going until the piece measures approximately 4.5" tall.
Fasten off.  Weave in ends.

Top Flap:

Make a swatch of argyle, using a single color pattern length. Keep going until the piece measures approximately 1.25" tall.
Fasten off.  Weave in ends.


Pin pocket to sides and lower edge of back piece.  Pin top flap to sides and top edge of back piece.
Sc around the outside edge of the back piece, placing 3 sc in each corner, to attach pocket and flap.
Using your hooks as guides, stitch a seam in the center of the large lower pocket.  Make 5 individual pockets for the hooks on the left side of the case. Leave the right side open to hold scissors.  Don't sew pockets into the top flap.  It's there to keep the hooks from sliding out of the case and to (slightly) protect the hook heads.

Strap: 

ch 136
R1: sc in 2nd ch from hook and in each ch across (135 st)
Fasten off.  Weave in ends.


Sew the strap to the center of the side edge of the hook case.  Fill with your tools and go on a road trip!  Visit Disneyland!  Or Atlantic City!  Or The Grand Canyon!  And annoy your family by crocheting the whole time!  Sounds like a perfect vacation to me!  LOL!!


xoxo
Don't they look nice together?  You can check out my Clover Amour Hook Case HERE!

Friday, April 26, 2013

Clover Amour Hook Case

I'm 38 years old.  For a long time I really wanted to NOT be 38, or any other age past 24.   In fact, I refused to move past 24 for so long that I celebrated the 10th anniversary of my 24th birthday...  Recently, I've begun to see the advantages that being 38 gives me.  I'm wiser than I was.  I've got mad skillz that the 24-year-old me didn't have.  I've had life experiences.  I'm beautiful in an entirely different way, one that means more than a perfectly unlined face...

Last year, for my birthday, my parents gave me an Amazon gift card, and I bought a set of crochet hooks and a Blue Q tool bag and I used them to start this blog.  So, to continue the tradition, they gave me another Amazon gift card for my birthday this year, with the understanding that I was supposed to do something amazing with it too!  LOL!!!  So I bought a really swanky set of crochet hooks with it, a 10 piece set of Clover Amour hooks.


They took, like, 2 weeks to get here (they were out of stock when I ordered, there wasn't anything wrong with the shipping!), and then I didn't want to actually use them, I just wanted to look at them in the box for another week because they were so pretty.  Finally, this week I got them out and actually crocheted with them, and I am (pun intended) hooked.  The ergonomic handles are rubbery, but not squishy, and they fit nicely in my (on the small side) hands.  I made Katie-bug's hat and booties with them, and I was impressed that my left pinky (the one I broke 6 years ago, and now has arthritis) didn't ache afterwards.  That's the highest praise I can give a crochet hook!

I am not a terribly organized person.  It's my one flaw (LOL!!).  I tend to lose hooks A LOT.  I was determined that I wanted to keep this set together and complete.  So I got out some of my kettle dyed yarn and made a case for them.  It looks (and FEELS!!) as swanky as the hooks that it holds.  I am feeling ridiculously spoiled, which I can say, is one of the perks of being 38.


I added an extra slot to hold a pen, since I tend to take a lot of notes as I crochet even if I'm not writing it up as a pattern.  You don't have to add the extra pen slot, but if you do, I bet you'll love it!  I also used that space to hold a couple of yarn needles, since I never can have enough of those around...

If you'd like to make a swanky case for your hooks, Clover Amour or not, here's the pattern:


CLOVER AMOUR HOOK CASE
Finished size approximately 10" wide x 7" high
Supplies:
Sport weight or DK weight yarn - approximately 180 yards
Size D crochet hook
Yarn needle
Scissors
Pins (optional, to pin pocket in place)

Back:
ch 51
R1: (sc, hdc, dc) in 4th ch from hook, [skip 2 ch, (sc, hdc, dc) in next ch)] 16 times, hdc in last ch
R2-22: ch 2 (counts as hdc), (sc, hdc, dc) in next dc and each dc across, hdc in top of turning ch
Fasten off.  Weave in ends.

Pocket:

ch 51
R1: (sc, hdc, dc) in 4th ch from hook, [skip 2 ch, (sc, hdc, dc) in next ch)] 16 times, hdc in last ch
R2-12: ch 2 (counts as hdc), (sc, hdc, dc) in next dc and each dc across, hdc in top of turning ch
Fasten off.  Weave in ends.

Top Flap:

ch 51
R1: (sc, hdc, dc) in 4th ch from hook, [skip 2 ch, (sc, hdc, dc) in next ch)] 16 times, hdc in last ch
R2-6: ch 2 (counts as hdc), (sc, hdc, dc) in next dc and each dc across, hdc in top of turning ch
Fasten off.  Weave in ends.

Pin pocket to sides and lower edge of back piece.  Pin top flap to sides and top edge of back piece.
Sc around the outside edge of the back piece, placing 3 sc in each corner, to attach pocket and flap.
Using your hooks as guides, stitch seams in the large lower pocket to make individual pockets for the hooks. I made 11 pockets in my case.  Don't sew pockets into the top flap.  It's there to keep the hooks from sliding out of the case and to (slightly) protect the hook heads.

Strap: 

ch 91
R1: (sc, hdc, dc) in 4th ch from hook, [skip 2 ch, (sc, hdc, dc) in next ch)] to end, hdc in last ch
R2: ch 2 (counts as hdc), (sc, hdc, dc) in next dc and each dc across, hdc in top of turning ch
Fasten off.  Weave in ends.

Sew the strap to the center of the side edge of the hook case, 7" in from the edge of the strap.  You will have one long side of the strap, and one 7" side of the strap.


To fold up your case: Fold the outer third of the case to the center.  Roll that part over onto the last third (by the strap).  Wrap the long side of the strap around the case and tie it to the short side of the strap with a loose knot.  Tuck the loose ends of the strap into the wrapped part of the strap to keep them neat!


While I was at it, I also made a purse-sized To-Go case for my other (skinny, aluminum) hooks (and all the supplies I need for working on a project out in the world) using the Argyle Crochet technique!  I'll post the instructions for it on Sunday!

Sunday, April 21, 2013

Katie-bug has arrived!

My niece is finally here!!  This is Mimsey's cousin, Katie-bug!

And this is my sister S, not to be confused with my sister-in-law S (LOL!).
Of course, I had to make her something special, because nieces don't come along every day...

I was so excited to get to use some of the yarn that I dyed last week.  I found THIS really cute hat pattern, and THIS pattern for booties.  The set worked up pretty quickly, and they looked REALLY good in person.  They're going to be my go-to baby gift from now on!

This is me and my little Katie-bug!  
Brand new babies are extra fun when you don't have to give birth to them yourself... LOL!!!

This is my Mema holding her newest great-grandbaby!  They've got a 92 year age difference!!

 My mom is the happiest grandma (Pickleberry!) in the world!  

The happiest new family in town!   New daddy J is already a baby handling pro!!

My sister has been telling me for years (6 to be exact) that having a niece is like no other relationship in the world.  While I believed her, I had to take her word for it. Until now!  I get it now.  She's mine in a different way than my daughter is.  I don't have to worry about her rules.  I don't have to agonize over her future.  I can love her in exactly the place that she's in, for her whole life.  It's almost like getting to be a fairy godmother, only better, because she looks like my little sister!!

So, I wanted to introduce you all to her, since I'm sure you're going to be seeing a whole lot of Katie-bug around here.  I'm going to take a few days to be with my sister and her family, because this is just the most wonderful thing that has happened in a long time and I want to enjoy every minute of it!

xoxo

Thursday, April 18, 2013

A fancy sweater and Award Ceremony


This weekend I had the awesome privilege to get to go to see my dad (artist James J. Eads) receive an Illustrator of the Future award.


I don't know which was cooler, watching him being announced by Nancy Cartwright (OMG!!!)...


Or watching him giving the best acceptance speech of the night (I'm biased, but it's true!).


The awards ceremony was very formal, and my gown was strapless, so I made myself a fancy wrap sweater to wear over the top.  I based it on a pattern in Curvy Girl Crochet by Mary Beth Temple.  I am so happy with how it turned out, and I felt covered but still fancy at the ceremony!

I think the best part about it was that no one asked if I made it myself.  In fact, none of my family commented on it at all.  Perhaps in other (um, supportive in a different way than mine?) families that might be an insult in the if-you-don't-have-anything-nice-to-say vein, but in my family everyone always assumes that I've made everything myself (even when I haven't).  So for none of them to mention it, good or bad, it means that they didn't even notice it.  So I'm coming away from it thinking that my little wrap sweater was appropriately formal for the occasion, and well made enough that everyone assumed I bought it somewhere.  LOL!!!  It's almost as good as winning a big honkin' award.

xoxo

Monday, April 15, 2013

Dying for some new yarn!

After all of the struggle to find any DK/Sport weight yarns that would work with my Argyle Crochet technique (still haven't found any), I got it in my head that I should just dye my own variegated yarn.  So I went online and ordered some gorgeous superwash wool/nylon blend yarn from KnitPicks, and I got a dying kit and a book on dying techniques.  I discovered that the precision that I was going to need to make evenly spaced variegations was going to be WAY too hard for me (a first-time beginner!), so I decided instead that I would just play around and experiment.  I went searching for some awesome videos on YouTube.  The yarn that was being dyed with food coloring was too cool!  I watched, like, fifteen video tutorials in a row.  Oh my goodness, I was having so much fun I felt like I'd opened Pandora's rainy-day craft box!!! And I hadn't even dyed anything myself yet!

For my first experiment into dying my own yarn, I decided to use (10-cent clearance!) egg dye pellets with my yarn.  It meant that I could use my regular cookware (no non-food chemicals!) to dye the yarn right on my stove!  Awesome!

 I wanted to follow this ChemKnits tutorial exactly!  Her yarn turned out so beautiful, and it was just the colors that I wanted.  I grabbed my box of egg dye and my yarn and headed to the kitchen to play!

Egg dye comes in mystery pellets.  The outside color of the pellet gives you very few clues about what the dye color actually is.  I ended up getting the edge of a paper towel barely-damp and making marks with them to give myself a color chart.


 I followed her instructions precisely, but my colors weren't as green as hers.  I like aqua blue, but I wanted a blue/green combo, so at the last second I tossed a green dye tablet into the center of the pot.  Um, that was a mistake.

 The green was a much more dominant color, and suddenly all of the yarn was green.  I yanked it (carefully, so I didn't get burned) out of the pot and rinsed it as soon as it was cool enough to handle.  It looked pretty enough, but as it dried, the colors lightened up a little and there just wasn't enough difference between the intensity of the shade of blue and the intensity of the shade of green.   It looked flat and boring to me.

 Especially when I compared it to the vivid variations in my second experiment!  The cantaloupe colored yarn had all of the gradations of a summertime sunset, with bright pinks and soft yellows and something new for my eyes to discover every time I looked at it.  I don't even particularly like orange, but I fell in love with this yarn!  I wanted to fall in love with the green, but I knew it wasn't going to happen unless I did something drastic.

 I over-dyed it!  The little jar on the side had (boiling! eep!) spring green dye, and the red pot had purple and blue.  It was quite a circus for a few minutes.  **Helpful hint, don't let the dry yarn rest against the hot pot.  I got two scorch marks that I will have to cut out later.  D:

It was so worth the extra effort.  I am thrilled with how it turned out!  I love it so much now!  If I had know how easy it was to dye my own yarn, I would have tried this much sooner.  I feel like if I have this much success with it as a complete beginner, I can't wait to see what I can create with more experience under my (crocheted) belt!

I've got two more skeins of 'blank' yarn left.  My mind is racing with possibilities!  As a creative, crafty gal, I think that having something new to occupy my imagination is well worth pursuing.  It's like planning a dream vacation, only instead of jet lag, I get new yarn!!

xoxo

Tuesday, April 9, 2013

Galaxy S3 Cover

I got a new phone yesterday.  My old one was over two years old, and it had had a crack in the screen for the last year (Mims dropped it on the tile floor of a Rubio's, not that I'm keeping track...), and the renewal/upgrade option finally became available with my cell provider.

My old phone was a Galaxy S (the original) and I adored it.  It was, by far, my favorite phone I've ever had.  In fact, I used it to take pictures for the blog in the early days before I upgraded my camera.  If I could have gotten another phone exactly like it, I would have.  (This sounds like a sales pitch, but it's not.  I just really loved my phone.)

I ended upgrading to a Galaxy S3, which I think I'm going to love even more!  I'm super nervous about dropping it and cracking the new screen, so I've ordered a super-protective case for it (they didn't have the color I wanted at the cell phone store).  It should arrive in a day or two.


In the meantime, I want to protect it my own way.  I made my own cover using cotton yarn.  I used a tiny hook so that it would be really dense, just in case it got dropped.  And it's TIGHT, so that the slippery little phone won't shoot out of the cover when I reach for it.  I think it would be enough protection on its own, if I didn't have a six-year-old that loved playing with drawing apps.  But since I do, so it'll be a perfect solution for us until the hard case comes.

Samsung Galaxy S3 Cover


Worsted Weight Yarn - approximately 40 yards (I used Lily The Original Sugar'n Cream 100% cotton worsted weight yarn in Daisy Ombre)
Size C crochet hook
Scissors
Yarn needle

ch 32
R1: sc in 2nd ch from hook, (ch 1, skip 1 ch, sc in next ch) 14 times, sc in last ch (30 st)
R2-14: ch 1, sc, (ch 1, sc in next ch space) 14 times,  sc in last st (30 st)
Fasten off.  Weave in ends.

Whipstitch the side edges of the piece together to form a tube.  Flatten the tube, centering the seam in the back.  Whipstitch the bottom of the tube together.


My mom also got a new phone, so I made a case for her too!  I switched colors every row, alternating between three colors.  When you use 3 colors you can carry the yarn up the side of the piece and you don't have to weave in so many ends when you're done!  This would also be gorgeous done in a rainbow pattern, if weaving ends didn't bother you...

xoxo

Sunday, April 7, 2013

Dynamite Market Bag

So, you know how I wrote an ebook called Crochet Dynamite: Argyle Crochet? (Even if you don't have a Kindle, you can download Amazon's FREE software and read it on your tablet, smartphone or computer!  Awesomesauce!)  Well, I ended up with a lot (LOT) of variegated yarn that just doesn't work with the argyle technique.  It's a bummer.

On the bright side, I've got some really fun yarn to play with now!  Yippee!

I was teasing my grandma the other day about her daily routines, but it made me think about myself.  I've realized that I've got two routines that I do daily too.  I have to crochet to calm my brain down, because the days that I don't are the days that I have panic attacks and can't function (um, too much information?).  And I have to make my daily run to Target (it's close, and our local grocery store just closed, so it's a two-for).


I did a recycling week in January (check THIS LIST for the projects), and ever since then I've been hyper aware of how much plastic is thrown away in my environment.  I've been working hard to reduce it, but it's hard to get everyone in the family on board with the "Take the Reusable Bag in EVERY time!" plan.  Don't get me started on the "Reuse Ziplock Bags!" plan... LOL!!!

I made these bags to be similar to a bag that I picked up at Harrods.  I love them! They are perfect for my Target runs, but they'd be equally awesome carrying around my latest crochet project.   And I really love that they are such a great way to show off some of that awesome variegated yarn that I can't Argyle Crochet with.


Dynamite Market Bag
Approximate finished size -16.5" tall x 15" wide

Supplies:
Variegated Worsted Weight Yarn - approximately 380 yards (for the White/Pink/Green bag I used Loops & Threads Impeccable in Holland, for the Brown/Pink/Green bag I used Red Heart Super Saver in CherryCola)
Size I crochet hook
Scissors
Yarn needle

ch 37
R1: hdc in 3rd ch from hook, hdc in each sp across (35 st)
R2-9: ch 2, hdc in each st across (35 st)
R10: ch 2, hdc in each st across, turn piece and 10 hdc across short edge, 35 hdc across the back loops of R1, 10 hdc across final short side, sl st to first hdc to join round (90 st)
R11-35: ch 2, hdc in each st around, sl st to first hdc to join round (90 st)
R36: ch 2, 2 hdc, ch 15 st, skip 15 st, 30 hdc, ch 15, skip 15 st, 28 hdc, sl st to first hdc to join round (90 st)
R37: ch 2, hdc, 15 hdc across ch stitches, 30 hdc, 15 hdc across ch stitches, 29 hdc, sl st to first hdc to join round (90 st)
R38-39: ch 2, hdc in each st around, sl st to first sc to join round (90 st)
Fasten off.  Weave in ends.


**For you Argyle Crocheters:  The Red Heart Super Saver CherryCola yarn actually will argyle, but the pattern length is about as long as their Camouflage yarn pattern.  Two skeins would make an amazing scarf.

Ooh!  Just a reminder to get your Argyle Crochet questions ready for our Twitter Q and A tomorrow at 3pm PST.  Make sure you label your tweets #argylecrochet!  (If you haven't gotten your copy yet, it's not too late!  Read it today and join us tomorrow!)

xoxo

Thursday, April 4, 2013

My brain is fried, so now what?!

Now that the new book, Crochet Dynamite: Argyle Crochet, is launched and all of the hoopla surrounding the One Year Blogeversary is over, I am at a bit of a loss of what to do with my time.  My brain feels fried, and yet, I am longing for a new challenge.  Jake suggested I try something in a new direction, still yarn related, but perhaps crochet adjacent.

I think the one thing I was the most disappointed about when I was experimenting with Argyle Crochet was that I couldn't find any sock yarns that worked with the technique.  I really wanted to make a pair of low stress argyle socks!  I really wanted to make some cool preppy headbands that Mims could wear to school (and, of course, I'd have to make a few for myself too!).  I wanted to make a cool argyle coin purse key chain.  I wanted to make an argyle lipbalm holder!  Worsted weight yarns just won't work for what I had in mind...

So, in the downtime between when I finished the last of the Blogeversary stuff, and when my brain feels like it wants to create something new, I've decided to learn to dye my own variegated sock yarn so I can try to make some of my dream argyle projects.  I don't expect it to be easy, and I expect to make lots of mistakes, because the Argyle Crochet technique needs the dyed segments to be pretty precise, but it sounds like fun.   And fun is just what I need right now.

I've gotten some really great questions about Argyle Crochet, and so if you're one of the nearly 1,000 people who downloaded it last Friday, I'm going to be hosting a Q and A on Twitter on Monday, April 8th from 3pm - 4pm PST.  Ask me questions!  Get an answer right away!  Let's have fun together!  Just make sure to label your questions with #argylecrochet so I can find them!

And, if you haven't gotten your copy of Crochet Dynamite: Argyle Crochet yet, it's available for purchase right now in the Amazon Kindle store -- you don't need a Kindle to read it, Amazon has free software you can download so you can read it on your computer, smartphone, or tablet!  Get it and then join us on Monday for the Q and A!


And because I didn't have any pictures to go with this post, here's a picture of Jake and Mims and the space shuttle Endeavour!  LOL!!!

Hope you have a wonderful day!!  And an extra hug goes out to anyone who is a caretaker for an elderly family member, because it's the hardest job in the world!  

xoxo
Related Posts Plugin for WordPress, Blogger...