Google+

Saturday, August 31, 2013

Old Fashioned Muslin Bags

My mom's birthday is this month, and I wanted a cute way to give her a bunch of my soap.  I have obsessively poured over Pinterest looking for the cutest packaging I could find (do you do that too?  I've gotten to the point where anytime I make anything fun my family asks 'Oh, did you see it on Pinterest?" Sheesh, but, um, yes...).  I really felt myself drawn to the soaps individually packaged in little muslin bags.  I priced out the bags on Amazon and a couple of my soap supply sites, but the cost was pretty prohibitive.  I had to either buy in inappropriately huge quantities, or pay way too much for just a few.  Either way I was spending more money than I wanted to for something that was going to get thrown in the trash anyway.

Clearly my only option was to make my own! I used this YouTube vid to make up a bunch of bags, but I added a twist to them.  I had read somewhere that if you use your sewing machine to zig-zag over the edge of fabric you could crochet into the stitches instead of having to go through the tedious marking/awl-punching/fighting-to-crochet-into-fabric edges I've done before. (I read it probably a year ago, and now I can't for the life of me find the place I read it.  I really would like to give credit to the brilliant mind that shoved me in this direction, since I totes would have never thought of it on my own.) I set the stitch width on my machine to 5 and my stitch length to 4 and zig-zagged over the top edge of the bags before I sewed the sides and bottom together (like in the YouTube vid).


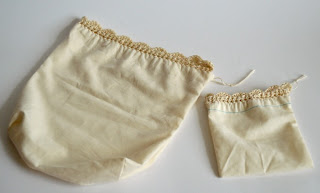
That gave me awesome sewn loops to crochet into.  I used a C hook and #5 crochet thread to add an edging to the top of the bags.  I love the way they turned out.  They look like the vintage linens that my grandma got from her mother and grandmother.  It was pretty quick and easy once I got the hang of it.


If you want to try it out yourself, I've got some hints to help you figure it out faster than I did:
1. Make sure the zig-zag goes OVER the edge of your fabric.  It will make little mountain peaks (or v's) instead of the zigs and zags. 
2. Only crochet into the "down" side of your mountains.  If you go into both sides the crochet starts to ruffle, which sounds good, but looks bad. 
3. Crochet a 3 row edging so that you start and end on the front of your piece.  The zig-zag edge is all but invisible if you start on the front.

I wanted a shell edge for my bag tops, so this is what I did:

SHELL EDGING (crocheting into a machine stitched edging)

R1: attach yarn and sc in first zig-zag loop, sc in each "down" loop to end
R2: ch 1, sc in each st across to end
R3: ch 1, sc in first st, skip st (5 dc in next st, skip st, sc, skip st) repeat to end
Fasten off, weave in ends.


I made my bags in two sizes, the small ones are 5" x 6" and will hold a bar of soap and a crochet soap dish doily.  The big bags are approximately 10" x 12" and will hold a bunch of bars of soap, or slippers, or anything else I can think of!  I can't wait to make some cute pillowcases for Mims using this technique!

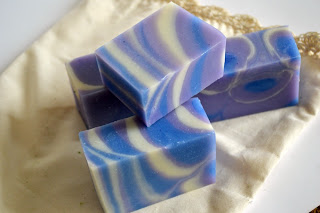
I've been having so much fun lately practicing my soap making techniques.  I picked up a copy of Soap Crafting by Anne-Marie Faiola (the Soap Queen!), and I'm now going through it, Julie & Julia style, trying to make every recipe/design in the book.  She's got a Pinterest/Instagram contest going on until September 23rd, which I'm going to add my pictures to, but I think just having a reason to practice all the new techniques makes me a winner already.

This is the Raspberry & Cream Column Pour soap I made:


And here is my version of her Psychedelic Green Tea soap (mine is Lime Margarita scented!):


And then these are two soaps that I was just fooling around with:


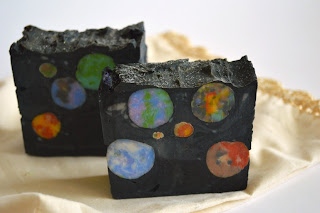
This is my Planetary Explorer soap that I made for Jake.  His birthday is this month too.


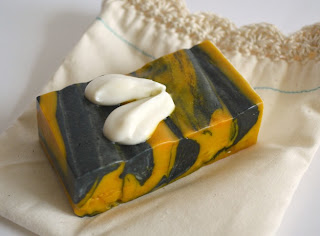
And this is my Queen Bee soap.  I used a Milk & Honey fragrance with it, and I made it because we had a small hive of bees that were living near the house.  I liked watching them, and they were used to us, but my brother-in-law is severely allergic to bee stings, and we just couldn't risk his safety.  I had hoped they could be saved and given to a local bee keeper, but it turns out that they were just barely surviving, so when the bee people came to get them the bees became very aggressive and had to be destroyed.  Broke my heart.  I would have planted more flowers if I had known.  

Okay, on that super depressing note, I'm going to go.  Have a great holiday weekend!!!

xoxo 


Tuesday, August 20, 2013

Crochet Soap Doily


I have recently come to realize that soap dishes are the exact opposite of coasters.  Coasters are best when they are absorbent and hold on to all of the water that gets dripped on them so that they can protect the surface they rest on.  Soap dishes are good when they allow all liquids to run straight through them, and are best when they sit above the water as it puddles on the sink counter (allowing airflow and evaporation).

As part of my new soap making endeavor, I have been on the hunt for some cheap, but good looking, soap dishes.  I used to work at a little soap shop before my daughter was born, and good soap dishes were the key to our sales (No one wants to buy fancy (pricey!) soap for it to melt away in a week and a half.  Plus, if you add a soap dish to a fancy soap it looks like a good (pricey!) gift.).   The problem that I had was the price for the soap dishes that met my good-soap-dish criteria, the cheapest I could find was 3 wooden soap dishes for $12.  I suppose if I was only planning to give my soap away to my mom and sister that would be a great price, but I need WAY more soap dishes than that.  Everyone on my Christmas card list this year is getting soap! (Um, I've got to unload about 50 pounds of the stuff!)

So I looked for DIY soap dishes.  Immediately the kids-crafting popsicle stick dish projects were out (um, no thank you), and the mosaic tiles/terracotta pot base dishes were out (not enough drainage for handmade soap, it would sit in the water and melt too fast).  Neither my husband or I are handy enough with wood working projects to consider any of the build-your-own dish projects I found, and besides, the cost per dish would be more than $4 (which became my standard I held all the other dishes against: Can I buy it cheaper on Amazon?!). While I did find some gorgeous crochet soap dishes, they were really soap coasters, which (like I said earlier) is the exact opposite of what I was looking for.  And the soap saver bags I found were adorable (homemade soap-on-a-rope, yo!) but if I am going to the time/energy/effort to make beautiful soap, I don't want to cover it up with a baggie (although I'm not opposed to it if the soap turns out ugly! Go HERE for an example).

But that left me high and dry (or really, low and soggy!) for good soap dish options.  I got to thinking (always dangerous!) about yarn.  I didn't want to use any yarn that might be absorbent.  But #18 nylon thread would hold its shape even if it got wet, it wouldn't absorb any of the water it came into contact with, and if it got covered in slimy soap film it could be rinsed off and would look as good as new.

But it still needed to drain well.  I wanted a pattern with lots of open space for lots of good airflow.  Doilies have lots of open spaces, and they're beautiful too!  Okay, two of my criteria were already met, but I thought I could even make something better...

**A brief note: I found the most awesome diy soap dish tutorial that used window screen and glass decorator marbles and grommets.  It was amazing and it looked like exactly what I wanted, except when I started pricing it out, it didn't meet my Amazon criteria.  But I LOVED the idea of the soap being held up above the counter by glass marbles, so it would have LOTS of space for air to flow beneath it.  I was going to link the project (you know, instead of this ridiculously long description) but I can't find it again.  I have google searched for nearly 40 minutes using every keyword I can think of, and it's just not there.  So, mystery tute, I salute you!**

So, armed with the awesome knowledge that glass (flat-backed) decorator marbles make every project better, I set about making a soap doily.  It took a few tries (massive crochet fails) to get it perfect, but I am so happy with them!  And they're WAY cheaper than Amazon!

$6.49 for 197 yards of #18 nylon cord will make 8 soap doilies
1 bag of decorator marbles at the Dollar Tree will fill 12 doilies
Size F hook - cost nothing, I already had it - and it will make infinity + 1 doilies
Which works out to 89 CENTS per soap dish!  Woo!!  (and did I mention, they look gorgeous too?!)


SOAP DOILY
approximately 4" across

Supplies:
25 yards of #18 nylon thread (I think the colors from the Artiste line at Hobby Lobby are gorgeous, but the Red Heart cord feels the best to work with, for what it's worth)
Size F crochet hook
3 large flat back decorator marbles

Doily Center
(make 2)
ch 6, sl st to first ch to form a ring
R1: ch 2, 14 dc into the ring, sl st to first dc stitch to close round (14 st)
R2: ch 3 (counts as a dc + a ch 1), (3 dc in next st, ch 1, skip 1 stitch) 6 times, 2 dc in next st, sl st to 2nd ch to close round (28 st)
Note about Round 2 **I don't know the proper way to explain this, but close the round by crocheting into the 2nd of the chain stitches you made when you started the round.  I have wasted too much time trying to figure out how to word this so that no one will be confused. This will end the round with 7 clusters of 3 stitches, and will line you up for the next row. Thank you. **
R3: ch 2, 4 dc in ch 1 sp, (5 dc in next ch 1 sp) 6 times, sl st to 2nd ch to close round (35 st)
Fasten off.  Weave in ends.

Outer Edging
Holding the two doily centers together with wrong sides facing to the center, attach thread to any stitch.
R1: ch 1, 28 sc (making sure to go through the stitches on both doily centers to crochet them together), add the three large decorator marbles to the pouch you've created, 7 sc (to close up the pouch), sl st to first sc to close round (35 st)
R2: ch 1, (5 dc in next st, skip 1 st, sc, skip 1 st) 8 times, 5 dc in next st, skip 1, sc (54 st)
Fasten off.  Weave in ends.


Once I got the patten memorized (it's so easy!!) I was able to crank a bunch of these out in about 25 minutes each, so really, there's no excuse to NOT make a bunch of them!!

We've been using a couple at the various sinks around the house and they work great!  The soap dries beautifully between uses, which, honestly, is what it's all about.

xoxo


Friday, August 16, 2013

Chopstick Holder

When I was in my early twenties I had a friend that carried a set of chopsticks around with him everywhere, just in case he might get to eat chinese food.  He didn't like the splintery disposable take-out chopsticks, and he despised using a fork.  He was also quasi-homeless, walked a cat on a leash, and had an opinion about every movie that had ever been made.  He was totally weird, and yes, he was in our wedding.  Ah, the things you find charming when you're young...

I picked up a big package of chopsticks to use for swirling techniques in my soapmaking, and it made me think of my friend Josh.  I was completely inspired to pull two pairs out of the bag and make some chopstick holders.  I like that they're going to keep my chopsticks clean in my purse and they work as a chopstick rest while I'm eating.  Because, now as a full-fledged grownup, I finally get it.  The splintery take-out chopsticks really do suck, and you really never know when you might get chinese...


CHOPSTICK HOLDER
to hold 2 chopsticks

Small amount of worsted weight yarn - I made mine in two colors, but they would look great in a single solid color as well (I used Patons Classic Wool in Mercury and Aran)
Size F crochet hook

(I switched color every row, carrying the other color across as I went, but for ease of instructions, I have not added the color changes into the pattern)
ch 12
R1: sc in 3rd ch from hook, sc in each ch across (10 st)
R2-20: ch 2, sc in each st across (10 st)
Fasten off.  Weave in ends.

Fold piece together lengthwise (hotdog style).  Attach yarn in the corner of the piece to crochet the edges together.
ch 1, 30 sc along the long side (making sure to catch both edges in your stitches), 3 sc in the corner, 5 sc along the short end.
Fasten off.  Weave in end.  Add your chopsticks!


I think these could make your table look really sharp for a party, and would make a cool favor for your guests to take home.  Just a thought...

xoxo


Wednesday, August 14, 2013

Felted Soap!


I am a beginning soapmaker.  I am having a lot of fun with it, but the learning curve has been really steep.  All of my soap has turned into real soap (gentle on the skin, makes bubbles, removes dirt and grime from hands) but my bars don't always look as beautiful as I would like them to.


Like my Pumpkin Spice soap.  It's made with coconut oil and olive oil and pumpkin puree, and it smells divine!  Just like fresh baked pumpkin pie.  But it's brown, and while there's nothing wrong with brown, I had really wanted a beautiful deep pumpkin orange that made you think "Fall" the second you laid your eyes upon it.  Lucky for me, I know how to fix it...


Cover it with beautiful crochet!!!!  I bought some beautiful chunky autumnally colored wool and made a cover that just screams harvest-time!

And because it's wool, it will felt as I use it, becoming even more beautiful and working as a built in washcloth/soap saver.  Beauty and function?!  Oh my goodness, I'm almost glad my yummy smelling soap turned out so ugly... almost.

3" ROUND SOAP COVER
(to cover 3" round x 1" thick soaps)

I used approximately 23 yards of Patons ColorWul in Countryside (but you could use any bulky weight 100% wool yarn)
Size H hook

Bottom piece:
R1: 6 hdc in a magic loop, pull loop tight and sl st to first hdc to close round (6 st)
R2: ch 2, 2 hdc in each st, sl st to first hdc to close round (12 st)
R3: ch 2, (2 hdc in next st, hdc) 6 times, sl st to first hdc to close round (18 st)
R4-8: ch 1, sc in each st around, sl st to first sc to close round (18 st)
Fasten off, leaving a long tail for stitching later.

Top piece:
R1: 6 hdc in a magic loop, pull loop tight and sl st to first hdc to close round (6 st)
R2: ch 2, 2 hdc in each st, sl st to first hdc to close round (12 st)
R3: ch 2, (2 hdc in next st, hdc) 6 times, sl st to first hdc to close round (18 st)
Fasten off, leaving a long tail.

Fit soap into the bottom piece.  Cover with the top piece and whipsitich the top to the bottom using the long tails left from fastening off.  Match stitches to create a smooth even edge. Weave in any loose ends.

The soap on the left is freshly crocheted, the one on the right has begun to felt from use...
Use as you would use any felted soap, the cover will loosen when first exposed to water, but will snug up around the soap as you use it, making a tight wool case until all the soap is gone.  Even after the soap is all used up, I know that some people slice open the empty soap pockets to use as the bottom of a coin purse, or to continue to use the empty felted pocket as a bath scrubby...


I made one in a dark gray wool with a cream colored star, too!  Now all of my ugly soaps are beautiful, and I can still smell their yummy pumpkin scent through the crochet fabric.  I am a happy girl!

If you don't have a source for great smelling 3" round soaps, you can always use THIS pattern from Lion Brand to make a cute cozy for commercially produced bars of soap.  I think they would make beautiful and unique holiday gifts...

xoxo

Saturday, August 10, 2013

Crochet To-Do List!

Do you guys know my friend Mary Katherine?  She's the uber-talented crochet genius behind Crochet Chiq.  She's also a member of the Crochet Lounge on Facebook (if you're not a part of it, it's an amazing -and super fun- group of proud hookers showin' off their stuff. It's a closed group, but I think anyone can apply to join.)  So, because of Mary Katherine I've been lurking and eavesdropping on all of the awesomeness (yes, that's a word) that all of the creative folks over at Crochet Lounge are working on. I feel like I get a sneak peek at the newest and coolest crochet projects out there!

Like c2c blankets (corner to corner, if you're not in the loop! LOL!!).  Quick to make, and awesome as all get out, a c2c blanket is on my list for my niece for Christmas...  I like this c2c pattern from The Crochet Crowd, and Mikey is awesome in the video!!


But what I'm totally digging for myself, and maybe Mims if I'm feeling generous, is a pair of crochet slipper boots.  I am in love with this pattern I found via Pinterest and I Really Should Be Sleeping.  I'm thinking that I need a purple pair, and a gray pair, and a green pair... I think I would LIVE in them...
(I actually have ordered the pattern, and a couple others, because her designs are so adorable! Check them out at Mamachee Patterns! I'll let you know how they turn out!)

Do you have a fave pattern you're working on this summer?  I'm on the lookout for fun!!  I still want to crochet a pair of socks...

xoxo

Thursday, August 8, 2013

Chili Pepper Ristra!

When I was a little girl one of my aunts had a southwest themed house, including a large chili pepper ristra decoration in the kitchen.  It was definitely a don't-touch item, but it was cool to look at.  I think my mom had a garlic braid in our kitchen in my childhood too, but I don't remember her cooking with it.  I think food decorations must have been big in the '80s. There's probably an entire landfill devoted to those decorative bottles of infused pepper oils... LOL!!!

Um, for those of you who don't know what a ristra is, it's a hanging arrangement of chili peppers (usually tied with raffia) and it's both decorative and functional.  It's a way of drying and displaying the peppers.  It's handy to have the dried peppers hanging on the wall, because you can just pull them off and crush them up and into your spaghetti sauce or taco meat.

As I mentioned in my last post, I've got a few pepper plants that are just going wild in the summer heat.  One of my plants is a chili pepper that I can't pick fast enough.  I was drying the peppers in a basket on the kitchen counter, but since counter space is at a premium around here, I had to think of a better way to dry them.  Suddenly, I remembered my aunt's chili pepper ristra and I knew I could make one for my peppers.


CHILI PEPPER RISTRA
I'm going to call this a helpful tip, because it's too simple to be a pattern.  I grabbed a size G crochet hook, and some cream colored cotton yarn, and I made a chain about ten inches long.  I made a slip stitch in the 8th ch from hook, and fastened it off.  Then I took my peppers and wove the little stems in between the chain stitches.  The peppers are lightweight, and the stems are a little jagged/pokey so they stuck right into the yarn and hung there!  I've still got plenty of room for more peppers as they come off my plant.  Even if I fill the whole thing, it'll take me about two minutes to make a second one, including looking for where my crochet hook has rolled off to.  LOL!!

I think it looks great in my kitchen, although I am very much looking forward to those bottom peppers drying so that I can cook with them!  I'm sure I'm not the first person to have thought of this, but I'm feeling terribly clever today... :D  I hope you guys all have wonderfully clever days too!!

xoxo

Tuesday, August 6, 2013

Habanero Pineapple Jelly

I have a container pepper garden this year.  It's got three different types of hot pepper plants, one for salsa, one for crushed red pepper, and one for melting your face off.  My family likes salsa, and crushed red pepper, but I had no idea what I was going to do with the habanero peppers because no one around here can handle the straight up heat of them.


So, inspired by my friend Charlotte (who you know as the incredibly talented Nyan from Nyan-Pon's Knits and Crochet), I made some Habanero Pineapple Jelly.  She makes it seem so easy, although she uses ghost peppers (aka The Hottest Pepper in the World!) and I used merely rip-yer-face-off-hot habaneros.  Let me tell you, she's a pro, because even though I had the door open and I was wearing glasses and gloves to protect myself, I ended up inhaling fumes that caused me to barf TWICE during the chopping/de-seeding process.  I quite literally pepper sprayed myself.  It was not my favorite thing I've ever done...


But now that I have six little half-pint jars sitting on my counter cooling, I am feeling pretty darn proud of myself.  I love that I found a use for my ridiculously hot peppers!  And the jelly is amazing!  I had some left over that I put on a burger, and woah mama it's awesome!

The recipe I used is HERE if you've got some habaneros that need to be turned into jelly.
Related Posts Plugin for WordPress, Blogger...