Google+

Thursday, May 31, 2012

Star Wand Pencils

A batch of stars, waiting to be wrapped and sent to their new home. Thank you, S, for your order!

xoxo

Wednesday, May 30, 2012

Drawing Horses and Stuffing Them...

Mims and Jake were drawing the other day, and Mims drew this cute horse.  I've read online about people turning their kid's drawings into stuffed toys, so I thought it would be a fun challenge to try myself.

I am really happy with it.  I think it turned out close enough to the drawing that it's recognizable.  And Mims adores it, which is really all I cared about.  She named it Elizabeth.

Also, this is what Mims dressed herself in this morning.  Jake had to take a picture.
It was the Halloween costume that I made her last year.  Although, we are such a super-hero-lovin' household, we let her wear it all day.  The fine folks at Target were amused...

xoxo

Monday, May 28, 2012

Star Spangled Everything!

Happy Memorial Day!

It took me a while to figure out a cool star pattern for my Wonder Woman Running Tiara pattern, and it seemed like such a waste to only use it once, so I've been busy crocheting stars like crazy trying to come up with something (else) awesome to do with them.

I know it was only yesterday, but I'm going to repeat the pattern here now, just for the sake of keeping all the starry stuff in one place.  I promise, you will thank me later when you don't have to bounce between posts to make your cute stars...

Star Pattern:
Use size 3 crochet thread and a size D hook thread for a larger star
Use size 10 crochet thread and a size 8 steel hook for a smaller star
(make 2)
R1: 10 sc in magic loop, sl st to first sc to close round (10 st) 
R2: ch 1, (2sc in next st, sc) 5 times, sl st to first sc to close round (15 st)
R3: sl st,[(hdc, dc, trc, dc, hdc) in next st, 2 sl st] 4 times, 
(hdc, dc, trc, dc, hdc) in next st, sl st.
Fasten off. Leave a long tail to sew star together.


I discovered that, while a single flatty piece, they have cute rounded points, but if you sew two of them together the points become sharp and pokey and they look really good.  Just like a star should look!  It made me feel patriotic!  I wanted to star spangle my world!!!

Of course I had to do a red-white-and-blue garland.  I used size 3 crochet thread and a size d hook for the larger stars, and size 10 crochet thread and a size 8 steel hook for the yellow stars.  I stuffed them lightly to give them a little more shape.  I think these would make a super cute decoration for your year-round tree, or if you really went crazy you could decorate for 4th of July with a garland around your patio... You still have enough time if you start right now!

I sewed some stars together, leaving the bottom open, so that I could use them as pencil toppers.  I am thinking about cute stuff for Mims when she starts kindergarten in the fall, and I think these would be a hit.  I have been informed by my mom, who is a public school teacher, that perhaps these would be better 'at home' pencils, since the toppers can be removed and played with.  I will defer to her great wisdom, and plan a birthday party that needs princess and/or fairy wands for Mims next year... Ooh! If you cover the pencils with a fancy scrapbook paper, I think they would look extra cool (and less school-y).  These would also be cool for an end-of-the-year magic test-taking pencil... I hear that they only know how to write correct answers...

I used some size 10 crochet thread (made of bamboo fibers, yo!) and a size 8 steel crochet hook to make the star for this necklace.  I sewed it right onto the ball chain, stuffing it lightly to make it a little puffy and cute.  It doesn't slide easily, so if you try this, make sure you center it!  The bamboo thread is so soft, and the star weighs practically nothing, so I forget that I'm even wearing it.  I adore it.  Mims has requested several, so that she can have them in all her favorite colors.
I attached some bobby pins through the stars to decorate Mims's bun today.  It looked so festive and fun, I'm a little jealous of her long hair...

What I would not recommend is doing more than 2 colors per star.  This tri-colored experiment was a disaster.  I was sure you wouldn't believe that it was possible for me to make anything that was this awful, so I am posting a picture as proof that I screw up all the time... But seriously, if you want to do a two colored star, it think it could look cool, but the way the increases on the 2nd row go, it just doesn't look good with a third color.  Heed my cautionary tale... Don't do it! LOL!!!

The stars themselves are really appealing, just on their own.  When I was a kid I used to make origami wishing stars, and I think that a collection of these little crochet stars would be just as beautiful in a jar to tell someone how much you love them.  I could also see making these as keepsakes for a special occasion, you could even put a loop on them to use as a Christmas ornament.  I might even hang one in the car for Jake, to remind him that Mims and I love him.  Aww, so sappy today.  But, the stars are really cute, and once you start making them, your rational brain will justify making more and more to give away.

Fill your world with stars today, Dynamos, and share them with the people you love!

xoxo


Sunday, May 27, 2012

All Runner Girls need Wonder Woman Tiaras...


I am a runner.  I am a slow, chunky runner, but a runner none the less.  I know this because last year Jake and I did a 5k turkey trot.  And even though I got passed by some very fit octogenarians and a lot of people pushing strollers, I finished.  Therefore, I am a runner. I have a picture to prove it.  I wish it showed my race number...

While I was training for this event I got very into the runner headband scene.  There are several companies that make specialized running headbands that supposedly don't slip and help keep the sweat out of your eyes.  My experience is that all headbands slip, unless they are so tight around your noggin that it gives you a headache.  But a headband that helps keep sweat and sunblock out of your eyes is worth it's weight in gold.

So, it's about time to start training for this year's turkey trot.  I need some new headbands because of my awkward length hair, and also to keep general yucky-ness out of my eyes.  I wanted something cotton and washable, but something that would be fun.

I love Wonder Woman.  Jake reads the comic books, apparently Brian Azzarello is doing a good job on this current run, but my heart belongs to the Linda Carter version from tv.  I watched re-runs of The New Adventures of Wonder Woman after school.  I adored her.

Aha!  I needed a Wonder Woman tiara headband.

I can't guarantee that this headband will give you super powers, but I can guarantee that you will feel like you're running faster.  I think if I had had this tiara last November I would have shaved at least 3 minutes off my (agonizingly slow) time, even if its only because my hair wouldn't have been in my eyes...

Wonder Woman Running Tiara

Size 10 crochet thread in yellow and red
Size 3 crochet thread in black (you only need a little, embroidery floss would work well too)
Size 8 steel crochet hook
Yarn needle
1/8" elastic
Sewing thread to match yellow

Tiara:
With yellow crochet thread ch 166.
R1: hdc in 2nd chain from hook, hdc in each ch space across, ch 1, turn (165 st)
R2: hdc across all stitches, ch 1, turn (165 st)
R3: 50 sc, 32 hdc, 3 hdc in next st, 32 hdc, 50 sc, ch 1, turn (167 st)
R4: 53 sc, 30 hdc, 3 hdc in next st,  30 hdc, 53 sc, ch 1, turn (169 st)
R5: 59 sc, 25 hdc, 3 hdc in next st, 25 hdc, 59 sc, ch 1, turn (171 st)
R6: 62 sc, 23 hdc, 3 hdc, 23 hdc, 62 sc, ch 1, turn (173 st)
R7:86 hdc, 3 hdc, 86 hdc, ch 1, turn (175 st)
R8: 87 hdc, 3 hdc, 87 hdc, ch 1, turn (177 st)
R9: 88 hdc, 5 hdc, 88 hdc (181 st)
Fasten off.  Weave in ends.
 
Star:
Use red crochet thread.
R1: 10 sc in magic loop, sl st to first sc to close round (10 st)
 
R2: ch 1, (2sc in next st, sc) 5 times, sl st to first sc to close round (15 st)
R3: sl st,[(hdc, dc, trc, dc, hdc) in next st, 2 sl st] 4 times, 
(hdc, dc, trc, dc, hdc) in next st, sl st.
Fasten off. Leave a long tail and sew star to the front of the headband.
Use the black crochet cotton, or embroidery floss to outline the star. 
 I used 1/8" elastic to close the back of my tiara.  You could use thicker elastic if you had some on hand.  I pinned one side in place, and then tried it on, holding the elastic tight to get a good fit.  Mine ended up needing about 2" of elastic, but I have kind of a big head.  Try it on and adjust it before you sew it in place.
I sewed mine with the sewing machine, because it was out and I was doing some other sewing for my grandma. You could totally hand stitch the elastic in if you didn't want to bother with a machine.

Jake and Mims want me to point out that this headband is the Sleeping Beauty Tiara if you leave the star off.   

xoxo

Friday, May 25, 2012

Sharp Crochet Hook

I recently won a contest over at Cut Out + Keep.  This was my prize!

It's a sharp crochet hook for doing edgings!  I was over-the-moon-excited when it arrived!  I couldn't wait to try it out.

I was very into embroidery a couple of years ago, and even had an embroidery design blog for a little while, and  my favorite thing to embellish was handkerchiefs.  I would buy big packs of men's handkerchiefs and put little doodle designs on the corner.  It was fun, but once everyone I knew had a half dozen handkerchiefs, I lost interest.  So, I had a stack of handkerchiefs that were dying for a new fancy edge.  I pulled them out and got busy crocheting!

It took me a little while to get used to the technique needed to make the crocheting smooth and even.  I split the yarn a couple of times, and I snagged the fabric, since both the tip and the hook are pretty sharp.  But eventually I got the hang of it, and once I did, it was very fast and very fun to work with.

This is just a plain single-crochet edge.  I think it looks fantastic, simple and unfussy.  I've done crocheted edgings on fabric before, and it never looked this clean and sharp.  I loved how easy it was to make the hole exactly where I wanted it to be, and not have to punch it with an awl first.

This is a row of single-crochet, followed by one of the edgings from the edging book, which I used a size D crochet hook to complete.  There were lots of cute designs in the book, but none of them had instructions for how to do the corner.  I picked a simple design, so that the corner wouldn't be an issue, but I would have liked instructions for corners on some of the designs.

I can't wait to experiment more with my new sharp crochet hook.  I want to make some fancy edged socks for Mims, and I think that putting a crocheted edge on some pillowcases would be a cool gift for my Mom.  Neither of those projects have corners!  I will stick to more simple edgings if I want to make DC a fancy blanket or two.  He's a boy and a baby, I can't imagine that he will mind...

xoxo

Wednesday, May 23, 2012

Yarn Spindles

If you've read any of my posts lately, you will know that my current favorite yarn is the Aunt Lydia's Fashion 3 Crochet Cotton.  I am obsessed with it.  I love everything about it: the bright colors, the all cotton-ness, the fact that it's so small so all my projects look hand-crafted and not homemade-y.  Yeah, I make up a lot of words, but you get the point. I am crazy about that yarn.

I am not crazy about the way that that yarn comes.  It comes in balls. Not pull skeins.  I suppose that it would tangle too much if it was in a pull skein, but still.  I spend solidly half of my crocheting time pulling yarn from the ball, chasing the ball across the room when I have pulled too vigorously and it rolls off the couch, and then re-winding the mass of yarn that has come off as it rolled around on the floor.  I am unwilling to crochet from a ball rolling around on the floor, if you're thinking that might be an acceptable solution to my problem.  But I had to do something about it.

I went to Target, thinking that they might have something I could use to keep my yarn from rolling around on the floor.  I looked at paper towel holders, closet organizing systems, and I even toyed with the idea of using one of those free-standing toilet paper holders.  None of them were perfect though, and I knew that I would have to fuss with whatever I brought home to make it work.  I knew that I could come up with something better.

When I was in college I took a sculpting class.  One of our projects required an armature, which we made from plumbing supplies and a block of wood.  Something about that project popped back into my mind to use as a solution to my problem. I took a trip to Home Depot to see if I was right.

I picked up two 1/2" metal floor flanges from the plumbing department.  I got two 1/2" x 5" pipes that were threaded at both ends, and I got two 1/2" caps to seal the ends.  I then went to the paint department and grabbed a can of aqua spray paint and some clear gloss spray.  My grand total at checkout was right around $25. (Pardon my hand and camera shadow in the picture! lol!)

I got my supplies home and went to work.  I threaded the pipe into the floor flange, and then twisted the cap onto the other end of the pipe.  Easy peasy, lemon squeezy!  It took less than a minute.  I grabbed a sheet of paper, so I wouldn't spray paint the lawn, and I went outside.

I put two light coats of the aqua paint on the pieces.  I used a third coat to hold on some glitter, because I love glitter almost as much as I love size 3 crochet cotton.  Then I sprayed the heck out of it with the clear gloss.  I let it dry for about a half hour.  It was a warm sunny day, it might take longer if it was overcast and cold.

My new yarn holders work great!  The spindle parts work like the thread holder on a sewing machine, so I don't have to pull as hard to get the yarn off, and the ball just spins instead of rolling around.  The floor flange is heavy enough that I don't pull it over, and I can see making a bunch of these for when I'm working with lots of colors.  Tres Convenient!!


xoxo

Monday, May 21, 2012

Pattern Testing

Happy Monday Dynamos!

This weekend I tested the pattern for my Striped Crossbody Bag, and I am glad that I did.  While I have used patterns my whole life, I've never tested a pattern before.  It was a challenge to do things exactly the way that the instructions were written.  Normally, I use patterns as a general guideline, and I put things together the way it makes sense to my brain, not necessarily the way that the designer had planned.  I was really hard to not rush ahead and sew things out of order, since I knew how the pieces fit together because it was my pattern.  I found 2 very minor mistakes, that I have now corrected.  One was an issue with row counts that were off by 2, and one was clarifying a sewing instruction.  And it gave me something to do while my Dad was projecting the partial eclipse onto a sheet of paper through a pinhole...

I discovered that the bag is the perfect size to hold my Kindle Fire!  I don't like to take it's cover off, so I was really excited that I didn't have to and it still slid right in.

This time I made the bag in black and off-white, and it looks very Jack Skellington/Nightmare Before Christmas-y to me.  I love it!  I really only like wearing black and gray anyway, so it will match everything.  Plus, because it's made out of cotton, it's totally washable if I flip an iced-tea on it (pray the Kindle isn't in there when I do!).


I am really happy that I re-made this bag.  I like that I've got it in 2 colors now, and I still think it's just the perfect size for everything I want it for.  I may use up the leftover yarn and make a matching wallet to go with it.  But things are pretty crazy around here, and I have so many other things I want to make...

Have a really great day!!
xoxo

Saturday, May 19, 2012

Birthday Award Button

Yesterday was my sister's birthday.  We all went out to dinner and then came back here and I made brownies for dessert. It was fun.  

I had put together a The Night Circus themed gift (remember this?) for her, but I wanted to make her something that she could wear to dinner, to let everyone know it was her birthday.  I also wanted to make her something that she would be happy to wear during her birthday festivities...

I've been playing around with the idea of doing a county-fair-style award ribbon, which seemed like a good place to start for my birthday button.  Of course, she would get the blue ribbon, but I wasn't exactly sure what to put in the center.  A miniature birthday cake?  Spell out Happy Birthday?  Her age?!  That got me to thinking about a story from a couple of weeks ago, one that has been cracking me up every time I think of it:

My sister is a teacher, and at her school they have a big birthday party at the beginning of each month for all of the teachers at the school that have birthdays that month.  So, 2 weeks ago, my sister walked in my back door with her arms full of birthday presents, and flowers, and balloons.  My dad asked her what all the stuff was for. She replied,  "It's my birthday presents!"
He looked at her quizzically.  "Is today your birthday?" he asked.
She put her presents down and narrowed her eyes.  "No," she replied.  "Dad? Do you know when my birthday is?"
He paused for a few moments.  "Your sister's is March, so you're May.  It's not the 15th, it's the 18th. May 18th." he said.
She gave him a smile. "You got it right.  But, do you know how old I am?" she teased.
This time he didn't hesitate at all. "You're twenty-seven!" he declared.
My sister, who is now well into her thirties, delightedly replied, "Yep, Dad, you got it right again."

So, when I handed her the present at the restaurant, she delightedly put her birthday award button on.  
"You knew just the right age for it!" she told me.
"Well, of course!  I asked Dad." I replied.

xoxo

Thursday, May 17, 2012

The Striped Bag and Wallet!

Hello, Dear Dynamos!
I am working late into the wee hours of the evening to bring you this post today.  I've been rushing like crazy to get two (yes, 2!!) new patterns done.
I am doing an experiment in independent design work.  I have lately been looking into magazine submission requirements, trying to figure out if I should be spending my time designing and writing articles for paper and e-magazines, or if I can find another way to get my patterns out to more people.  The problem is, it's a pretty subjective business (as all art is) and while I have had my share of writing rejections, I don't want to put time and energy into fruitless endeavors unnecessarily.

The unnecessarily part comes from my belief in the brilliance that is Craftsy.com.  They are the champion of independent designers of all crafty mediums, not just crochet.  And they allow their members to put up pattern stores on their site, without any fees (unlike Etsy).  So it got me to thinking: What if I put one of my patterns on Craftsy and see what happens?

So, I have put my new Striped Crossbody Bag on Craftsy.com.  It is pretty cool.  You should go over there and check it out. I put it on for $1.  I want everyone who wants the pattern to be able to afford it.  Besides, this is just an experiment, anyway.

(Okay, you twisted my arm.  I will offer you an incentive to go check it out.  I've put the matching wallet pattern on for free!  You don't have to buy anything! Just go get the pattern.)

So, back to my magazine story: One of the magazines that I was super interested in submitting a project to pays $25 per published pattern... But! If my $1 experiment goes well, and more than 25 people decide to actually purchase my pattern, I'm not going to bother with magazines.  I'm going to keep doing free designs for my Dynamos, and throw the really exceptional pieces onto Craftsy and continue to charge $1 for everything.  Because, ultimately, I love doing this. And with a little bit of cash flow, I can do it for a whole lot longer!

xoxo

edit 5/18/12: Hey! I forgot to tell you the best part about the wallet!  I made it entirely out of  yarn that was left over from the crossbody bag!  So, if you buy all the supplies to make the bag, the wallet is essentially free!  And you aren't stuck with leftover yarn that wastes precious yarn storage space! Woot!  So, seriously, you should go get your free wallet pattern!! xoJ

Tuesday, May 15, 2012

My Clock Cover needs Work...

I thought it would be fun to crochet a cover for my plain, cheap, boring clock.  And it was fun, until I decided that I wanted to put a red stripe in the cover where twelve o'clock would be.  The stripe wasn't sharp enough, and when I added rows at the bottom, and at the top of it, it looked horrifying.  Like a little blob of blood had gotten on the cream colored fabric I had crocheted. Not appealing to me in any way.

But!  We had recently been to the beach, and had brought home a bucket of shells.  Maybe one of them would be the right size to cover my red blob and be the focal point of my clock.  I have a sea-themed bathroom, it would go perfectly in there!


I hung it up, using one of those little command strip hooks, but about two hours later, I heard a crash.  It was just too heavy for the hook and it jumped off the wall to its death. With the shells, the cover was just too heavy.  Maybe I should have used a nail... Anyway, it was too much work for it to only have lasted two hours, so no more crochet clock covers for me.

I hope that your next crochet adventure is a good one, Crochet Dynamos!
xoxo

Monday, May 14, 2012

Crocheting a Necklace

I wear glasses.  I wear reading glasses and I wear sunglasses.  I lose my glasses a lot.  There seems to be an direct correlation between how much money I spend and the likelihood of me losing the glasses. The really expensive ones sometimes get lost on the way out of the mall... Sigh...

But, seriously, I misplace my glasses a lot.  But I don't really care for the long lanyard with a loop glasses holders that are out there, so that wasn't really an option for me.  What I really wanted was something that was so pretty, no one would ever suspect that (in the privacy of my own home) I sometimes loop my glasses through it for safekeeping.

I had picked up some plastic cabone rings the last time that I was at the craft store, and I was excited to experiment with them. The 3/4" size seemed a perfect fit for my project.

On my first try, I experimented with a crochet/macrame combo using the cabone rings and some hemp cord. It looked exactly like I had wanted, but it was a little scratchy, and I didn't like the sliding closure I put in the back.

So, I got out my trusty size 3 crochet cotton and re-made it.  This time I just crocheted long ties, so I could adjust the length each time I wear it with a simple knot.

I really like how it turned out.  I was showing them to my mom, and she insisted that I sit down and make one for her immediately. If you need one right away, I will give you my (very simple, very minimal) instructions.

The (Glasses Holding, shhh!) Necklace
approx. 25" long
Supplies:
Size 3 Crochet Cotton in the color of your choice, or a fine hemp cord if that's more your style
Size D crochet hook
One 3/4" plastic cabone ring
Four 1/2" plastic cabone rings
Sharp yarn needle

Okay, so there's not an exact way to do this.  Grab the big cabone ring.  It's going to be your center.  Sc over the plastic.  It will take between 25 and 30 sc stitches to go around.  When you can't squeeze any more stitches on, sc the last st to the first st.  Cut the yarn at this point and weave the end in.

Sc the same way around all four of the smaller cabone rings.  They will take about 15 sc stitches.  After you sc the ring of stiches together, leave a longish tail for attaching them together.  Use the picture for reference.  Use two of the rings to make a Mickey-Mouse-ish shape, then attach the others on the outside so that no one else notices that you're wearing a Disney icon. Weave in all those ends, please!

Now that you have your center piece complete, attach the yarn on one side (it doesn't matter which, you'll do the other side as soon as this side is done) and chain 71.  
R1: starting in 2nd ch from the hook, sl st across all 70 ch spaces.
Fasten off.  Leave a tail and weave it into the ring to secure the side piece.
Repeat on the other side.

If my instructions have scared you, I want to reassure you that once you get going, it is the simplest project in the world.  The hardest part is weaving the ends in, and that's just basic sewing.  If you're on the fence, I say go for it!

Okay, so me and my glasses are off for the day! I hope you have a good day too, dear Dynamos!
xoxo

Saturday, May 12, 2012

Glamorous Crocheting

Hello Dynamos!
When Mims was about 4 months old, I tripped on my neighbor's front porch step and broke my left pinky.  I am left handed, so it was extra tough.  It won't surprise you that Mims did not seem to take it easy on me because I had a broken finger.  Four-month-olds are selfish like that...

Ahahahahahahahaha!!!

Okay, so my finger was broken at the knuckle, and it still (five years later) doesn't close into a fist all the way.  And it hurts when it rains, but that is not the point I am making.  Where I was going with this story is that I need  to crochet with those ergonomic big-handled crochet hooks or my pinky aches for the rest of the day.  Alas, the big-handled crochet hooks are four times the price of the skinny aluminum ones, and I have a set of the skinny aluminum ones, so OBVIOUSLY I needed to make my own handles.

Yippee! I could make anything I wanted. And I wanted glitter!  I saw a video awhile back that The Crafty Chica did on glittering a floor.  That was what I wanted my crochet hook handles to look like!  Fabulously, glamorously, Zsa Zsa Gabor-worthy glittered!

When I got to the craft store to pick up some polymer clay, I found that the Premo line of polymer clays had glitter colors!  Hooray! My job was half done! I picked up a package of red and blue glitter clay and went on my merry way.

I made my hook handles (1/2 oz is about right for a handle, 30 min at 275 degrees!), and they were glittery and beautiful, in a subtle subdued sparkle sort of way.  A coat of resin helped bring the sparkle out, but it wasn't the fabulous over-the-top blinding-myself-when-I-crochet effect I was looking for.

So, I got out a hook that I had made a handle for in a flat turquoise color, and I got out my micro-glitter.  I gave the handle a thin coat of uv curing resin, and then glittered the heck out of it.  When it had cured, I went for round two, making sure to cover all the spots that weren't sparkly enough!  When the 2nd layer had cured, I gave it a thicker top coating of resin to seal all the glitter inside, so it wouldn't get on me and my projects.  Glitter hook, super awesome. Glitter on my face, not so much.

All in all, this project was super fast and so much fun I would highly recommend you glitter yourself some fabulous hooks.  And my pinky doesn't hurt!

Oh yeah, one last thing, I couldn't help myself.  I crocheted a cover for a green handle with my favorite Aunt Lydia's Size 3 Crochet Cotton.  So soft and squishy, and I like that the green shows through!

xoxo

Thursday, May 10, 2012

The London Crochet Bag

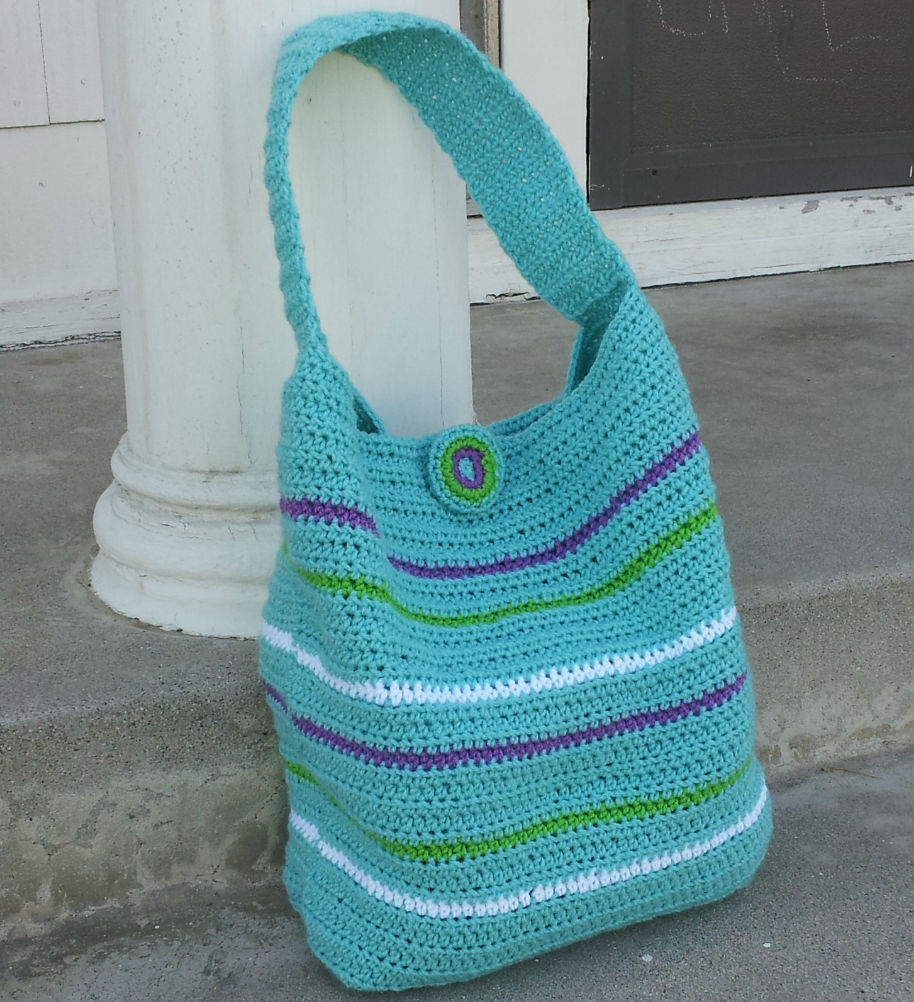
Cheerio!  I am not in London, nor have I gotten to crochet in London, but this bag is based on one that my sister-in-law bought the last time that we took a family vacation to London.  Thus, it is The London Crochet Bag.  It is the inspiration for my fast and easy crochet buttons.  In that post, I said that I would write up the pattern if anyone was interested.  I got a request for it!!! Yippee!!  (I am not going to apologize for being excited, I design and blog in an isolated bubble.  You can't comment too much for me!!)

The first one I made used up leftover yarn from two other projects, but I wasn't sure exactly how much yarn I actually used.  This one I made with brand spankin' new skeins, so I can say with absolute confidence, you need about two skeins. If you want to use two different colors (or more) please make wider stripes than I did, or you will find yourself running back to the craft store mid-project.  Heed my warning, two full skeins!!
Also, use cheap yarn.  I used Red Heart Super Saver, because it's not soft, and it makes a dense fabric.  You won't need to line it, and it will hold it's shape fairly well.  This isn't the project for your beautiful, soft, specialty yarns.  This is a workhorse bag, pretty, but more importantly, functional. The bag in the picture is holding the leftover (virtually whole) purple, lime and white skeins from this project.  It's a biggie!

If a large project bag sounds like your cup of (English Breakfast) tea, give it a try!

The London Crochet Bag
approx. 16" tall, 11" wide (across front), 6" deep (across side)
Supplies:
2 skeins of Red Heart Super Saver Yarn (or other cheap worsted weight yarn, in a color that makes your heart sing!)
Size G crochet hook
Yarn needle (I use the Chibi needle with the bent tip, you can use whatever works for you)

Main Bag Body:
Ch 61.
R1: hdc in 2nd ch from hook, hdc across all ch, ch 1, turn (60 st)
R2-40: hdc across all st, ch 1, turn. (60 st)
R41: sl st across 10 st, ch 1, 40 hdc, ch 1, turn. (40 hdc st)
R42-50: 40 hdc, fasten off. (40 st)
R51: using the now broken off piece of yarn, ch 10, hdc across the 40 st from row 51, ch 11, turn. (60 st)
R52: hdc in 2nd ch from hook, 9 hdc in ch spaces, 40 hdc, 10 hdc in ch spaces, ch 1, turn. (60 st)
R53-87: hdc across all st, ch 1, turn. (60 st)
R88: (button hole row) 24 hdc, ch 12, 24 hdc, ch 1, turn (60 st)
R89: 24 hdc, 12 hdc across ch space, 24 hdc, ch 1, turn. (60 st)
R90: hdc across all st, fasten off.
Strap:
Ch 11.

R1: hdc in 2nd ch from hook, hdc across all ch, ch 1, turn (10 st)
R2-39: hdc across all st, ch 1, turn. (10 st)
R40: hdc across all st, fasten off.

Button:
R1: using a magic loop, sc 7 st, sl st to first sc to join round. (7 st)
R2: ch 1, 2 sc in each st around, sl st to first sc to join round. (14 st)
R3: ch 1, (2 sc in next st, sc) 7 times, sl st to first sc to join round. (21 st)
R4-6: ch 1, sc in each st around, sl st to first sc to join round. (21 st)
R7: ch 1, (sc 2 st tog, sc) 7 times, sl st to first sc to join round. (14 st)
R8: ch 1 (sc 2 st tog) 7 times, sl st to first sc to join round. (7 st)
Fasten off. Weave in end from magic loop, making sure to tighten and secure it. Flatten button into a disc shape.  Using the tail from R8, tack the flattened disc together in a few places, trying to keep your stitches invisible on the front (good side) of the button. Weave in end on the back.

Whipstitch the sides of the bag together, matching stripes if you chose to make any.


When you get the sides sewn, open the bag up and flatten the side along the open area of the bottom of the bag. This is what makes the bag sit flat.  Whipstitch the bottom edge together.  Weave in ends.

Center the short edge of the strap along the side seams, and whipstitch into place, making sure to put several extra stitches in each edge corner for added strength. Weave in ends.

Using buttonhole as a guide, center and sew on button.

xoxo

ed. 7/10/12: Want to see the bag in more colors?  Check out the Dynamo Gallery!  Finished a bag and want to show it off?  Send me a picture at CrochetDynamite@gmail.com to be featured in the Dynamo Gallery!
xo Jaime

7/11/12: Washed and dryed the bag in my machines.  No special settings, just threw it in with a load of Mims's clothes.  It came out great!  No problems at all.  Thank you, Libby, for asking about how to wash it!

7/13/12: I've gotten 2 emails in 2 days (Hi Ginny and Rebekah!) about R51.  This is the general gist of the question: 
I got through row 50 and fastened off, but I'm a little confused by what you mean by "using the now broken off piece of yarn." Was I supposed to fasten off leaving a long tail? Or do I make a new foundation chain? I see in the pictures that its' made in like one piece and then sewn together, I'm just not sure how to start making the long sides again from the short one I just finished. Does that question make sense? I'm still a novice crocheter so that's mostly why I'm stuck. Thanks in advance for any help you can give me! (Thanks for letting me use your email, Rebekah!  Double Dynamo points to you!)


I figure that if these Dynamos had this question, some others of you might have wondered it too.  Here's my answer:

I had you fasten off the yarn at the end of R50 so that you could start R51 by chaining 10 (a new foundation chain to add the 10 stitches back on that I had you drop off during R41). Then with the chain stitches on your hook, you're going to hdc in each stitch across the main bag body piece, and then chain 11 to finish the row.  This puts the extra stitches that will become the sides of your bag back on.  You shouldn't have to sew any part of the bag together, except the side seams and the handle.  R51 ends with 61 stitches (10 chain st, 40 hdc's attached to the main bag piece, and then 11 more chain stitches).  That's how you add the long sides back on after the shorter bottom section.

I am super sorry that I wasn't more clear in my instructions.  I think that your question was really good, and I hope that I answered it in a way that didn't confuse you more.  Please don't hesitate to email me if you need more clarification.  


I hope this answers your question too, Dynamos.  And that last line pertains to you as well, please don't hesitate to email me if you need more clarification (on this pattern, or any of my other patterns!).  I'm still learning how to write patterns, so all the feedback that you give only helps me to produce better work.  Love to you all!
xo Jaime

Tuesday, May 8, 2012

Hospital Germs

I spent twelve hours at the hospital yesterday with my Mema. Her surgery was text-book perfect and she is doing very well.  And I got a lot of crocheting in!

I wasn't the only one who was crocheting in public either.  There was another woman in the surgical waiting room who was crocheting a beautiful afghan. She and her husband asked me about my (large!) crocheted bag, which I was toting all my crocheting supplies around in.  Then the security person who was in charge of keeping order in the waiting room asked me about one of the crocheted pen covers I was working on. We crocheters are a friendly bunch!

Honestly, I was just grateful I had something to do.  I tried to read, but it didn't hold my interest for long.  Instead, I used the meditative stitching to soothe my anxious brain.  Which was good, because I got to thinking...

I wanted to make a fun tissue holder.  Something that my daughter would want to use, nay! actually ASK to use, instead of endlessly sniffing away and then rubbing her nose on Jake's shirt. The little rectangular package of tissues was completely uninspiring to me.  I became annoyed.  Who was the person that decided that 8 tissues was the appropriate amount for the package?  And why do other brands have 10 tissues instead?  And why is the package so crinkly?! I have actually addressed the crinkly tissue issue before, but still!  Who determines how many tissues I am allotted?  Why am I allowing them to make such critical decisions for me?  And, back to my eco-consiousness, is the wastefulness of crinkly plastic packaging something that I actually want/need?

 I became inspired to make something new.  A tissue holder just for me.  Okay, me and Mims.  Something fun and funky and small.  What I came up with only holds 3 or 4 tissues, but they can easily be replaced from our large cardboard box of tissues at home. Maybe they don't look quite as pretty as the flat tissues that pop out of the plastic to-go packages, but I don't care.  I don't intend to share them with strangers anyway.

This is my cartoony version of a cold germ.  I thought that the next time I get sick I will really appreciate that    the little guy looks like he feels sorry about it. And it's a good reminder for Mims to wash/sanitize her hands after blowing her nose to keep the germs from spreading.

The Germ Tissue Holder
approx 4" long
Supplies:
Worsted Weight Yarn in Green, Purple, White, and Black (I used Red Heart Super Saver)
Size G hook
Yarn Needle

The Germ Body:
R1: 5 sc in a magic loop, pull tight and sl st the round closed. (5 st)
R2: 2 sc in each st around, sl st the round closed. (10 st)
R3: (2 sc in next st, sc) 5 times, sl st the round closed. (15 st)
R4: (2 sc in next st, 2 sc) 5 times, sl st the round closed. (20 st)
R5: (2 sc in next st, 3 sc) 5 times, sl st the round closed. (25 st)
R6-9: sc in each st around, sl st the round closed. (25 st)
R10: 8 sc, ch 9, 8 sc, sl st the round closed. 
R11: 8 sc, 9 sc evenly spaced over the top of the chain length, 8 sc, sl st the round closed. (25 st)
R12-14: sc in each st around, sl st the round closed. (25 st)
R15: ch 1, (sc 2 st tog, 3 sc) 5 times, sl st the round closed. (20 st)
R16: ch 1, (sc 2 st tog, 2 sc) 5 times, sl st the round closed. (15 st)
R17: ch 1, (sc 2 st tog, sc) 5 times, sl st the round closed. (10 st)
R18: ch 1, (sc 2 st tog) 5 times, sl st the round closed. (5 st)
Fasten off, sew last round closed using the tail of the yarn.  Weave in ends.

The Polka Dots:
(make 9 in purple, 2 in white)
R1: 5 sc in a magic loop, pull tight and sl st the round closed. (5 st)
Fasten off.  Leave a long tail of yarn to sew the polka dots to the germ body.   Sew the white dots near the "mouth" area, and the purple dots randomly around the body.  Weave in ends. 

Using black yarn, make french knots for pupils.  Weave in ends. Stuff with 3 (maybe 4) tissues!


xoxo

Sunday, May 6, 2012

Kelsey

 A tiny version of our black lab Kelsey for my little Mims.  
xoxo

Thursday, May 3, 2012

Every Day is a Good Day.

I am a cancer survivor.  I was diagnosed with Hodgkin's Lymphoma a month after my 29th birthday. I did a course of chemo and radiation, and it worked beautifully.  I have been cancer-free for 7 years (and 1 month)!

Last month my 91-year-old Mema was diagnosed with breast cancer.  It is very slow moving, and not in her  lymph system.  Her oncologist is extremely optimistic about her diagnosis, and she will be cured with a simple mastectomy, which is scheduled for next week.

I was filing her insurance authorization paperwork today in her cancer binder (On a side note, did you know that cancer patients carry a binder to all of their doctors appointments?  That way all of the doctors can see at a glance what all the other doctors are doing.  It's a nifty system.), and it occurred to me how grateful I am that I'm here to take care of her.  How grateful I am that I survived so that I could have Mims, and celebrate birthdays and anniversaries and weddings and brand-new nephews.

Mema needed a new mug wrap to protect her hands from the heat of her morning cup of coffee, so I made her one with a crocheted awareness ribbon button.  I think it turned out really cute, so I'd like to share my pattern with you. I also made a visual tutorial to go with the pattern, grade-school-science-fair-style, all in one picture.

The Awareness Ribbon Button
approx 1" across
Supplies:
Aunt Lydia's Size 3 Crochet Cotton (Black and Pink)
Size D crochet hook
Sharp yarn needle
3/4" safety pins (optional)

R1: 5 sc in a magic loop, pull loop tight and sl st into first sc (5 st)
R2: ch 1, 2 sc in each st around, sl st into first sc to complete round (10 st)
R3: ch 1, (2 sc in next st, sc) 5 times, sl st into first sc to complete round (15 st)
R4: ch 1, sc in each st around, sl st into first sc to complete round (15 st)
Stop.  Get out the pink yarn and embroider the awareness ribbon shape onto the front of the button.  Don't worry about trimming the ends too closely, you can just tuck them inside as you finish the button.
R5: ch 1, (sc 2 st tog, sc) 5 times, sl st into first sc to complete round (10 st)
R6: ch 1, (sc 2 st tog) 5 times, sl st into first sc to complete round (5 st)
Finish off, leaving a long tail.  Flatten button, tucking any stray threads inside before you stitch up the back.  Tack the button together around it's outer edge.  Enjoy your new button!

 I made some that I attached a small safety pin to the back of, so that they could be worn.  I'm planning to give them to my mom and sister, so that we can all show support for my grandma.

I think that these buttons would be great for fundraising, particularly for families that are in crisis who really need donations to help pay for treatments.  You could give the buttons away with any donation to the family, or you could sell them for $2 (or $5 or $20) each, depending on how much money you're trying to raise.  I'm not a fundraising expert by any means, I just think it might work.  I put some on my business cards, and they turned out professional-looking enough that I would have bought one if I'd seen it out in the world, especially for charity.

I made the purple awareness ribbon in the picture for myself.  Purple is the color they use to represent Lymphoma and Leukemia.  I made it to remind myself that today is a really great day.  Every day that I have is a really great day.  Because I get to be here.
xoxo

Tuesday, May 1, 2012

My First Giveaway!

Happy May Day to you all!  I am so excited that today my blog is being featured on Craft Gossip.  I want to share the love and happiness with everyone that comes by today, so I think it's time for a Crochet Dynamite Giveaway!
I recently purchased a metal punch, which has solved the problem that I was having with my mason jar lids  (unsurprisingly, a crochet top just doesn't protect the carpet very well when your jar of iced tea gets kicked over, assuming that the crochet lid doesn't fall into the tea all on it's own.).  Amazingly enough, if you punch a straw-sized hole in a canning lid, you get all of the convenience of a fast-food cup, but it's super eco-responsible (except for the straws, but that's something we'll address at a later date...).
So I would like to giveaway a set of 4 punched lids, so that you can enjoy Playdoh-free iced tea all summer long, with no worries about what will happen if the dog knocks over your jar...
I think you need a Jar Sock (still not sure about that name...) to go with the lids.  I'm not going to actually send the wide mouth quart-sized canning jars because I don't want them to break, and I have no confidence in my shipping skills.

I made the bee set to go together, so I have to send a Fancy Pen to go with the Jar Sock and lids!  It would be weird to separate them. I really like how the pen turned out with the bee charm.  Very fancy!

If you would like to be entered in the giveaway drawing, please leave a comment below.  Of course, I would love it if you wanted to follow my blog, so I will enter you twice if you follow me (and become a Crochet Dynamo!). If you want a third entry, you could like it on Facebook, +1 it on Google Plus, or blog about the giveaway.  Let me know in your comment which of the things you have done!

I am going to keep this giveaway open until 11:59 pm Friday, May 4th, so let your friends know (I bet they would share the prize with you!).  I will do the random drawing on Saturday morning. Please make sure that you leave an email address so that I can contact you if you win.  

I am so grateful that you've taken the time to look at my blog.  I hope that my patterns are fun and easy to follow, if they aren't, please leave me a comment or send me an email (CrochetDynamite@gmail.com) so that I can update the pattern to make the instructions more clear.  I would also love a picture if you actually make something from one of my patterns! I would love to post it, so everyone can see what you made (with your permission, of course)!  Thank you so much, Crochet Dynamos, you have made my day!
xoxo


Related Posts Plugin for WordPress, Blogger...