
The first one I made used up leftover yarn from two other projects, but I wasn't sure exactly how much yarn I actually used. This one I made with brand spankin' new skeins, so I can say with absolute confidence, you need about two skeins. If you want to use two different colors (or more) please make wider stripes than I did, or you will find yourself running back to the craft store mid-project. Heed my warning, two full skeins!!
If a large project bag sounds like your cup of (English Breakfast) tea, give it a try!
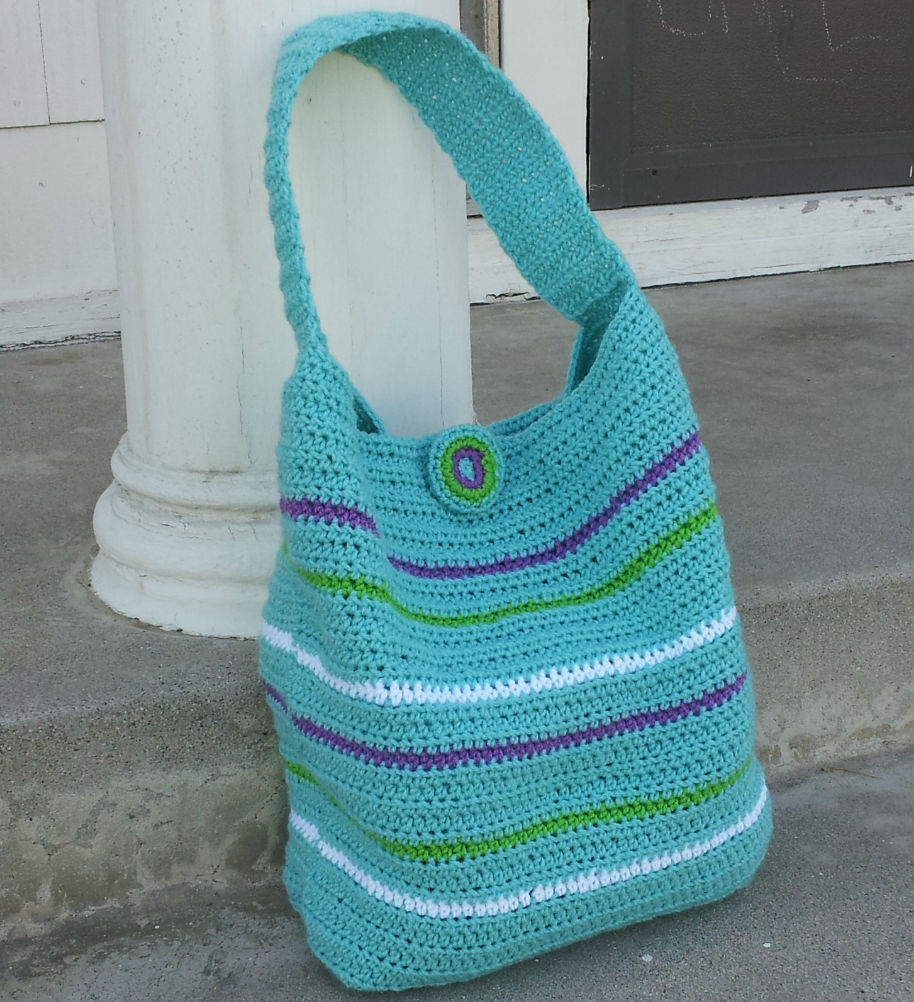
The London Crochet Bag
approx. 16" tall, 11" wide (across front), 6" deep (across side)
Supplies:
2 skeins of Red Heart Super Saver Yarn (or other cheap worsted weight yarn, in a color that makes your heart sing!)
Size G crochet hook
Yarn needle (I use the Chibi needle with the bent tip, you can use whatever works for you)
Main Bag Body:
Ch 61.
R1: hdc in 2nd ch from hook, hdc across all ch, ch 1, turn (60 st)
R2-40: hdc across all st, ch 1, turn. (60 st)
R41: sl st across 10 st, ch 1, 40 hdc, ch 1, turn. (40 hdc st)
R42-50: 40 hdc, fasten off. (40 st)
R51: using the now broken off piece of yarn, ch 10, hdc across the 40 st from row 51, ch 11, turn. (60 st)
R52: hdc in 2nd ch from hook, 9 hdc in ch spaces, 40 hdc, 10 hdc in ch spaces, ch 1, turn. (60 st)
R53-87: hdc across all st, ch 1, turn. (60 st)
R88: (button hole row) 24 hdc, ch 12, 24 hdc, ch 1, turn (60 st)
R89: 24 hdc, 12 hdc across ch space, 24 hdc, ch 1, turn. (60 st)
R90: hdc across all st, fasten off.

Ch 11.
R1: hdc in 2nd ch from hook, hdc across all ch, ch 1, turn (10 st)
R2-39: hdc across all st, ch 1, turn. (10 st)
R40: hdc across all st, fasten off.
Button:
R1: using a magic loop, sc 7 st, sl st to first sc to join round. (7 st)
R2: ch 1, 2 sc in each st around, sl st to first sc to join round. (14 st)
R3: ch 1, (2 sc in next st, sc) 7 times, sl st to first sc to join round. (21 st)
R4-6: ch 1, sc in each st around, sl st to first sc to join round. (21 st)
R7: ch 1, (sc 2 st tog, sc) 7 times, sl st to first sc to join round. (14 st)
R8: ch 1 (sc 2 st tog) 7 times, sl st to first sc to join round. (7 st)
Fasten off. Weave in end from magic loop, making sure to tighten and secure it. Flatten button into a disc shape. Using the tail from R8, tack the flattened disc together in a few places, trying to keep your stitches invisible on the front (good side) of the button. Weave in end on the back.
Whipstitch the sides of the bag together, matching stripes if you chose to make any.


When you get the sides sewn, open the bag up and flatten the side along the open area of the bottom of the bag. This is what makes the bag sit flat. Whipstitch the bottom edge together. Weave in ends.
Center the short edge of the strap along the side seams, and whipstitch into place, making sure to put several extra stitches in each edge corner for added strength. Weave in ends.
Using buttonhole as a guide, center and sew on button.
xoxo
ed. 7/10/12: Want to see the bag in more colors? Check out the Dynamo Gallery! Finished a bag and want to show it off? Send me a picture at CrochetDynamite@gmail.com to be featured in the Dynamo Gallery!
xo Jaime
7/11/12: Washed and dryed the bag in my machines. No special settings, just threw it in with a load of Mims's clothes. It came out great! No problems at all. Thank you, Libby, for asking about how to wash it!
7/13/12: I've gotten 2 emails in 2 days (Hi Ginny and Rebekah!) about R51. This is the general gist of the question:
I got through row 50 and fastened off, but I'm a little confused by what you mean by "using the now broken off piece of yarn." Was I supposed to fasten off leaving a long tail? Or do I make a new foundation chain? I see in the pictures that its' made in like one piece and then sewn together, I'm just not sure how to start making the long sides again from the short one I just finished. Does that question make sense? I'm still a novice crocheter so that's mostly why I'm stuck. Thanks in advance for any help you can give me! (Thanks for letting me use your email, Rebekah! Double Dynamo points to you!)
I figure that if these Dynamos had this question, some others of you might have wondered it too. Here's my answer:
I had you fasten off the yarn at the end of R50 so that you could start R51 by chaining 10 (a new foundation chain to add the 10 stitches back on that I had you drop off during R41). Then with the chain stitches on your hook, you're going to hdc in each stitch across the main bag body piece, and then chain 11 to finish the row. This puts the extra stitches that will become the sides of your bag back on. You shouldn't have to sew any part of the bag together, except the side seams and the handle. R51 ends with 61 stitches (10 chain st, 40 hdc's attached to the main bag piece, and then 11 more chain stitches). That's how you add the long sides back on after the shorter bottom section.
I am super sorry that I wasn't more clear in my instructions. I think that your question was really good, and I hope that I answered it in a way that didn't confuse you more. Please don't hesitate to email me if you need more clarification.
I hope this answers your question too, Dynamos. And that last line pertains to you as well, please don't hesitate to email me if you need more clarification (on this pattern, or any of my other patterns!). I'm still learning how to write patterns, so all the feedback that you give only helps me to produce better work. Love to you all!
xo Jaime

This is a gorgeous bag. I love your colour choices and the way you've designed it and then pieced it together is really unique. I think I need to give this one a try!
ReplyDeleteHi Fiona!
DeleteThank you so much! I hope you do make one. I have packed mine (2!) with so much stuff, I may need to make another as well!
Jaime
This is a wonderful pattern but I'm still stuck at the R51. I just cannot figure out what I'm doing to keep that row even. Do you use the long tail of the broke R50 end to change 10 and then turn and go across the main body to the last 50hdc and change 11 and then start the next line? I apparently don't understand your technique. Could you please show us how to get past that part.
Deletejanet.wesson@yahoo.com Thanks Jaime!
Love it! I want one! :)
ReplyDeleteTeach me!
I love this! Beautiful color choices too. This will be on my to-do list for summer crafts. Thanks for sharing!
ReplyDeleteThank you so much for checking it out, Sherrie! It would make a perfect bag for summer. It's big enough to hold all the stuff you need when you go to the pool!!
DeleteJaime
Can I possibly make this without the button hole? Aside from that, this is the perfect pattern I've been looking for! Thanks so much!! :D
ReplyDeleteIt would be really simple to just hdc across the row, instead of making the button hole. In that case, your new instructions are:
DeleteR53-89: hdc across all st, ch 1, turn. (60 st)
R90: hdc across all st, fasten off.
LOL!! Easy peasy, no button hole! If you make the bag, I'd love to see a picture of it.
Jaime
Hmmm... I just might have to give this one a try! Thanks!!!
ReplyDeleteThanks for checking it out, kpmomma! Glad you stopped by!
DeletexoJaime
I love this bag! I love to use big bags as purses, and this looks like it's going to be perfect for me. :) I think the only difference I'll make in mine is to put a pocket on the front. Thanks for making such a great bag & making the pattern available for free.
ReplyDeleteThis bag is huge! A pocket on the front is a brilliant idea, I want to add one to my bag too!
DeleteThank you for your kind words, it really means a lot to me!
xoJaime
Very nice! I will definately give this one a try. In the same colors too!!!!
ReplyDeleteThank you for the pattern.
wonderful gonna make me one thanks vicky
ReplyDeleteI just found your blog by accident this morning while I was going thro' emailed crochet projects. I love this bag!! Then I got reading your blog and love that too. You have a great sense of humour -- I'm 'following'. Thanks for giving me my morning giggle :)
ReplyDeleteHi Anna and Vicky! I hope you will send me pictures when you're finished. I'd love to get a pattern gallery going with all the finished bags!
ReplyDeleteHi Sharon! You just made my day! Thank you so much for 'following' too! I am really glad that you found me by accident! ;D
I hope you all have an absolutely wonderful day!
xoxo Jaime
Oh very nice I love the colors too, I think I will give this a try.
ReplyDeleteHi Deb! Thanks for checking it out!
Deletexo Jaime
How often do you stripe? I would like to stripe mine evenly, is it every 10 rows or what? I love this bag, I'm making mine in Stl Cardinals colors an adding the cardinals patch.
ReplyDeleteHi Trisha! Good question, since my stripes aren't done evenly. I did the first 8 rows in the main color, then I started the stripes. If you wanted to do thicker stripes, you could switch colors every other row, which would give you 6 coordinating color stripes (rows 9-10, 13-14, 17-18, 21-22, 25-26, 29-30)and then 10 rows to the bottom of the bag, before you start the short rows. OR, you could get a really cool bag by doing the whole thing in every-other-row stripes. There are only 40 rows on each side of the bag, so there's not much room to stripe.
DeleteAre you planning to use Navy, Red and White? What did you have in mind?
I'm using navy for the stripes and red for the rest.
DeleteSounds like it's going to look amazing! I'd love to see it when you finish! :D
Deletexo Jaime
Thanks for a pattern that looks easy, practical, but pretty, too!
ReplyDeleteAw, thanks greaterexp! I'm glad you checked it out!
Deletexo Jaime
Hi Jaime,
ReplyDeleteLove the bag, have the yarn and am starting the project tonight. I'm curious if you have ever washed your bag?Gentle cycle, low dry temp maybe. What do you think? Thanks for the pattern and the feedback. --Libby
You know, I haven't washed either of mine yet, but I made mine out of super saver acrylic, so I personally wouldn't hesitate to throw them in the washer and dryer. Okay, I will do a science experiment tonight. I'm washing and drying one. Just straight up, with the laundry tonight. I will let you know in the morning how it goes... GREAT question, Libby!!!
Deletexo Jaime
It came out awesome!!! Perfect, the yarn looks great, and now it smells amazing too! ...not that it smelled bad before, but now it smells like fresh laundry... It's a little softer than it was before I washed it, but I like that.
Deletexo Jaime
Oh, great! I read about acrylic yarn that it needs to go in the dryer to regain its shape! So, no worries about tossing it in the dryer, that is what is supposed to happen to it. I figured I would end up with something getting messed up inside mine...chocolate, probably, imagine that!...so being able to wash it would be important. Thanks for your quick response! --Libby
ReplyDeletehehe, thanks for my points! your help was greatly appreciated and the bag is coming together great now! I'm on the strap and the button stage! Thanks again, you're awesome!
ReplyDelete--Rebekah
Yes, someday those points are going to be valuable... LOL!!! Thanks again for letting me use your email.
DeleteI would love to see a picture when you finish the bag!!! I'll put it in the Dynamo Gallery and link it to your blog, if you'd like!
xo Jaime
I will be making this bag for sure! Maybe just a little smaller, I don't carry much with me. But I still want the bag! Thank you for sharing your pattern!
ReplyDeleteI think you'll be able to customize it pretty easily. If you took 15 rows off of each side, it would be shorter but it would still look good. So just skip R26-40 and R73-87... Or change it however you like... LOL!!!
Deletexo Jaime
Wow thats an awesome bag.. im a beginner crocheter and it looks like something i can tackle if i go slow and row by row.. u think it would look just as good in cotton too?? thanks for shareing this !!
ReplyDeleteSusie
Hi Susie! I think it would look awesome in cotton, but it will be heavy. It would be a perfect beginner project, and if you run into any problems you can always send me an email.
Deletexo Jaime
Hi there, I have finished the body and the strap, but I am completely lost on the button. Row 3 confuses me, because I end up with 28 stiches, not 21. What I interpreted was two single crochets in one space, then 1 in the next space. Is how I am reading this wrong, since my number of stiches in the end don't add up? Sorry about the confusion, and thanks for a great pattern!
ReplyDeleteHi Eva! You're reading it correctly, 2 sc in one space and 1 sc in the next, which should only add 7 additional stitches to the row. I wish I could see what you've got going on there. Do you want to email me a picture?
Deletexo Jaime
Hi Jamie,
ReplyDeleteI'm still confused about Row 51.
Jamie, This is your response to Ginny and Rebekah regarding Row 51.
"I had you fasten off the yarn at the end of R50 so that you could start R51 by chaining 10 (a new foundation chain to add the 10 stitches back on that I had you drop off during R41). Then with the chain stitches on your hook, you're going to hdc in each stitch across the main bag body piece, and then chain 11 to finish the row. This puts the extra stitches that will become the sides of your bag back on. You shouldn't have to sew any part of the bag together, except the side seams and the handle. R51 ends with 61 stitches (10 chain st, 40 hdc's attached to the main bag piece, and then 11 more chain stitches). That's how you add the long sides back on after the shorter bottom section"
I need more clarification on this one please. After I chain 10, (which is the new foundation chain), how do I add the 10 stitches back on that I slip stitched from Row 41? Row 41 says: sl st across 10 st, ch 1, 40 hdc, ch 1, turn.
Hi Wanda! Are you at Row 51? Good. This is much easier that you think. Start R51 by chaining 10 (a new foundation chain). Then with the chain stitches on your hook, you're going to hdc in each stitch across the main bag body piece, and then chain 11 to finish the row.
DeleteThat's it. All of 60 stitches are back on. Don't worry about what you did on R41, that was just to take them off. Okay? Hope this has clarified it for you. Please feel free to email me if you have any more questions.
xo Jaime
I just made a bag per your instructions and it came out much smaller, approx 12" tall, 14" across, and 4" deep. Also the buttonhole was huge and the button tiny so I had to add to the button. Also, to make the strap usable I ended up doing 120 rows total. I'll post a pic soon. I'm making another bag, this time with an H hook and I'll measure to 16" before I decrease; I think it'll end up being closer to 60 rows than 40.
ReplyDeleteHow bizarre! Hmm. I am so sorry to hear that. Maybe you crochet tighter than I do? You know what, let me do a gauge swatch today and get back to you before you start the next one. You might have to go up to an I hook...
Deletexo Jaime
Okay, so I've done a swatch and I'm getting this gauge for the bag:
Delete13 stitches = 4 inches
10 rows = 4 inches
I used Red Heart Super Saver worsted weight yarn and a size G hook. Hope this helps you next time!
xo Jaime
Hi Jamie,
ReplyDeleteThanks so much for these great instructions! I'm halfway through my bag - just finished the 40stitch rows and I'm about to start the button hole side.
Just a note, so far, mine seems to match your sizing. :)
I'm curious about something... Maybe my math is wrong... But is the button hole side 1 row shorter than the solid side? I am going to follow my pattern by rows because I used stripes... But I'm curious if i were doing solids.. It seems like row 51 is just another row of the base of the bag, plus the chains. Where row 1 is actually a full row of HDC's?
I'm pretty new to crochet, so this feels like a rather advanced (more like time consuming) project than dishcloths and coasters! ha! :)
Thanks for your great blog. I'm looking forward to trying some of the other projects too! Lipbalm Keyrings seem like an awesome stocking stuffer! :)
Hi Jenn! LOL!! You are correct. The buttonhole row kinda stretches things out at the top, so the one row difference doesn't show. If you need it to line up perfectly because of striping, you can eliminate one of the short bottom-of-the-bag rows.
DeleteAnd it really IS way more time consuming than coasters!
xo Jaime
Thanks, Jaime!! :)
DeleteI noticed that in this pattern and in another pattern, you mention a "magic loop" to start your button. What is this "magic loop" you are talking about? I am making this for a wheelchair tote so I will probably use 2 handles on each side so they can be put on my wheelchair handles.
ReplyDeleteHi Cynthia! Planet June has a great tutorial on how to make a magic loop (also known as a magic ring). Here's the link:
Deletehttp://www.planetjune.com/blog/tutorials/magic-ring-right-handed/
This should get you started! :D
xo Jaime
I have a question. Would the bag end up entirely too gigantic if I used a size H hook instead? I'm using size G but it gets stuck in between the little strands that make up the yarn (I totally just went blank on what they're actually called). So, if I used H would it turn out okay?
ReplyDeleteHi Kaleigh! Switch to an H hook, girly! It'll be fine. Slightly larger, but not significantly. It'll be fine. Can't wait to see a pic when you're done!
Deletexo Jaime
YAY. Thank you for answering so quickly! You have made my life MUCH easier. :)
DeleteI appreciate the distraction! I'm supposed to working on a pattern, so I was excited to get to take a break! LOL!!
Deletexo!
Love the bag, sent you a photo, not as big as I like so planning on making another one, will line the next one. Going to do the Tardis bag for oldest daughter who is a DR Who nut lol will line it with a striped fabric in colors close to his scarf.
ReplyDeleteThat sounds AWESOME! I've been super-sick and haven't made it through all the emails yet. Can't wait to see the picture!
Deletexo Jaime
Love it! I'm going to try it!! I'm new at crocheting, but I'm having so much fun looking at projects and planning for my next one.
ReplyDeleteHi Ohio Grandma!
DeleteOh, I'm glad you like it!!! Most of my patterns should be perfect for you!
xo Jaime
I love the look of this bag! I'm making mine in 4 rows of brown, 2 rows of yellow, and 4 rows of navy repeating. I am also using Red Heart super saver yarn. Except my yellow is a silky different yarn to add some texture. I was reading through the comments and I'm having the same problem someone else ran into. My gauge is too small. I have 3 inches to 10 rows and 3 inches to 13 stitches. I must crochet much tighter than you! It is 15.5 inches wide, which confuses me because I have 60 stitches and you say yours is 11 inches across the front. Will it get smaller when I sew it together with the bottom? If not, that's ok. I like a big bag! Also, I figure if I add 2 more blocks of my rows to each end of the flat bag (20 rows total) it should even out the shape. Does that make sense? If so do you agree? Thanks for a great pattern and all your extra help and advice!
ReplyDeleteHi lb91011! Ooh, your bag sounds beautiful! Okay to answer your question, yes when you sew the side seams and the bottom, that will make the front of your bag smaller (since part of the front now becomes the side of your bag). I think that the extra rows could look really cool. I would totally try it.
DeleteHope this helps!
xo Jaime
Thank you for this pattern. I was very excited to get started on it using some leftover yarn. I was also confused on R50 but your clarification was great! My button hole also was very large but figured out something on my own that worked out (may not be done right, but it works...lol).
ReplyDeleteI do have a question....I'm stitching up the sides and was wondering if I do this "wrong" side out? I noticed that the opposite side I'm working on looks better. Not sure if I missed where this was said. :)
Thanks!
Hi VirtuousMama! I stitched my sides together right side out, but I held them flat next to each other as I did it. I didn't include that in any of my instructions! LOL!! You didn't miss anything. If it looks better stitching it wrong side out, I would totally do that!
Deletexo Jaime
Loved the pattern .Bag came out very well .
ReplyDeleteThank you for the pattern
Can we have the permission to sell what we make from pattern.
Thank you
Hi! I'm glad the bag turned out well. Yes, you can sell what you make with my blessing! Thank you for asking!
Deletexo Jaime
I love this bag so easy to make I'm making my fourth one I have 1 myself. + the others iv made have been for my daughter + 2 of her friends thanks for posting this pattern xx
ReplyDeleteJamie;) Thank you for the tutorial and, more important, for your sweet, kind, and patient answers to frustrated crocheters;)
ReplyDeleteAwesome pattern! This looks like sooo much fun to make! I'm giving it a try RIGHT NOW! =D And OMG! Tomorrow I am seriously printing out a coupon and making a trip out to get some Caron (one pound) "Royalty" so I can make the Tardis version, as well! That is soo cool! (You probably already know about this, but here are some awesome and accurate Dr. Who scarf patterns! http://wittylittleknitter.com/)
ReplyDeleteIf you'd like, check out my patterns at freepatternsbyh.blogspot.com (I would love to return the favor by providing you with some free patterns you might enjoy. Also - feel free to send a request and I'll try to make a crochet pattern for you!) =D
1st attempt was a serious fail :( Tried to double the stitch count & it made it way to big, then I whip stitched the bottom wrong, and then my strap was twisted when whip stitching it,lol. Guess I'll use it for laundry bag & try it again, only following it exactly as written.
ReplyDeleteI can't wait to make this. I'm going to use cotton. I can't use super saver. It makes me itch. And I hate changing yarn so I use a lot of self striping yarn. I have a bright orange, yellow, white that will be great.
ReplyDeleteGorgeous! I am a beginner who has crocheted only few strips in her life, but I really love the bag and want to try it.
ReplyDeleteI came upon this bag by accident and am I thrilled that I did! I am on my second one. Your directions were ingenious! I love the once piece pattern. I lined mine! First one was for me! Thanks so much for sharing this wonderful bag! Love, love the button too!
ReplyDeleteI can't wait to make this bag! I have recently semi retired so i am having fun with the crocheting.
ReplyDeleteFor the whip stitch, do you turn the bag inside out to do it, or leave it right side out?
ReplyDeleteCould we stripe just one side? I mean do you think it would look ok?
ReplyDeleteThank you for posting the free pattern! It is lovely:) I have included it on my blog Karla's Making It (linking to your pattern, of course)! You can view it here http://www.karlasmakingit.com/free-crochet-patterns/free-crochet-purse-and-bag-patterns/
ReplyDeleteGoing to try it in cotton yarn......gorgeous pattern, smart lady.
ReplyDeleteLove this bag - so cute!! Thanks for the great pattern. Love your colors as well. Great job!
ReplyDeleteHi Ladies,
ReplyDeleteI have a problem with row 88. I assume after I get to row 88 I should still have 60 stitches across which I do. I know this sounds dumb but I am a new crocheter and still learning. If I HDC 24 stitches, then chain 12, then another 24 HDC I end up with 12 stitches at the end. Am I supposed to be counting the ch.12 has part of the 60. Whats going on?
Hi, I love your London bag.One day I would like to make it. I'm very interested in your crochet towards your diploma. I've not decided yet. I need to ask if your blog is still going as I can't see any new blogs (sorry if not looking in the right place). Did you finish the whole course and how did you feel after finishing?
ReplyDeletePlease advise.
Cathy x
Could you please send me the rows you changed colors on. I'm trying to figure it out from the picture, but want to be sure I fit all the colors in. I am using the same colors. I love the way it's turning out.
ReplyDeleteThanks a bunch. Doreen
Bless you for coming up with a simple pattern that doesn't involve making circles for the base and is all in one piece (except the handle)!
ReplyDeleteThank you so much for this pattern it's awesome.! I just finished it.
ReplyDeleteI really do appreciate your explanation about the second half of the bag. Your very patient and smart.
I can't wait to show it off.:)
Hi. I am self taught and always wonder which side is the right side.?
ReplyDeleteI've made this bag twice, once regular sized and another one about half sized. I may try to make another one for a walker bag with 2 smaller handles or maybe 4 ties to attach it to the walker.
ReplyDeleteI love this bag
ReplyDeleteyour site is amazing …
ReplyDeletevisit this site https://diyeasycrafting.com/
you also will like this.
Do you have a video of yourself making this?? I was able to follow up to Row50, but after that, it got a bit complicated, at least for me.
ReplyDelete