Google+
Showing posts with label London. Show all posts

Thursday, September 20, 2012

Tardis Bag Strap

Welcome back to some more Dr. Who fun!  We made the bag part of the Tardis Bag last Tuesday, so today I'm going to show you how I made the Tardis Bag Strap.   The top of the strap was made using a quasi-tapestry crochet technique where I carried the yarn across the back of the piece.  This makes the wrong side Uh-huh-huh-huh-gleeee (that's 'really super ugly' to those of you who don't speak Jaime gibberish)!  So that's why we've got second piece to cover the ugliness up.  And it makes the strap stronger and less prone to stretch all out of shape.


This is my first attempt at charts.  I made my charts going from the top down (row numbers down the sides), but on my large strap charts I also numbered the stitches across the top. Please don't let this confuse you.   I'm not going to re-do them, since this is a free pattern, but I would love to know, was I supposed to do the chart from the bottom up?  I made mine go from top down, because my blog posts scroll from the top down, and I thought it would be inconvenient and more confusing if I made them go from the bottom up.  But now I don't know.


I made 3 different straps.  I made a big strap for the LCB version that looks exactly like the Tardis, and I made a thinner strap that looks a little less authentic, but is more appropriately sized for the smaller purse-sized bag in both a shoulder bag size and a longer crossbody size.  If you want, you can ditch the charts and just make a plain black strap for either of the bags, and I think they would still look really cool.

**IMPORTANT:  All charts are worked in single crochet.  Carry the yarn on the back of the piece, since we're going to cover all the loose threads up.  You can cut the white yarn between charts to keep the white from pulling weirdly on the piece from the back.  It's going to look wonky up close, so if you are working on the strap and think that it's turning out horrible, go get an iced tea, and take a break from it.  When you come back, look at it from across the room.  It will look much better.**


Tardis LCB Strap - front
approx 35" long
Supplies:
Worsted weight yarn in Black and White (I used Red Heart Super Saver 100% acrylic in black and white)
Size G hook
Yarn needle
Scissors

using Black ch 14
R1: sc in 2nd ch from hook, sc in each ch space across (13 st)
R2-3: ch 1, sc in each st across (13 st)
R4-32: work LCB CHART A (13 st)
R33-35: using black, ch 1, sc in each st across (13 st)
R36-56: work LCB CHART B (13 st)
R57-59: using black, ch 1, sc in each st across (13 st)
R60-82: work LCB CHART C (13 st)
R83-85: using black, ch 1, sc in each st across (13 st)
Fasten off.  Weave in ends.

LCB CHART A

LCB CHART B

LCB CHART C

Tardis LCB Strap - Back

Using Black, ch 14
R1: sc in 2nd ch from hook, sc in each ch space across (14 st)
R2-85: ch 1, sc in each st across (14 st)
Fasten off.  Weave in ends.


Finishing strap:
Match front and back pieces with wrong sides together (to cover up all the loose threads!).  Pin in place. 
Using Black yarn, sc the 2 straps together along one of the long sides, using 1 stitch for each row.  Fasten off.  Repeat along the other long side.  
Center the strap along the top sides of the Main Bag (use the side seam as a guideline for centering the strap). Whipstitch the edge of the strap to the edge of the bag.  Repeat on the other side. Weave in ends.


Tardis Bag (Purse-Sized) Shoulder Strap- Front 
approx 35" long
Supplies:
Worsted weight yarn in Black and White (I used Red Heart Super Saver 100% acrylic in black and white)
Size G hook
Yarn needle
Scissors

using Black ch 6
R1: sc in 2nd ch from hook, sc in each ch space across (5 st)
R2-5: ch 1, sc in each st across (5 st)
R6-31: work CHART A (5 st)
R32-36: using black, ch 1, sc in each st across (5 st)
R37-57: work CHART B (5 st)
R58-62: using black, ch 1, sc in each st across (5 st)
R63-77: work CHART C (5 st)
R78-82: using black, ch 1, sc in each st across (5 st)
R83-95: work CHART D (5 st)
R96-100: using black, ch 1, sc in each st across (5 st)
Fasten off.  Weave in ends.

CHART A

CHART B

CHART C

CHART D

Tardis Bag (Purse-Sized) Shoulder Strap - Back
Using Black, ch 6
R1: sc in 2nd ch from hook, sc in each ch space across (5 st)
R2-100: ch 1, sc in each st across (5 st)
Fasten off.  Weave in ends.

Finishing strap:
Match front and back pieces with wrong sides together (to cover up all the loose threads!).  Pin in place. 
Using Black yarn, sc the 2 straps together along one of the long sides, using 1 stitch for each row.  Fasten off.  Repeat along the other long side.  
Center the strap along the top sides of the Main Bag (use the side seam as a guideline for centering the strap). Whipstitch the edge of the strap to the edge of the bag.  Repeat on the other side. Weave in ends.


Tardis Bag (Purse-Sized) Crossbody Strap - Front
approx 45" long
Supplies:
Worsted weight yarn in Black and White (I used Red Heart Super Saver 100% acrylic in black and white)
Size G hook
Yarn needle
Scissors


using Black ch 6
R1: sc in 2nd ch from hook, sc in each ch space across (5 st)
R2-30: ch 1, sc in each st across (5 st)
R31-51: work CHART A (5 st)
R52-56: using black, ch 1, sc in each st across (5 st)
R57-77: work CHART B (5 st)
R78-82: using black, ch 1, sc in each st across (5 st)
R83-97: work CHART C (5 st)
R98-102: using black, ch 1, sc in each st across (5 st)
R103-115: work CHART D (5 st)
R116-145: using black, ch 1, sc in each st across (5 st)
Fasten off.  Weave in ends.

Tardis Bag (Purse-Sized) Crossbody Strap - Back

Using Black, ch 6
R1: sc in 2nd ch from hook, sc in each ch space across (5 st)
R2-145: ch 1, sc in each st across (5 st)
Fasten off.  Weave in ends.

Finishing strap:
Match front and back pieces with wrong sides together (to cover up all the loose threads!).  Pin in place. 
Using Black yarn, sc the 2 straps together along one of the long sides, using 1 stitch for each row.  Fasten off.  Repeat along the other long side.  
Center the strap along the top sides of the Main Bag (use the side seam as a guideline for centering the strap). Whipstitch the edge of the strap to the edge of the bag.  Repeat on the other side. Weave in ends.

Okay, so for those of you who are making the unlined button-closure versions, you are now done!  Yippee!  For the rest of you, you fabric-lining darlings, I will see you on Saturday!  Bring a lining fabric (I'm going to use white cotton!) and your knit pickers.  

xoxo

Thursday, May 10, 2012

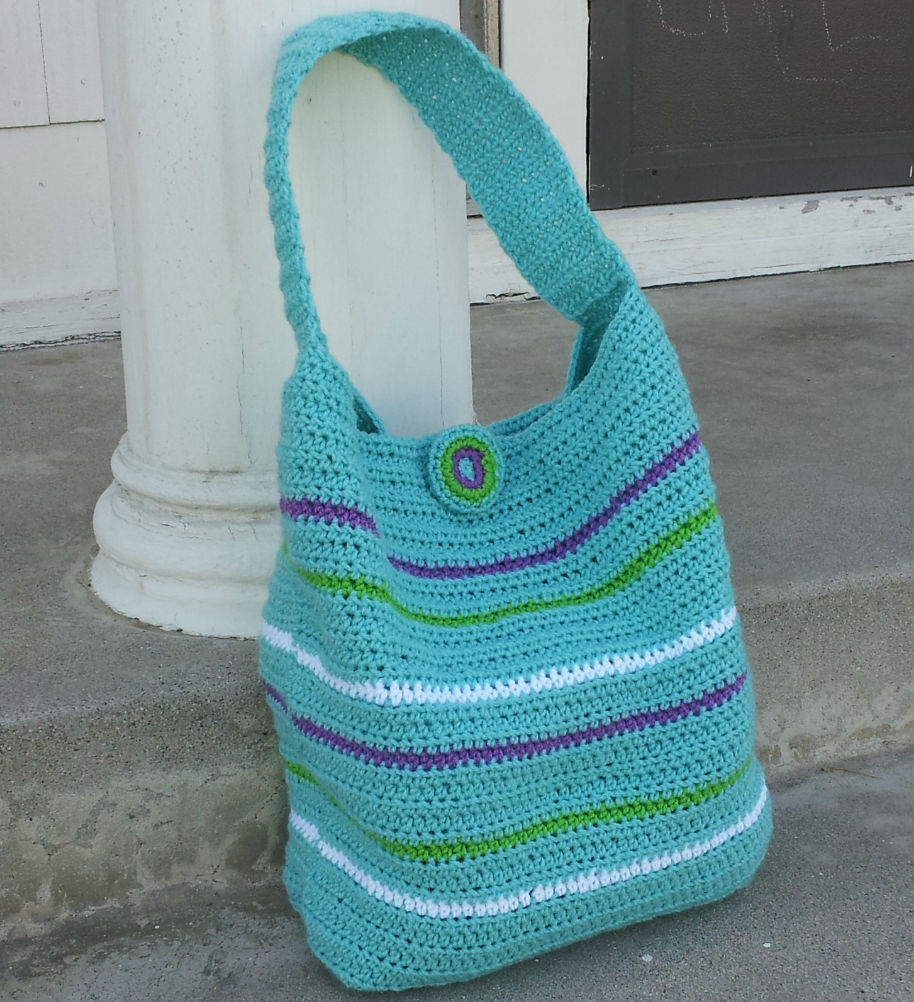
The London Crochet Bag

Cheerio!  I am not in London, nor have I gotten to crochet in London, but this bag is based on one that my sister-in-law bought the last time that we took a family vacation to London.  Thus, it is The London Crochet Bag.  It is the inspiration for my fast and easy crochet buttons.  In that post, I said that I would write up the pattern if anyone was interested.  I got a request for it!!! Yippee!!  (I am not going to apologize for being excited, I design and blog in an isolated bubble.  You can't comment too much for me!!)

The first one I made used up leftover yarn from two other projects, but I wasn't sure exactly how much yarn I actually used.  This one I made with brand spankin' new skeins, so I can say with absolute confidence, you need about two skeins. If you want to use two different colors (or more) please make wider stripes than I did, or you will find yourself running back to the craft store mid-project.  Heed my warning, two full skeins!!
Also, use cheap yarn.  I used Red Heart Super Saver, because it's not soft, and it makes a dense fabric.  You won't need to line it, and it will hold it's shape fairly well.  This isn't the project for your beautiful, soft, specialty yarns.  This is a workhorse bag, pretty, but more importantly, functional. The bag in the picture is holding the leftover (virtually whole) purple, lime and white skeins from this project.  It's a biggie!

If a large project bag sounds like your cup of (English Breakfast) tea, give it a try!

The London Crochet Bag
approx. 16" tall, 11" wide (across front), 6" deep (across side)
Supplies:
2 skeins of Red Heart Super Saver Yarn (or other cheap worsted weight yarn, in a color that makes your heart sing!)
Size G crochet hook
Yarn needle (I use the Chibi needle with the bent tip, you can use whatever works for you)

Main Bag Body:
Ch 61.
R1: hdc in 2nd ch from hook, hdc across all ch, ch 1, turn (60 st)
R2-40: hdc across all st, ch 1, turn. (60 st)
R41: sl st across 10 st, ch 1, 40 hdc, ch 1, turn. (40 hdc st)
R42-50: 40 hdc, fasten off. (40 st)
R51: using the now broken off piece of yarn, ch 10, hdc across the 40 st from row 51, ch 11, turn. (60 st)
R52: hdc in 2nd ch from hook, 9 hdc in ch spaces, 40 hdc, 10 hdc in ch spaces, ch 1, turn. (60 st)
R53-87: hdc across all st, ch 1, turn. (60 st)
R88: (button hole row) 24 hdc, ch 12, 24 hdc, ch 1, turn (60 st)
R89: 24 hdc, 12 hdc across ch space, 24 hdc, ch 1, turn. (60 st)
R90: hdc across all st, fasten off.
Strap:
Ch 11.

R1: hdc in 2nd ch from hook, hdc across all ch, ch 1, turn (10 st)
R2-39: hdc across all st, ch 1, turn. (10 st)
R40: hdc across all st, fasten off.

Button:
R1: using a magic loop, sc 7 st, sl st to first sc to join round. (7 st)
R2: ch 1, 2 sc in each st around, sl st to first sc to join round. (14 st)
R3: ch 1, (2 sc in next st, sc) 7 times, sl st to first sc to join round. (21 st)
R4-6: ch 1, sc in each st around, sl st to first sc to join round. (21 st)
R7: ch 1, (sc 2 st tog, sc) 7 times, sl st to first sc to join round. (14 st)
R8: ch 1 (sc 2 st tog) 7 times, sl st to first sc to join round. (7 st)
Fasten off. Weave in end from magic loop, making sure to tighten and secure it. Flatten button into a disc shape.  Using the tail from R8, tack the flattened disc together in a few places, trying to keep your stitches invisible on the front (good side) of the button. Weave in end on the back.

Whipstitch the sides of the bag together, matching stripes if you chose to make any.


When you get the sides sewn, open the bag up and flatten the side along the open area of the bottom of the bag. This is what makes the bag sit flat.  Whipstitch the bottom edge together.  Weave in ends.

Center the short edge of the strap along the side seams, and whipstitch into place, making sure to put several extra stitches in each edge corner for added strength. Weave in ends.

Using buttonhole as a guide, center and sew on button.

xoxo

ed. 7/10/12: Want to see the bag in more colors?  Check out the Dynamo Gallery!  Finished a bag and want to show it off?  Send me a picture at CrochetDynamite@gmail.com to be featured in the Dynamo Gallery!
xo Jaime

7/11/12: Washed and dryed the bag in my machines.  No special settings, just threw it in with a load of Mims's clothes.  It came out great!  No problems at all.  Thank you, Libby, for asking about how to wash it!

7/13/12: I've gotten 2 emails in 2 days (Hi Ginny and Rebekah!) about R51.  This is the general gist of the question: 
I got through row 50 and fastened off, but I'm a little confused by what you mean by "using the now broken off piece of yarn." Was I supposed to fasten off leaving a long tail? Or do I make a new foundation chain? I see in the pictures that its' made in like one piece and then sewn together, I'm just not sure how to start making the long sides again from the short one I just finished. Does that question make sense? I'm still a novice crocheter so that's mostly why I'm stuck. Thanks in advance for any help you can give me! (Thanks for letting me use your email, Rebekah!  Double Dynamo points to you!)


I figure that if these Dynamos had this question, some others of you might have wondered it too.  Here's my answer:

I had you fasten off the yarn at the end of R50 so that you could start R51 by chaining 10 (a new foundation chain to add the 10 stitches back on that I had you drop off during R41). Then with the chain stitches on your hook, you're going to hdc in each stitch across the main bag body piece, and then chain 11 to finish the row.  This puts the extra stitches that will become the sides of your bag back on.  You shouldn't have to sew any part of the bag together, except the side seams and the handle.  R51 ends with 61 stitches (10 chain st, 40 hdc's attached to the main bag piece, and then 11 more chain stitches).  That's how you add the long sides back on after the shorter bottom section.

I am super sorry that I wasn't more clear in my instructions.  I think that your question was really good, and I hope that I answered it in a way that didn't confuse you more.  Please don't hesitate to email me if you need more clarification.  


I hope this answers your question too, Dynamos.  And that last line pertains to you as well, please don't hesitate to email me if you need more clarification (on this pattern, or any of my other patterns!).  I'm still learning how to write patterns, so all the feedback that you give only helps me to produce better work.  Love to you all!
xo Jaime

Tuesday, April 24, 2012

The Crochet Button

I have been crafty for a long time.  For a brief stint I had the opportunity to work as a professional knitter (which was awesome, btw), and I have been sewing like crazy since I was about 10 and my mom taught me to use her machine.  I've sewn dresses and quilts, but my favorite thing to sew is bags.  Big bags, small bags, purses, reusable shopping bags made of laminated grocery bags, you name the bag, I've probably made one.

But this is not the Jaime Sews blog, this is Crochet Dynamite!  And I needed to represent!  So I made The London Crochet Bag to carry around my current crochet project and my tool bag.  I based it loosely on a bag that my SIL picked up the last time we were in London, which was a slouchy hobo-type bag with a ton of room and a nice big opening, but I didn't want to add a zipper (which was how that bag, and the two dozen bags that I've sewn based on that bag, closed.  It's a pretty awesome bag.).  So I left it open.

Flash forward a couple of days and my frustration level was through the roof.  I've been using super fine crochet cotton for pretty much everything right now because I'm in love with bright colors for spring, and the balls kept rolling out of my bag if I wasn't careful how I set it down.  Annoying!  So I needed a way to close the bag, but I still thought a zipper would stretch my handcrafted cloth weirdly, and would be a pain to install. But a button would be perfect, assuming that I could find a button that would look good with my bag, and would be fairly cheap, since this bag was made using up leftover green yarn from the sushi coasters and black Ducky Momo eye yarn.

I didn't have time to head over to the craft store that day, so I began playing with the idea of doing a bubble-type button, stuffed with fiberfill so it would hold its shape.  The sphere itself was easy to make, but when I got to the last row, it started to collapse onto itself, which then I smooshed further, and was delighted with the awesome large button shape that it made.  The worsted weight yarn made the button dense, and with a few stitches to hold the two sides in place, I was over the moon!  It was a button.  I wove in the ends and then attached a new tail of yarn to sew it to the bag.  It worked like a charm.  I made a loop for the other side of the bag to fit my oversized crochet button and none of my yarn has rolled out since.

I do not believe that I originated this idea, even though I've never seen it before.  It seemed super intuitive and so I am sure that someone made a name for themselves in the '70s by teaching the crochet button technique and that they are super famous for it.  So, even though I feel like a crochet genius, I am pretty sure that I have just re-invented a wheel.

But, if you've never heard of this, then I am taking full credit, because I can see so many practical applications for handcrafted buttons.  And they are fast and cheap, but they look like they would be pricey.  Shoot, they would be pricey, if you bought them on etsy.  I should look at etsy, I'm sure someone already is selling them...
Back to what I was saying... If you'd like to make your own, here's the super secret pattern:

The Crochet Button
I used worsted weight yarn with a size G hook.  I also tried it with size 3 super fine crochet cotton and a size D hook.  Both worked well, but obviously the larger yarn and hook made a larger button.

R1: 6 sc in a magic loop, sl st to first sc to join round. (6 st)
R2: ch 1, 2 sc in each st around, sl st to first sc to join round. (12 st)
R3: ch 1, (2 sc in next st, sc) 6 times, sl st to first sc to join round. (18 st)
R4-5: ch 1, sc in each st, sl st to first sc to join round. (18 st)
R6: ch 1, (sc 2 st tog, sc) 6 times, sl st to first sc to join round. (12 st)
R7: ch 1, (sc 2 st tog) 6 times, sl st to first sc to join round. (6 st)
Collapse sphere on itself.  Weave in end from magic loop, making sure to tighten it and secure it.
Using the tail from R7, tack the flattened disc together in a few places, trying to keep your stitches invisible on the front (good side) of the button.  Weave in end.

 Use an additional piece of yarn (or matching thread) to sew onto your project.  Or, attach to a index card and sell on etsy.  I am sure you could make a fortune! lol!

Really, it's a simple formula that you could adjust the numbers for to make different sized buttons, if you needed something smaller for your project.  R1: 5 st, R2: 10 st, R3: 15 st, R4-5 15 st, R6: 10 st, R7: 5 st.  If you wanted to make a button smaller then that, I would sc into a chain space, since the magic loop might make it difficult to close a ring smaller than 5 stitches... But, give it a try, you'll know within a minute if it will work for you or not...

I have been busting projects out here, and assuming that my patterns are readable, since I think I am using standard crochet abbreviations.  Would a key be helpful?  I could make one for the terms that I use, and I could also explain the magic loop and how I change colors if anyone would be interested.  Leave me a comment if you'd like me to do a future post about that.  Otherwise, I'm just going to go along merrily on my way, confident that we all understand what we're doing.  Love to you all, my Crochet Dynamos!
xoxo
Related Posts Plugin for WordPress, Blogger...