Google+
Showing posts with label Bag. Show all posts

Sunday, July 29, 2012

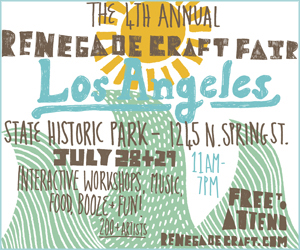
Goin' to the Craft Fair today!

This is where we're going today!  I'm so excited!!!


I needed a new purse.  Not because I don't have three bags that would have been perfectly fine, but I wanted an arty bag that would be fun and show off my crafty-ness... I wanted it to be a cross body bag that would be large enough to hold my stuff, plus whatever goodies I pick up while we're there, but not so big that my shoulder will ache after a day of walking around with it.


It's laminated plastic (Fresh and Easy bags, which I really like because they're made of really thick, strong plastic) and nylon yarn/thread.  I particularly like how the strap turned out.  The flower on the strap is at about corsage level...  And, so you get an idea of the size, it's sitting on one of the chairs that go with Mims's kid-size table...

**I think it's super cheesy to add that the idea for this bag came to me in a dream, even though it totally did.**

I had to make a new wallet too, since my everyday wallet is rather large and quite heavy.  I had picked up this mustache tape last week since I thought it was so funny, and this just seemed like a perfect use for it.


I like it!  It's a little oversized, which should make it easy to find in my bag.  I put a couple of slots in it for my driver's license and atm and medical cards.  Perfect for a day of adventurous wandering.

Okay, we're off for the day!  I will try to do a better job this time of taking pictures of the awesome stuff I see!

xoxo

Friday, June 29, 2012

Summer Stripes...

I was working on this striped bag, thinking that it would be perfect for pretty much everything I want to do this summer.  It's completely made of cotton, and it's not so big that I feel like I'm going to give myself back problems if a quick trip to Target ends up in a crazy adventure at Disneyland, or the beach, or detours into a fishing trip.
It measures 14" across, 8" high, and 5" deep.  The strap drop is 14".

I was almost done with it, and then I sold it.  Crazy!  My sister was watching me finish up the strap and then offered me designer-purse money for it.  She could buy Coach for the price she offered me.  She is a handbag snob.  That was when I knew that I should write it up as a pattern.  The purse is really that cute.

Hmm... Guess I'm going to have to make another one for my summer adventures... LOL!!!!


(Do you need one for your summer adventures?  The pattern is available on Craftsy and Ravelry, for the bargain price of a single buck.  Designer bags have never been more affordable!)

I wanted to throw in a little cute bonus for her, so I made a matching case for her sunglasses and iPhone.
I thought you might enjoy the bonus too! Here's the pattern:

Summer Stripes Cell Phone/Sunglasses Case
Finished measurements: 6.75" x 4.5"

Supplies:

100% Cotton Worsted Weight Yarn, approx. 40 yards (I used Bernat Handicrafter 100% Cotton yarn in Strawberry and Mango) or any other worsted weight yarn
Size G crochet hook
Yarn needle
Sewing needle
Scissors

Main Case:
Stripes are created by changing color every two rows.  This gives a bolder stripe, and it allows you to work continuously without having to cut your yarn when you switch color.  You can just carry the yarn up the side of the work as you go.  You will only have to weave in four ends on the main piece if you use two colors.
Or, alternately, you can make the case from a single color.


ch 16
R1: sc in 2nd ch from hook, sc in each ch sp across, ch 1, turn (15 st)
R2-49: sc in each sc across, ch 1, turn (15 st)
R50: sc in each sc across.
Fasten off, weave in ends.

Front Pocket:
Continue in stripe pattern, beginning with the color that you started the main case with.

ch 16
R1: sc in 2nd ch from hook, sc in each ch sp across, ch 1, turn (15 st)
R2-19: sc in each sc across, ch 1, turn (15 st)
R20: sc in each sc across.
Fasten off, weave in ends.

Sew the stitch loops of  R20 of the Front pocket to R14 of the Main Case piece, matching the stripes.

Single crochet both sides of the case closed, using one stitch per each row, going through all three layers when  necessary.   Fasten off.  Weave in ends.  Enjoy your new double pocketed case!!


You could even use it to hold two pairs of sunglasses!

*ed. side note:  In an effort to show you how useful the Cell Phone/Sunglasses Case is, I have shown it with my sunglasses and phone sticking out of it.  In reality, the sunglasses and phone tuck neatly inside the case, so they won't get scratched and beat up while they're being carried around.  I just wanted to clarify, in case anyone was wondering why you would only want to protect ONE of the lenses of your pricey sunglasses... ;D


xoxo

Wednesday, June 20, 2012

The WIP Bag, Part 2 - Put in the Zipper!

Are you ready to put a zipper into your bag?  I know that I am.  I'm going to show you a way of putting them in that looks really neat, and will impress all of your family and friends.  Okay, grab the supplies you rounded up on Monday and meet me back here in two minutes (brief reminder, you'll need your: zipper, your bag, your lighter (or matches), a pair of scissors, a sharp needle, thread that matches the bag, yarn needle, and leftover nylon yarn).  Whether you go get a glass of iced tea or not is entirely up to you...

First thing we're going to do is sew the zipper on to one of the flaps.   You can just center the zipper along the flap.  Don't try to line up the end, it will only make it more complicated later.  Centered inconveniently is what we're going for here.   Sew it in, getting the flap lined up as close to the zipper teeth as possible, then go  back and whip stitch the bottom (non-toothed) edge to the flap as well so that the zipper lies nice and flat against the bag.  The picture is what the inside should look like, with the two rows of stitches.


Pin the other flap in place, along the other side of the zipper, and then stitch it down the same way you stitched the first side.  It will be a little less fun than the first side, because you'll have to unzip the zipper in order to do the stitching.  That's why it's important to pin it in place before you start.

Now you can zip the top closed! Yippee!  You're in the home stretch now, so why don't we stitch the zipper closed at the bottom of the flap?  It's easy, just stitch over the teeth where the flap ends.  Go over it with doubled thread, three or four times.  Then slide the zipper pull into the area between the flaps and pin the zipper closed at the other edge of the flaps.  Stitch the zipper closed at that edge too, which will be a little less neat, and a little bit more difficult, since the zipper is open at that edge.  I've put two pictures, one so that you can see how it should look, and then one pointing out the exact places you will be sewing across the zipper teeth.


Now you're going to cut the zipper off at the end of the flap!  Sounds scary, but it's not.  Just snip across the end!  Then get out your matches or lighter (Jr. Dynamos, please get help from an adult!) and run a flame along the cut edge to seal it and protect it from fraying. (You will notice the knots left from when I sewed that  end shut.  I didn't cut through my stitches, lol!  We're going to cover the ends of the zipper up in the next step, and I didn't want my knots to show on the inside of the bag.)  Make sure you cut and seal both ends of the zipper.

Last step!  Get out your yarn needle, and the leftover piece of nylon you had left.  Stitch the last 4 stitches along the edge of the flaps together, and then sew the flap pieces to the little open area at the butt end of the zipper.  Do it on both sides.  Weave the tail ends in about two stitches, and then snip and melt the ends, like you did on Monday.

Voila! You now have an awesome new bag to put your current project in! It looks small, but...

Look at all the stuff it's holding!!!  Can you believe it?!  It's like the clown-car of bags!!!
Btw, yep, that's a couple of lip balm holders in-the-making... Have you made one yet?  What are you waiting for?! 

xoxo

Monday, June 18, 2012

Work in Progress... Part 1: Crochet!

I cannot say it enough, I love project bags.  Small enough to throw in a purse on my way out the door, but big enough to hold all of the supplies I need for crochet-on-the-go.  I tend to work in phases, and it helps me to stay organized when I keep the yarn and hook and pattern all together when I have to put a project aside for a while.  Then I know I've got everything there when I am ready to pick it back up again!

I am fascinated with nylon yarn.  It doesn't behave the way that cotton, wool or acrylic do, the fibers don't blend together.  The stitches are smooth and even the tightest stitches leave lacy stitches and hole-y fabric.  It's heavy and it's slippery.  The ends unravel.

Yet, it produces beautiful results.  Results that you can't get any other way, because the natural fibers don't behave the way that nylon does. Nylon doesn't stretch out of shape in awkward and dramatic ways.  You don't have to weave in ends...


I got some Iris Nylon Thread (size 18) to make a project bag.  I wasn't sure what I had in mind, but I wanted something with a zipper, and maybe handles. I wanted a one-skein bag, since I only bought one skein of this color...  I got to crocheting, and 197 yards is just not much to work with.  I frogged several designs, since I was at the end of my skein before I was even halfway done with my bag.  My bag was going to be a lot smaller than I had thought it would be.  This was going to be a bag for delicate projects.  That was okay with me, I am still on my size 3 crochet thread kick.  My current projects tend to be small anyway.

The crochet part of this bag is really straightforward and simple, but the zipper instructions are a little image heavy, so I'm going to break this project up into two parts: The Crocheting Instructions, and Installing the Zipper.  Most of the crocheting is just working hdc stitches in the round.  I made the flaps in (what I would consider) a rather unconventional manner, so I would recommend reading through the pattern before you start.  If you have any questions, please feel free to email me at CrochetDynamite (at) gmail (dot) com.

So, if you'd like to make a Work In Progress bag, grab your supplies and let's get going.

The WIP Bag
Supplies:
1 skein Iris Nylon Crochet Thread size 18 in French Wines (or any other color that makes your heart sing!)
Size D crochet hook
1 polyester zipper that is at least 9" long
Thread to match yarn (if you have to choose between matching the zipper color or the yarn color, match the yarn color)
Scissors
Yarn needle
Sewing needle
Matches or lighter

Making the Bag:
ch 31
R1: hdc in the back loop of the 2nd ch from hook, hdc in back loop of each ch across, ch 1, turn (30 st)
R2-4: hdc in each stitch across, ch 1, turn (30 st)
R5: hdc in each stitch across, 5 hdc across the short side, 30 hdc across the other long side, and 5 hdc across the other short side, sl st to first hdc of row (70 st)
*a side note: don't add extra stitches to the corners, we don't want the bag to flare out, we want it to go straight up from the base.
R6-31: ch 1, hdc in each stitch around, sl st to first hdc of row (70 st)
R32: (flap row) ch 1, 30 hdc in back loops only, 5 sl st, 30 hdc in back loops only, ch 10, skip 5 st (60 st in a really weird row. Don't turn work, just start next row, leaving the chain to dangle.)
R33: (flap row) 30 hdc across hdc stitches, ch 10, skip 5 st, 30 hdc across hdc stitches, ch 10, skip 5 st (60 st)
R34: (flap row) 30 hdc across hdc stitches, ch 10, skip 5 st, 30 hdc across hdc stitches (60 st)

Fasten off, leaving a few inches of yarn tail.  We're not going to weave the ends in, exactly, but we are going to move them away from the edge of the bag flaps a little. So, use your yarn needle to pull the end through a couple of stitches, so the frayed yarn end is now on the inside of the bag.  Make sure the starting yarn tail is on the inside as well.


Now, READ THIS CAREFULLY:  You are going to cut the chain loops from the flap rows.  Only cut through ONE strand of yarn, halfway between the two flaps (which would make it the 5th or 6th chain). THEN, unravel the chain back to the crochet fabric. Stop before you unravel your flap!  Use the yarn needle to weave the unraveled chain back into the flap a few stitches.  It's going to look bad at this point, but the next step will clean it up.  Trust me, dear Dynamos!  I would never steer you wrong! You will be cutting, unraveling and weaving the end into the inside of the flap for all four of the chain loops (8 frayed chain ends, plus the start and end tails, will give you total of 10 ends to be dealt with).


CAUTION: CAUTION: CAUTION: CAUTION: CAUTION: CAUTION:
This next part is slightly dangerous.  If you are a Junior Dynamo, please get an adult to help while you do this next part.  Grab your matches, or lighter, and your scissors. We're going to melt the ends of the nylon so that they don't unravel or fray. *Go slowly. Only do one thread at a time!! Open a window so that you aren't inhaling the fumes!

Snip the thread, leaving a 1/4" tail sticking out of the fabric.  Melt it with the matches, letting it melt into the stitches around it.  This is a quick process.  Don't worry if the stitches around it get slightly melty. (Just don't touch them!!!  They are super-hot melted plastic, and it will stick to your skin and burn you.)  The melted end will cool into a little hard blob of plastic that will never come loose.  Yippee!!


Now do that for all of the frayed ends.  Wow!  That was awesome.  Put it aside and get yourself a glass of iced tea.  We'll put the zipper on Wednesday. (Oh, and don't throw away the last 2 feet of yarn you have left, you'll need it for finishing up the top!)

xoxo

edit 6/21/12: This is the post where we put the zipper in!

Thursday, May 17, 2012

The Striped Bag and Wallet!

Hello, Dear Dynamos!
I am working late into the wee hours of the evening to bring you this post today.  I've been rushing like crazy to get two (yes, 2!!) new patterns done.
I am doing an experiment in independent design work.  I have lately been looking into magazine submission requirements, trying to figure out if I should be spending my time designing and writing articles for paper and e-magazines, or if I can find another way to get my patterns out to more people.  The problem is, it's a pretty subjective business (as all art is) and while I have had my share of writing rejections, I don't want to put time and energy into fruitless endeavors unnecessarily.

The unnecessarily part comes from my belief in the brilliance that is Craftsy.com.  They are the champion of independent designers of all crafty mediums, not just crochet.  And they allow their members to put up pattern stores on their site, without any fees (unlike Etsy).  So it got me to thinking: What if I put one of my patterns on Craftsy and see what happens?

So, I have put my new Striped Crossbody Bag on Craftsy.com.  It is pretty cool.  You should go over there and check it out. I put it on for $1.  I want everyone who wants the pattern to be able to afford it.  Besides, this is just an experiment, anyway.

(Okay, you twisted my arm.  I will offer you an incentive to go check it out.  I've put the matching wallet pattern on for free!  You don't have to buy anything! Just go get the pattern.)

So, back to my magazine story: One of the magazines that I was super interested in submitting a project to pays $25 per published pattern... But! If my $1 experiment goes well, and more than 25 people decide to actually purchase my pattern, I'm not going to bother with magazines.  I'm going to keep doing free designs for my Dynamos, and throw the really exceptional pieces onto Craftsy and continue to charge $1 for everything.  Because, ultimately, I love doing this. And with a little bit of cash flow, I can do it for a whole lot longer!

xoxo

edit 5/18/12: Hey! I forgot to tell you the best part about the wallet!  I made it entirely out of  yarn that was left over from the crossbody bag!  So, if you buy all the supplies to make the bag, the wallet is essentially free!  And you aren't stuck with leftover yarn that wastes precious yarn storage space! Woot!  So, seriously, you should go get your free wallet pattern!! xoJ

Tuesday, April 24, 2012

The Crochet Button

I have been crafty for a long time.  For a brief stint I had the opportunity to work as a professional knitter (which was awesome, btw), and I have been sewing like crazy since I was about 10 and my mom taught me to use her machine.  I've sewn dresses and quilts, but my favorite thing to sew is bags.  Big bags, small bags, purses, reusable shopping bags made of laminated grocery bags, you name the bag, I've probably made one.

But this is not the Jaime Sews blog, this is Crochet Dynamite!  And I needed to represent!  So I made The London Crochet Bag to carry around my current crochet project and my tool bag.  I based it loosely on a bag that my SIL picked up the last time we were in London, which was a slouchy hobo-type bag with a ton of room and a nice big opening, but I didn't want to add a zipper (which was how that bag, and the two dozen bags that I've sewn based on that bag, closed.  It's a pretty awesome bag.).  So I left it open.

Flash forward a couple of days and my frustration level was through the roof.  I've been using super fine crochet cotton for pretty much everything right now because I'm in love with bright colors for spring, and the balls kept rolling out of my bag if I wasn't careful how I set it down.  Annoying!  So I needed a way to close the bag, but I still thought a zipper would stretch my handcrafted cloth weirdly, and would be a pain to install. But a button would be perfect, assuming that I could find a button that would look good with my bag, and would be fairly cheap, since this bag was made using up leftover green yarn from the sushi coasters and black Ducky Momo eye yarn.

I didn't have time to head over to the craft store that day, so I began playing with the idea of doing a bubble-type button, stuffed with fiberfill so it would hold its shape.  The sphere itself was easy to make, but when I got to the last row, it started to collapse onto itself, which then I smooshed further, and was delighted with the awesome large button shape that it made.  The worsted weight yarn made the button dense, and with a few stitches to hold the two sides in place, I was over the moon!  It was a button.  I wove in the ends and then attached a new tail of yarn to sew it to the bag.  It worked like a charm.  I made a loop for the other side of the bag to fit my oversized crochet button and none of my yarn has rolled out since.

I do not believe that I originated this idea, even though I've never seen it before.  It seemed super intuitive and so I am sure that someone made a name for themselves in the '70s by teaching the crochet button technique and that they are super famous for it.  So, even though I feel like a crochet genius, I am pretty sure that I have just re-invented a wheel.

But, if you've never heard of this, then I am taking full credit, because I can see so many practical applications for handcrafted buttons.  And they are fast and cheap, but they look like they would be pricey.  Shoot, they would be pricey, if you bought them on etsy.  I should look at etsy, I'm sure someone already is selling them...
Back to what I was saying... If you'd like to make your own, here's the super secret pattern:

The Crochet Button
I used worsted weight yarn with a size G hook.  I also tried it with size 3 super fine crochet cotton and a size D hook.  Both worked well, but obviously the larger yarn and hook made a larger button.

R1: 6 sc in a magic loop, sl st to first sc to join round. (6 st)
R2: ch 1, 2 sc in each st around, sl st to first sc to join round. (12 st)
R3: ch 1, (2 sc in next st, sc) 6 times, sl st to first sc to join round. (18 st)
R4-5: ch 1, sc in each st, sl st to first sc to join round. (18 st)
R6: ch 1, (sc 2 st tog, sc) 6 times, sl st to first sc to join round. (12 st)
R7: ch 1, (sc 2 st tog) 6 times, sl st to first sc to join round. (6 st)
Collapse sphere on itself.  Weave in end from magic loop, making sure to tighten it and secure it.
Using the tail from R7, tack the flattened disc together in a few places, trying to keep your stitches invisible on the front (good side) of the button.  Weave in end.

 Use an additional piece of yarn (or matching thread) to sew onto your project.  Or, attach to a index card and sell on etsy.  I am sure you could make a fortune! lol!

Really, it's a simple formula that you could adjust the numbers for to make different sized buttons, if you needed something smaller for your project.  R1: 5 st, R2: 10 st, R3: 15 st, R4-5 15 st, R6: 10 st, R7: 5 st.  If you wanted to make a button smaller then that, I would sc into a chain space, since the magic loop might make it difficult to close a ring smaller than 5 stitches... But, give it a try, you'll know within a minute if it will work for you or not...

I have been busting projects out here, and assuming that my patterns are readable, since I think I am using standard crochet abbreviations.  Would a key be helpful?  I could make one for the terms that I use, and I could also explain the magic loop and how I change colors if anyone would be interested.  Leave me a comment if you'd like me to do a future post about that.  Otherwise, I'm just going to go along merrily on my way, confident that we all understand what we're doing.  Love to you all, my Crochet Dynamos!
xoxo
Related Posts Plugin for WordPress, Blogger...