Google+
Showing posts with label Free Pattern. Show all posts

Monday, February 3, 2014

Basic Striped Headband

Happy February, Dynamos!  

About six weeks ago, Mims decided she wanted a dramatic new haircut (first graders are funny!).  Her stylist auntie cut her hair over the winter break so that she could have an awesome "reveal" on the first day back to class.  It was adorable.

I like it because her new short style makes it easy for her to do her own hair, freeing me up considerably in the mornings!  She likes to wear headbands, since her new style doesn't tuck back quite as easily as before, and she doesn't like her hair in her face while she's at school.  Easy peasy!  The only thing is, the plastic kind give her headaches, so we have to get her the soft stretchy kind.  And anyone who has bought the soft stretchy kind of headbands know that those things are pricey, even for the plain, boring headbands! Don't even get me started on the glitter ribbon ones that I paid $15 bucks for (designer headbands are a RACKET! LOL!!).

So I started making her headbands from those inkle bands I wove last month.  Cute and cheap!  I wanted to make her some crochet headbands too, but the headbands I have made in the past always stretch out and become useless after a couple of uses.  It got me to thinking, though.  What if I could make the crochet part less stretchy, like a ribbon?  

And the Basic Striped Headband was born! Ta-da!


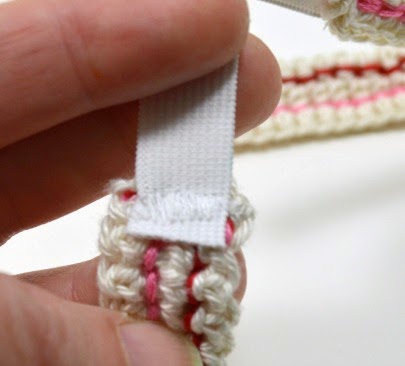
By crocheting along the length (instead of short, stretchy rows across the width), and then adding stabilizing (and decorative!) slip stitches between the rows, the crochet fabric loses it's stretchability and becomes a perfect headband ribbon.  Then add some soft elastic and VOILA! A headband that will keep your hair out of your face all day long, without giving you a headache!

BASIC STRIPED HEADBAND
(The crocheted ribbon is about 16" long, so the finished headband will fit 20"-22" heads.  My 6-year-old daughter and I can both wear these.)
Supplies:
Patons Grace 100% Mercerized Cotton in Natural - approximately 20 yards (or other light weight yarn)
2 colors of embroidery floss or craft thread - approximately 4 yards each 
Size D crochet hook
Scissors
Yarn needle
1/2" knit elastic - approximately 4" per headband 
Sewing thread
Sewing machine (or needle to hand sew)
Straight pins

Using yarn, ch 86
R1: sc in 2nd ch from hook, sc in each chain across (85 st)
R2: ch 1, 20 sc, 45 hdc, 20 sc (85 st)
R3: ch 1, sc in each st across (85 st)
Fasten off. 

To add the slip stitch stripes, use the floss to crochet into the holes between  rows. 


Using your first color, and starting at the end of the strip, pull a loop through the first hole between Row 1 and Row 2.  The pull a second loop through the next hole.


Pull the second loop through the first loop to create the slip stitch.  Keep slip stitching until you reach the end of the piece.  Then use your second floss color to slip stitch into the holes between Row 2 and Row 3.
Weave in all of the ends.


They don't take very long, so go ahead a make a whole bunch of them while you're at it!


Cut your elastic strips four inches long!


Pin your headband to the elastic, making sure that it's not twisted.  Try it on (don't poke yourself!) to make sure it's a good fit.  Adjust the elastic if necessary.


Sew the elastic to the crochet ribbon!  I used a lot of zig-zag stitches with my machine, but you could easily hand sew it into place.  Trim the ends of the elastic if needed so that they lie flat against the crochet part of the headband.


Admire your handiwork!  Well done!  Aren't we going to look adorable at the gym tomorrow? Oh who am I kidding?  The kid working the register at Target is going to be impressed I'm sure, even if he doesn't actually say anything beyond, "Here's your change, ma'am."


Now, go finish up the other headbands while you're on a roll.  When you're done, you can put them all on your wrist and swing them around because it's fun.  Or is that just me? It's just me? Okay, I'm weird.

One more thing...
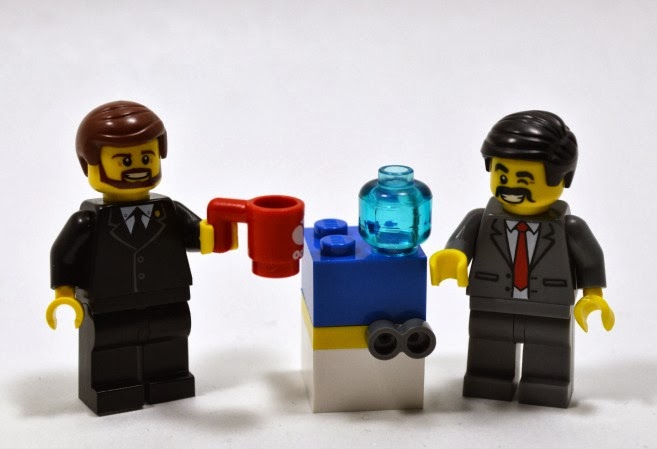
My daughter has gotten really into Legos lately.  She got an awesome Rapunzel set for Christmas that had a blue "jewel" (ie: clear blue lego head) in the set.  Her dad suggested that she should use it as a ghost face.  She said no, she wanted to use it as a water tank.

We had no idea what she was talking about until she created THIS SCENE:


Ba-hahahaha!!!  My kid is weird too!  Happy Monday!

xoxo

Tuesday, October 16, 2012

Bat Pen


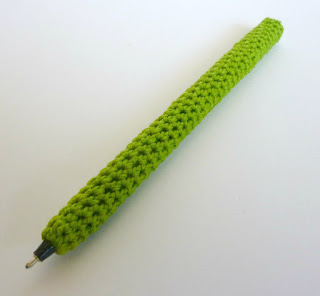
Since we're officially halfway through the month of Halloween October, I thought I'd better make some fun pens before I run out of time.  I was going to make some witch-y finger pens, hence the green, but for the life of me I just couldn't get the knuckles right.  Honestly, the bony knuckles are what sells it as a finger; without them the pen with a witch fingernail just looks like a double-sided implement of torture... Perhaps that is Halloween-y in it's own way, but not MY kind of Halloween...


I used embroidery floss to make the cover for these pens.  If you've ever crocheted with embroidery floss before, you know it doesn't behave the same way that crochet threads do... But it comes in such wonderful colors, I just can't help it!

The pattern is very similar to the Fancy Pen pattern.

Embroidery Floss Pen Cover (It becomes the Bat Pen when you add the bat!!!)
Supplies:
2 skeins of lime green (or any other color you like!) embroidery floss (It only takes 1.5 skeins of floss for each pen, so if you get 3 skeins, you'll be able to cover 2 pens!  Thrifty!)
Size C crochet hook (I am usually a Boye hook girl, but for this project try a Susan Bates hook because it doesn't seem to split the floss the same as the Boye hooks do.  Embroidery floss WANTS to separate, so using the right hook will mean the difference between a project that you love and a project so frustrating you throw it in the trash... Uh, not that I know this from personal experience... Ahem...)
Tapestry needle (Sharp please, not a big blunt yarn needle, okay?)
Scissors
Ball point pen (You can use any type of ball point pen that you like.  I personally like the Bic Stic pens, but pretty much any pen will work.  Cheap pens are awesome for this project!)
Super Glue (This is new.  When I first started making these pens, I just stitched the cover tight and hoped for the best.  Unfortunately, these pen covers have a tendency to slide around a little.  So I experimented a little and I've discovered that using a little super glue keeps them in place! It's optional, but I think it's worth it.)

R1: make 9 sc in a magic loop. Don't pull the loop tight, but close it enough that you can sl st the last sc to the first to join the round. (9 st)
R2-?: (from now on, the rounds are going to be done amigurumi style, continuously in one long spiral without joining) sc in each stitch (9 st)

Make the tube long enough to cover your pen (between 35 and 40 rows).  Try it on the pen to make sure! :D When you know it's the right length, fasten it off.  Leave a 5" tail (approximately, no need to get out a ruler) for the next part.  Get out your super glue and tapestry needle.


Put the cover on the pen with the magic loop end at the writing end, and the open end at the back end of the pen.  Pull magic loop end tail really snug and weave the end in.  Use a running stitch and weave the back-end tail through the last row of stitches.  Pull the tail so that it gathers the stitches together, don't weave the tail in yet.  Just stick the needle in the end stitches (out of the way) while we do this next part.


Put a few drops of super glue at the tip end of the pen.  Be careful.  If you add too much it will saturate the fibers and cause them to discolor.  Use it sparingly!  Let it dry before you do the other end (less than a minute, and you'll be good to go).


Now to glue down the back end! There may be a small space where you can slide the super glue nozzle in between the crochet casing and the pen.  If there is, use it! Otherwise, loosen your stitches a little and go in from the top.  You're going to have to work fast, because super glue dries faster than you think.  Put a few drops of glue on the back end of the pen and then quickly push the stitches down on top of it.  Hold it in place for a few seconds, so that the glue attaches to the cover.  Once it's attached, it will be hard as a rock.  You may have to use your embroidery floss tail end (that you have not woven in yet!  Yay!) to cover any open spots in the end of the cover.  It should look uniform and lovely, but if you get a little too crazy with the glue and end up with a discolored section, we'll just cover it up!  So no worries!


At this point, your embroidery floss covered pen is finished.  If you love it just the way it is, you can stop at this point.  This pen reminded me of Rita Skeeter's Acid Green Quill Pen (minus the quill, of course...).

Or you can turn it in to an awesome batty pen!

Okay, let's do it!!

Bat Pen
Supplies:
Freshly made embroidery floss covered pen (okay, it doesn't have to be freshly made...)
Purple felt (You don't need much. I used eco-felt, but I'm sure it would look gorgeous with a wool felt, if you've got some scraps around.  You can also use a different color.  Gray, black, navy, blood red... I could even see using orange or hot pink, if you're a sassy sort of gal...)
Glow-in-the-dark fabric paint
Scissors
Half Bat template 

This part is easy.  Start with the felt.  I found it easier to manipulate when I cut it into 1"x3" rectangles (approximately).  Fold the rectangle in half to make an almost square 1"x1.5" piece. Now get out your scissors (your good scissors will make this project easier, your kid's blunt paper scissors are going to make it harder.  Just sayin').

These bats are pretty tiny.  I scanned the template below from a drawing I did that is the right size, but honestly, I think you'll be better off not printing it out, and just using it as a starting guide.  Think of these bats like snowflakes, you want them each to be a little different.  That's what gives them their personality!  So, you can pin the template to the felt and cut along the template lines, but  I think that you will find that it makes the cutting harder and fiddley.   Okay, back to the project.

If you want to print this out, right-click to save it,
and print it out with whatever software you use to print pictures. 

Line the template up with the felt, making sure that the folded edge is along the bat-body side of the pattern. Cut out your little bat!  Adorable.  Cut out 2 more to put on bobby pins for your neighbor's daughter.  Cut out another one and tape it to the cat's collar.  Aww.  Isn't he cute?  Take a picture and put it on Facebook.  Now, go grab the glow-in-the-dark fabric paint so we can finish the pen already.  Sheesh!


I tried using super glue (it was out from earlier, don't judge) to attach the little battys to the pens, but alas, I couldn't make the felt stick to the cotton cover.  So I ended up using a little blob of the glow fabric paint and that stuck them on with no problem.  If you are the type that fires up your glue gun as you're starting your coffee maker in the morning, you could totally hot glue these on as well... I would probably say no Elmers, but Alene's Tacky Glue is the bomb and would also work... and it will be dry by tomorrow... :P  This is totally the time to cover up any discolorations that the super glue caused when you glued the top of the pen cover down.  Just slap a bat over the top of it and Voila! It's perfect and you're amazing!  (I love it when it works out like that!)

The eyes are also glow-in-the-dark fabric paint.  Mine was a little runny, so I ended up doing a 2nd coat because the first coat soaked into the felt. I'm going to blame myself and say that I didn't shake the bottle the first time (woops!) because the 2nd coat (after I remembered to shake the bottle) turned out awesome!  It does need to sit for a few hours after you apply the paint, so if you don't have that kind of time, the itty-bitty google eyes you can get at the craft store would be a better choice.  And waaaay more fun at corporate meetings...

Now, you may ask WHY do you need glow-in-the-dark anything (especially bat eyes) on a pen... so I will tell you:  Because glow-in-the-dark is awesome, and it's Halloween!  Duh!  Plus, if you leave one on the bookcase in the hall, it will scare the bejeezus out of your boyfriend when he gets up in the middle of the night and sees two little glowing eyes staring at him...

xoxo

Sunday, October 14, 2012

Sunday School!


Good Morning!  I hope your weekend has been wonderful so far!

I found a link to a book of 262 stitch patterns via Pinterest the other day.  It's all online and free and amazing:
http://issuu.com/talpa/docs/262_patrones_crochet

I found it completely inspiring!  I have been looking for something fun and different to work on, and I can see so many applications for these stitch patterns.  The only problem (not a problem!) with the book is that all of the patterns are charted.  I can read crochet charts, but I'm not an expert at it by any means.  But I know of someone who is!!!

Are you guys familliar with Dana at CraftyMinx?  She's got the absolute BEST crochet tutorial set that she calls "Crochet School".  It's flipping amazing and pretty much takes you from complete beginner to Crochet Rockstar in 23 awesome lessons!

Of course she had absolutely the best lesson on reading crochet charts:
http://www.craftyminx.com/2011/11/crochet-school-lesson-21-reading-crochet-charts.html
(squeee!  I love her so much!! Those of you who have bought my ebook know I mentioned her in it too!  She just rocks!)

So, using my awesome new stitch charts (that you can read now too!) I made you a scarf!  Isn't it Autumnal-ly fabulous?!  I named it in honor of the stitch chart number that I used to make it!


#48 Scarf
Approx 5 1/2" x 56"
Supplies:
Worsted weight yarn (I used a whole skein of Loops and Threads Impeccable in Cherry)
Size G crochet hook
Yarn needle
Scissors

(the 3 ch at beginning of row count as 1st stitch)
ch 23
R1: dc in 4th ch from hook, 2 dc, skip 2 ch, (dc, ch 3, dc) in next ch space, skip 2 ch, 5 dc, skip 2 ch, (dc, ch 3, dc) in next ch space, skip 2 ch, 3 dc (21 st)
R2: ch 3, skip first st, 2 dc, skip next st, 5 dc in chain space, skip next st, 5 dc, skip next st, 5 dc in chain space, skip next st, 3 dc (21 st)
R3: ch 3, skip first st, 2 dc, skip next 2 st, (dc, ch 3, dc) in next st, skip 2 st, 5 dc, skip 2 st, (dc, ch 3, dc) in next st, skip 2 ch 3 dc (21 st)
R4: ch 3, skip first st, 2 dc, skip next st, 5 dc in chain space, skip next st, 5 dc, skip next st, 5 dc in chain space, skip next st, 3 dc (21 st)
Repeat R3-4 as many times as you need to get the length that you want.  I used 42 repeats, which took me almost to the end of my skein.
When you're ready to finish the scarf, end on a R4 row.
Scalloped Edge: ch 1, skip first st, sc in next st,*skip 2 st, 5 dc in next st, skip 2 st, sc in next st* 3 times, sc in last st (21 st)
Fasten off.
Attach yarn to the edge of starting edge and repeat Scalloped Edge on the other end of the scarf.
Fasten off.  Weave in ends.


Okay, so I know I'm a little late to this party (and it has nothing to do with crochet) but I am in love with this video this week!  I can't stop watching it!  Warning: this song will get stuck in your head for DAYS...


xoxo


Now, a quick word from today's free-pattern SPONSOR:

Hi Dynamos!  I've put out an ebook of 6 of my fanciest-schmanciest (wearable) patterns from this site!  It's in the Kindle store right now!  It's called Crochet Dynamite: Fancy-Schmancy.  If you have an e-reader, iPad, Smart Phone or other tech-y awesomeness (including Kindle on your laptop/PC) please click HERE to go and check it out.

Friday, October 12, 2012

Mother Goose

You know I love a good hat costume, so this week has inadvertently turned into hat costume week... And I've got one more for next week.  They're just so practical!


Today is Mother Goose.  I know, I know, it looks like a funky witch hat.  In fact, if you wanted to use it as a witch hat you could, but I was really determined that I wasn't going to make a witch hat. In fact, Jake and I had a conversation a couple of weeks ago that went something like this:

Jaime: I want to make something fun for Halloween.
Jake: You should make a witch hat.
Jaime: There are a ton of adorable witch hats out there, everyone has a witch hat.  I want to do something different.
Jake: If it's your version, it would be different.  You should make a witch hat.
Jaime: No.
Jake: Then make a Lawn Gnome hat, but I really think you should make a witch hat.

LOL!!!!  Well, I got the Gnome hat finished and realized I had done 90% of the work of making a witch hat, so I'd just go for it and make my own version.  I sketched designs, a slouchy witch hat, a funky witch hat, trying to do something I hadn't seen a billion times on Pinterest...

I started the brim of the hat and it was short and weird and reminded me of something from my childhood.  I showed Jake and he thought it reminded him of European wood-cut prints of witches... Old world style...  Suddenly, we both were thinking 'Hansel and Gretel'-type witch, which made me think that we must have seen the same book when we were kids, because that was pretty random...

I consulted the Oracle (Google search) and realized it wasn't a witch we were thinking of at all!  It was Mother Goose!

18th century wood cut of Mother Goose by Luis d'Antin van Rooten 

So if you'd like to be something different, something that hasn't been seen a billion times on Pinterest, and you'd like to rock a funky witch hat, this is absolutely the pattern for you!!

Mother Goose Hat
Supplies:
Worsted Weight yarn (I used Loops & Threads Impeccable 100% acrylic yarn in Lavender)
Size G crochet hook
Yarn needle 
Scissors

R1: 8 hdc in a magic loop, pull loop tight and sl st to first hdc to close round (8 st)
R2: ch 1, hdc in each st, sl st to first hdc to close round (8 st)
R3: ch 1 (2 hdc in next st) 8 times, sl st to first hdc to close round (16 st)
R4: ch 1, hdc in each st, sl st to first hdc to close round (16 st)
R5: ch 1, (2 hdc in next st, hdc) 8 times, sl st to first hdc to close round (24 st)
R6: ch 1, hdc in each st, sl st to first hdc to close round (24 st)
R7: ch 1 (2 hdc in next st, 2 hdc) 8 times, sl st to first hdc to close round (32 st)
R8: ch 1, hdc in each st, sl st to first hdc to close round (32 st)
R9: ch 1 (2 hdc in next st, 3 hdc) 8 times, sl st to first hdc to close round (40 st)
R10: ch 1, hdc in each st, sl st to first hdc to close round (40 st)
R11: ch 1 (2 hdc in next st, 4 hdc) 8 times, sl st to first hdc to close round (48 st)
R12: ch 1, hdc in each st, sl st to first hdc to close round (48 st)
R13: ch 1 (2 hdc in next st, 5 hdc) 8 times, sl st to first hdc to close round (56 st)
R14: ch 1, hdc in each st, sl st to first hdc to close round (56 st)
R15: ch 1 (2 hdc in next st, 6 hdc) 8 times, sl st to first hdc to close round (64 st)
R16: ch 1, hdc in each st, sl st to first hdc to close round (64 st)
R17: ch 1 (2 hdc in next st, 7 hdc) 8 times, sl st to first hdc to close round (72 st)
R18: ch 1, hdc in each st, sl st to first hdc to close round (72 st)
R19: ch 1 (2 hdc in next st, 8 hdc) 8 times, sl st to first hdc to close round (80 st)
R20-22: ch 1, hdc in each st, sl st to first hdc to close round (80 st)
R23: (work in front loops only) ch 1, sc in each st, sl st to first sc to close round (80 st)
R24: (work in both loops) ch 1, (2 sc in next st, 9 sc) 8 times, sl st to first sc to close round (88 st)
R25: ch 1, (2 sc in next st, 10 sc) 8 times, sl st to first sc to close round (96 st)
R26: ch 1, sc in each st, sl st to first sc to close round (96 st)
R27: ch 1, 5 sc, (2 sc in next st, 11 sc) 7 times, 2 sc in next st, 6 sc, sl st to first sc to close round (104 st)
R28: ch 1, (2 sc in next st, 12 sc) 8 times, sl st to first sc to close round (112 st)
R29: ch 1, sc in each st, sl st to first sc to close round (112 st)
R30: ch 1, (2 sc in next st, 13 sc) 8 times, sl st to first sc to close round (120 st)
Fasten off.  Weave in ends.


xoxo

Wednesday, October 10, 2012

Lawn Gnome!

I am a big fan of the 'hat' costume: a hat so fantastic that you can just wear normal clothes and it still counts as a costume.  I am not a fan of cheapie drugstore costumes anymore, because alas, I am not a size 4 so none of them fit me right.  But a hat!  A hat costume is amazing.  You still can participate in the office costume contest (oh how clever, you say you made it yourself?!) and you can take it off when you go on your lunch break.  Now, I can't guarantee that you wont get hat-hair, but it's a small price to pay for not being dressed up as Effie Trinket from The Hunger Games at work all day...  Those eyelashes would begin to bother me after about fifteen minutes... 

Jake was a very good sport today.  He's going as the World's Tallest Lawn Gnome.  (He's 6'5" and the hat adds about 7")

Gnome Hat
Supplies:
Worsted weight yarn in Red (I used Red Heart Super Saver in Cherry Red - 1 skein should make 2 hats)
Size G crochet hook
Yarn needle
Scissors

R1: 8 hdc in a magic loop, pull loop tight and sl st to first hdc to close round (8 st)
R2: ch 1, hdc in each st, sl st to first hdc to close round (8 st)
R3: ch 1 (2 hdc in next st) 8 times, sl st to first hdc to close round (16 st)
R4: ch 1, hdc in each st, sl st to first hdc to close round (16 st)
R5: ch 1, (2 hdc in next st, hdc) 8 times, sl st to first hdc to close round (24 st)
R6-7: ch 1, hdc in each st, sl st to first hdc to close round (24 st)
R8: ch 1 (2 hdc in next st, 2 hdc) 8 times, sl st to first hdc to close round (32 st)
R9-10: ch 1, hdc in each st, sl st to first hdc to close round (32 st)
R11: ch 1 (2 hdc in next st, 3 hdc) 8 times, sl st to first hdc to close round (40 st)
R12-13: ch 1, hdc in each st, sl st to first hdc to close round (40 st)
R14: ch 1 (2 hdc in next st, 4 hdc) 8 times, sl st to first hdc to close round (48 st)
R15-16: ch 1, hdc in each st, sl st to first hdc to close round (48 st)
R17: ch 1 (2 hdc in next st, 5 hdc) 8 times, sl st to first hdc to close round (56 st)
R18: ch 1, hdc in each st, sl st to first hdc to close round (56 st)
R19: ch 1 (2 hdc in next st, 6 hdc) 8 times, sl st to first hdc to close round (64 st)
R20-21: ch 1, hdc in each st, sl st to first hdc to close round (64 st)
R22: ch 1 (2 hdc in next st, 7 hdc) 8 times, sl st to first hdc to close round (72 st)
R23-24: ch 1, hdc in each st, sl st to first hdc to close round (72 st)
R25: ch 1 (2 hdc in next st, 8 hdc) 8 times, sl st to first hdc to close round (80 st)
R26-27: ch 1, hdc in each st, sl st to first hdc to close round (80 st)
Fasten off.  Weave in ends.


Gnome Beard
Supplies:
Small amount of worsted weight yarn (I used Red Heart Super Saver in White)
Size G crochet hook
Yarn needle
Scissors

ch 52
R1: hdc in 2nd ch from hook, hdc in each chain space across (51 st)
R2: ch 2, 24 hdc, 3 hdc in next st, 24 hdc (53 st)
R3: ch 1, 16 sc, 10 hdc, 3 hdc in next st, 10 hdc, 16 sc (55 st)
R4: ch 1, 16 sc, 11 hdc, 3 hdc in next st, 11 hdc, 16 sc (57 st)
R5: ch 1, 14 sl st, ch 2, (do not skip a stitch) 13 hdc, 3 hdc in next st, 14 hdc, ch 2, turn (30 stitches + ch sp before 13 hdc = 31 st)
R6: 15 hdc, 3 hdc in next st, 15 hdc (33 st)
R7: ch 1, 4 sl st, ch 2, 11 hdc, 3 hdc in next st, 12 hdc, ch 2, turn (27 st)
R8: 13 hdc, 3 hdc in next st, 13 hdc (29 st)
R9: ch 1, 5 sl st, ch 2, 9 hdc, 3 hdc in next st, 10 hdc
Fasten off.  Weave in ends.

Using red yarn, stitch beard to the sides of the hat.  I just used a simple running stitch.


This costume rocked extra, because I was able to use yarn that I already had to make it.  So basically, it was free!!  And free hat costumes are the best kind of hat costumes!

xoxo

Monday, October 8, 2012

Isabella's Fireside Girl Beret

We love Phineas and Ferb around here.  A lot.  Mims likes to pretend that she's Isabella, so I decided to make her an Isabella-in-her-Fireside-Girl-uniform costume.  I don't know if this is going to be her Halloween costume, but it's fun for playing dress up, and it's cute to wear out in public.  People who know will recognize her, and those that don't will just think she's adorable.  Either way it's a win for this mom.

Isabella's Fireside Girl beret is gold with a red bow.  You could use my Dynamite Beret! pattern if you wanted to make an adult sized version.  This version should fit kiddos 3-10...  

Isabella's Fireside Girl Beret
should fit most kids 3-10
Supplies:
Worsted weight yarn for beret (I used Wool Ease by Lion Brand in Gold - you will need 1 skein)
Small amount of worsted weight yarn for bow (I used Red Heart Soft in Red)
Size G crochet hook
Yarn needle
Scissors

Beret 
(use Gold yarn)
R1: in a magic loop, 8 hdc, pull loop snug and sl st to first hdc to close round (8 st)
R2: ch 1, 2 hdc in each st around, sl st to first hdc to close round (16 st)
R3: ch 1, (2 hdc in next st, hdc) 8 times, sl st to first hdc to close round (24 st)
R4: ch 1, (2 hdc in next st, 2 hdc) 8 times, sl st to first hdc to close round (32 st) 
R5: ch 1, (2 hdc in next st, 3 hdc) 8 times, sl st to first hdc to close round (40 st) 
R6: ch 1, (2 hdc in next st, 4 hdc) 8 times, sl st to first hdc to close round (48 st) 
R7: ch 1, (2 hdc in next st, 5 hdc) 8 times, sl st to first hdc to close round (56 st) 
R8: ch 1, (2 hdc in next st, 6 hdc) 8 times, sl st to first hdc to close round (64 st) 
R9: ch 1, (2 hdc in next st, 7 hdc) 8 times, sl st to first hdc to close round (72 st) 
R10: ch 1, (2 hdc in next st, 8 hdc) 8 times, sl st to first hdc to close round (80 st) 
R11: ch 1, (2 hdc in next st, 9 hdc) 8 times, sl st to first hdc to close round (88 st) 
R12: ch 1, (2 hdc in next st, 10 hdc) 8 times, sl st to first hdc to close round (96 st) 
R13: ch 1, (2 hdc in next st, 11 hdc) 8 times, sl st to first hdc to close round (104 st) 
R14: ch 1, (2 hdc in next st, 12 hdc) 8 times, sl st to first hdc to close round (112 st)
R15: ch 1, hdc in each stitch around, sl st to first hdc to close round (112 st)
R16: ch 1, 6 hdc, (hdc next 2 st tog, 12 hdc) 7 times, hdc next 2 st tog, 6 hdc, sl st to first hdc to close round (104 st)
R17: ch 1, (hdc next 2 st tog, 11 hdc) 8 times, sl st to first hdc to close round (96 st)
R18: ch 1, 5 hdc, (hdc next 2 st tog, 10 hdc) 7 times, hdc next 2 st tog, 5 hdc, sl st to first hdc to close round (88 st)
R19: ch 1, (hdc next 2 st tog, 9 hdc) 8 times, sl st to first hdc to close round (80 st)
R20: ch 1, 4 hdc, (hdc next 2 st tog, 8 hdc) 7 times, hdc next 2 st tog, 4 hdc, sl st to first hdc to close round (72 st)
R21: ch 1, (hdc next 2 st tog, 7 hdc) 8 times, sl st to first hdc to close round (64 st)
R22: ch 1, 3 hdc, (hdc next 2 st tog, 6 hdc) 7 times, hdc next 2 st tog, 3 hdc, sl st to first hdc to close round (56 st)
R23: ch 1, (hdc next 2 st tog, 5 hdc) 8 times, sl st to first hdc to close round (48 st)
R24-26: ch 1, sc in each st around, sl st to first sc to close round (48 st)
Fasten off.  Weave in ends.

Isabella's Bow
(use Red yarn)
Loops:
ch 37
R1: hdc in 2nd ch from hook, hdc in each ch across (36 st)
R2-5: ch 1, 5 hdc, 8 dc, 10 hdc, 8 dc, 5 hdc (36 st)
R6: ch 1, 5 sc, 8 dc, 10 sc, 8 dc, 5 sc (36 st)
Fasten off.

Center:
ch 7
R1: sc in 2nd ch from hook, sc in each ch across (6 st)
R2-14: ch 1, sc in each st across (6 st)
Fasten off.

Grab your yarn needle and use the tail end of the big loop piece to stitch the short sides together into a loop.


Weave in any leftover ends.

Wrap the center piece around the center of the loop piece to make a bow.  Using the leftover yarn tail from the center piece, sew the center short ends together.


Tug the top corners of your bow up to make them nice and pointy, just like Isabella's bow!
Now you're ready to stitch it to the front of the beret.


Yippee!  You're done!  Now try it on a cute little girl!  But get your own, because this one is MINE!  :P

Mims loves being my model, but she get's a little squirrely sometimes.
Here are her outtakes:


xoxo

Thursday, October 4, 2012

Skully Necklace

I love October!  I love Halloween!  I love scary movies, carving pumpkins and homemade costumes!  I love fun decorations and I love dressing up all month long in not-quite-costumes that I can pretend are my normal clothes...


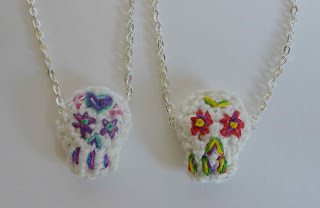
My Skully Necklace is inspired by Mexican sugar skulls, since Dia de los Muertos kinda jumbles in and becomes a part of the Halloween festivities in my neck of the woods.  I like the message behind the holiday, since having a family memorial day gives us a chance to talk to Mims about our family members who have passed on.  And, I just really dig the Mexican Folk Art style...

The supplies are really simple, just some embroidery floss, a hook, a needle and a plain chain.  You could probably whip out 3 or more of these in an evening!  Hmm, sounds like a grown-up Halloween treat...

Skully Necklace
Finished Pendant: 3/4" across at widest point, 1" from the top of the head to the teeth
Supplies:
Embroidery floss (White for skull, bright colors that make you happy for the embroidered decoration)
Size D hook
Sharp tapestry needle
Plain chain necklace (I used an 18" chain, you can use whatever length chain is most flattering to you)
Scissors
Tiny amount of fiberfil (optional!)


Tiny Skull Pattern
(make 2)
R1: Using white embroidery floss (6 strands), make 8 hdc in a magic loop, pull loop tight and sl st to first hdc to close round (8 st)
R2: ch 1, 2 hdc in each st around, sl st to first hdc to close round (16 st)
R3: ch 1, 3 hdc (3 st)
Fasten off.  Weave in ends (or don't and just tuck them inside the pendant later, if you want...)

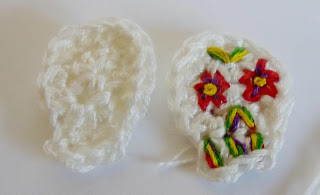
Grab one of your tiny sculls and your brightly colored embroidery floss!


I like to layer the colors as I embroider the faces.  I started with red (TOO SCARY on its own!), and then added the other colors over the top.  **It might be helpful to add that I only used 3 strands of floss when I embroidered the faces, to keep the lines from being too thick.  Feel free to experiment with floss thickness to change the look of the pendant.**
Since this a folk art style project, realism is unnecessary.  An abstract 'skull-feeling' is what we're going for, and once you get all the colors on, it will become more defined and it will look amazing.  Besides, this is a really tiny piece of art, you can't get too realistic with it.

Here is what I did, if you want a guide to get you started:


It wouldn't be a Halloween project if it didn't include a little gore... :P


It wasn't fatal.  Moving on.

Grab the 2nd skull piece (which will now be called 'the back') and your white embroidery floss.


Stitch the 2 skull pieces together, wrong sides facing to the center.  Start about half way down the head part of the skull and whipstitch down the side, across the bottom, and back up the other side. Use the picture below as a guideline for where to start and stop your stitches...


Open the top part up a little, so that you can slide your chain inside it!


Just lay the chain across the open top of the skull, it should appear to be entering and leaving the skull at pretty much the same place on each side of the skull head.  Make sure that the long sides of the chain are centered before you go on to the next step (you know, 'cause it will make your necklace off centered and wonky if you don't...).


It's time to whipstitch the top of the skull together. The chain will now be sticking out of either side of the head, and the skull will be slightly puffed.  If you would like a more pronounced puffiness to your skull, add some fiberfill before you stitch the top of the skull closed.  I didn't add any extra fiberfill in mine because I wanted the back to lie flat against my skin...


You can use other color combinations!  You can wear them all month!  They go with every outfit you own, because it's October and spooky fun is the height of fashion!  Have I mentioned how much I love October??!!!


xoxo

Now, a quick word from today's free-pattern SPONSOR:

Hi Dynamos!  I've put out an ebook of 6 of my fanciest-schmanciest (wearable) patterns from this site!  It's in the Kindle store right now!  It's called Crochet Dynamite: Fancy-Schmancy.  If you have an e-reader, iPad, Smart Phone or other tech-y awesomeness (including Kindle on your laptop/PC) please click HERE to go and check it out.

 
Related Posts Plugin for WordPress, Blogger...