Google+

Sunday, September 30, 2012

Sunday School


I had to make some hairpin crochet strips this week for the class that I'm taking.  I had heard of hairpin crochet (otherwise known as hairpin lace), but I never had done it before.  I read the instructions on the back of the loom, which didn't make any sense to me.  I then read some instructions in a book... and I still couldn't figure out what to do.  It took watching 2 YouTube videos to finally figure it out.  Sometimes you just need to SEE someone do it before it all makes sense.


These are the strips that I made.  I had to do a different spine (center) for each one.  Yeah, they all look pretty much the same to me too... LOL!!!


I have 5 more strips to make, including a hairpin fringe (!!!) which I'm going to make out of my fave size 3 crochet cotton, as a trial run to some fun hand towel edgings I want to make.

If you're inspired to try some hairpin crochet, I highly recommend these videos:
Hairpin Lace Demonstration (super awesome tute!)

Stacey Trock at Fresh Stitches did a podcast recently on Hairpin Lace.  I thought it was really interesting... Go HERE to check it out.

I also really enjoyed this article from WEBS about keeping hairpin lace strips neat. It also had links to some fun projects!  

Uh, this is my version, not Kendra's.  The text below is kinda misleading...

On to an entirely different subject now!  Ever since I got that first photo of Kendra Harris' Tardis bag, I have been shocked at how much Doctor Who crochet is out there... Here's a sample of all the cool stuff I've found:

Dalek Amigurumi (found via Nyan!)
Bigger On The Inside (a Tardis scarf!)
Tardis Headwarmer (would make an awesome gift! It's a pic for a sold Etsy item by chibitoaster, but I think it's worth checking out for the inspiration)
Crochet Cabana has a treasure trove of Whovian love... Filet crochet, scarves, and a mini-Tardis blanket that would make a rockin' baby shower gift...

Now I'm off for the day!  I'm going to enjoy a lazy Sunday at home, and then going out with the fam for my brother-in-law's birthday.  (Happy Birthday Doob!)  Hope your day fun too! 

xoxo

Friday, September 28, 2012

International Diploma in Crochet

A month or so ago I got an email from my friend ♥Piper♥, who some of you know, strongly encouraging me to take a series of classes offered by Pauline Turner.  I hadn't heard of Pauline's International Diploma in Crochet before, but Piper's email really resonated with me because I had been looking for a training program that would help me improve my skills and become a better designer.

It was like a miracle, how easily everything came together in my life in order to make this happen.  It was completely the right decision for me.  And the good part is, you guys all benefit by it too!  Better patterns, and better tips!  Yippee!  So, once a week, I'm going to share a little bit about what I'm doing in 'school' (it's a study-at-home, mail-in-my-swatches-and-projects program) and hopefully I'll have a new and interesting tip or two.

This program is split up into 3 parts.  The first part is designed to help you become a rock-star-awesome crochet teacher.  That's the part that I'm taking right now.  I've got 35 swatches to complete, plus 4 projects, a test, and a report.  I'm setting a goal of completing the program by Thanksgiving.

Some of my swatches, labeled and ready to go!

I got the first 7 of my swatches completed this week.  I blocked them, which I hope was the right thing to do, and I've gotten them labeled and ready to mail off to England today.   Apparently, the judging is pretty tough, so I'm nervous.

Blocking was fun for the whole family!  I wet the swatches, wrapped them in a towel and then had Mims stomp on them to help get the water out without wringing or twisting them.  
Before I began this program, I always felt lucky that I learned to crochet as a child.  I've got years and years of practice with proper gauge and yarn tension.  I've experimented and I've discovered 'my own way' of creating crochet.  I never saw this as a disadvantage before.

But now that I'm sitting down with my hook and yarn, wanting so badly to get 'Excellent' marks on all of my swatches, I am forcing myself to follow Pauline's instructions to the letter, and not slip into my 'lazy crochet' techniques.  I discovered that I've been so wrong about so much of what I do!  Crocheting 'the right way' has resulted in some of the most beautiful work I've ever produced.

For example:  I usually crochet into the back loop of the foundation chain.  I like it because it makes a neat edge that's easy to crochet into if I have to do an edging.  What I don't like about it, though, is that it leaves a small gap in the edge that isn't uniform with the rest of the crochet piece.

Now, because I'm me, I dismissed this as just the way the first row of crochet looked.  Besides, crocheting in the back loop looked much better than when I crocheted into a side loop of the chain...

I didn't know you were supposed to go through BOTH loops in the chain!  Do you know what happens when you crochet into both loops?!  It creates a beautiful, perfectly uniform first row, that matches every other row in the piece.  And you've still got that back loop available if you have to add an edging!  Zoh my goodness!  My life is transformed!

I am sure that all of you Dynamo's who learned to crochet in your 20's or 30's are laughing at my 'discovery'.  I would be too, if I wasn't so excited about it!  Seriously, I am filled with delight every time I think about it.

Waiting to go to the post office!
I wasn't sure what I was going to learn in this first program.  The second and third parts were the parts that I thought I was really going to benefit from, but this discovery (on my second swatch, yo!) is eye-opening.  I am excited to learn more!  I am excited that I have so much still to learn!  And I'm excited that, by learning the right way to crochet, my work is going to continue to get better and better...

xoxo

Wednesday, September 26, 2012

T-shirt Cardigan - Totally worth the math!

I saw the cutest thing on Pinterest the other day.  It was a t-shirt that had been re-fashioned into a sweater.  Of course, I wanted one!  I mean, tshirt + crochet = awesomeness! 

It was a cute idea, but I wanted to do my own version.  I had a 3/4 length sleeve t-shirt that was just begging to get re-made into something cool!  


If you'd like to make one too, here's what you're going to need:

T-shirt Cardigan (or tCardi as it is known in my Nickelodeon-watching house...)
Supplies:
T-shirt (this is an awesome recycle/upcycle project! Use what you've got!)
Good Scissors (the fabric ones you won't let your kids play with)
Sock yarn (You'll need one skein of a sock yarn that is washing machine-compatible with your shirt... So don't use a beautiful wool/cashmere blend that has to be hand washed, unless you only hand wash your t-shirts.  I used a wool acrylic blend that I can machine wash and dry.)
Size D crochet hook
Buttons that make you happy (It made me happy to use 5 cheapies, but you could get as vintage and fancy as you like... Once again, take your washing preferences into consideration before choosing un-washable buttons...)
A knit picker 
Small tapestry needle for weaving in ends and sewing on buttons

Pardon the wrinkles in the shirt!  It didn't want to cooperate when I was trying to shoot it's picture. Find the center of your shirt, and slice it open!  Make it as straight and perfect as possible.  


Now you need a swatch so that you can get your gauge for your Cardi button bands.  To make swatching more fun, you can make it big enough to be a pocket!

Cardi Swatch/Pocket
ch 33
R1: dc in 4th ch from hook, dc in each ch across, ch 3, turn (31 st)
R2-20: skip first st, dc in each st across, ch 3, turn (31 st)
R21: 2 dc in first st, skip 2 st, sl st in next st, *skip 2 st, 5 dc in next st, skip 2 st, sl st in next st* 4 times, skip 2 st, 3 dc in last st (31 st)
Fasten off.  Weave in ends (or save them for sewing the pocket on later...)


Now you can measure your pocket (swatch!) to find your stitch gauge.  Measure across the center to get the most accurate count.   My gauge was 6 stitches per inch.  When you get your number, write it down.


Now you're going to use that number to figure out how many stitches you need for the front of your sweater!  The cut edges down the center of my t-shirt were 19 inches long.  I multiplied that number by my stitch gauge number and got 114 stitches.  I used a shell-stitch edging that I know is a 6 stitch repeat plus an extra stitch so I added an extra stitch to make it 115 total stitches.

You're going to have to use your own gauge info to get your magic front edging number.
I crocheted ________ stitches per inch.
The cut edge of my shirt is __________ inches long.

Stitches per inch x Shirt edge length = ___________ stitches you're going to need so that your shirt edge doesn't pull in weird or ruffle!

If you want to add an edging, adjust the stitches so that your stitch pattern will come out even.  For a shell edging you will want to divide your Stitches-You-Need-Along-The-Edge number by a repeat of 6 stitches and adjust it up or down (including the plus 1 --and only one-- extra stitch) so that your pattern comes out even.

Cardi Button Bands (Front Edgings)
Make left side plain, make right side with buttonhole row
R1: Using the knitpicker, crochet your custom number of stitches onto the front edge of your shirt.
R2: ch 3, skip the first st, dc in each knit-picked stitch, ch 1, turn
R3: skip the first st, sc in each st across, ch 3, turn
R4: skip the first st, dc in each st across, ch 3, turn
R5: (optional shell edge) 2 st in first st, *skip 2 st, sl st in next st, skip 2 st, 5 dc in next st* to last 6 st, skip 2 st, sl st in next st, skip 2 st, 3 dc in last st.
Fasten off.

For the Buttonhole Row: 
Women's clothing buttons on the left side, so keep this in mind when you are putting the front edgings onto your Cardi.  

Now that you know how many stitches you need along the front edges, you're going to have to do just a little bit more math, if you want your buttonholes to be even... Which you totally do...

My buttons were 3/8" so I needed a 3 stitch gap to make my buttonholes.  (3 stitch = 1/2" - crochet is stretchy, and this way the buttons will still stay in place even if the buttonholes get a little stretched out.)

3 stitches x 5 buttons = 15 stitches...

I wanted my first and last buttons to be 1" from the top and bottom edges of my cardi, so that was 6 stitches from each edge...

15 buttonhole stitches + 12 top/bottom edge stitches = 27 stitches...

I used 5 buttons, so that gives me 4 (FOUR!!!) spaces between buttonholes...

115 - 27 stitches = 88 stitches divided by 4 (FOUR!) spaces = 22 stitches!

So here's what my buttonhole row looked like:

R3: skip first st, 5 sc, *ch 3, skip next 3 st, 22 sc* 4 times, ch 3, skip next 3 st, 6 sc, ch 3, turn (115 st)
R4: skip first st, 5 dc, *3 dc in ch space, 22 dc* 4 times, 3 dc in ch space, 6 dc, ch 3 turn (115 st)


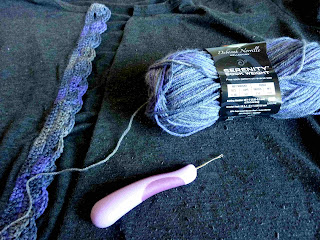
Supplies!  Notice my awesome new PINK knit picker!
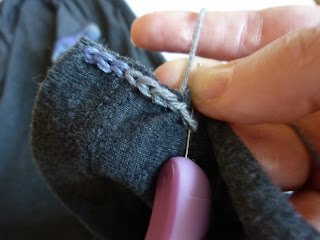
Use the knit picker to crochet the stitches onto the cut edge of your tshirt. Make sure that the loops are on the front of the shirt, and that the 'dashed line' is on the inside edge!  You don't want the t-shirt edge to show when you're done...


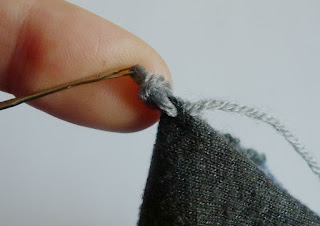
Get the knit picker ready...

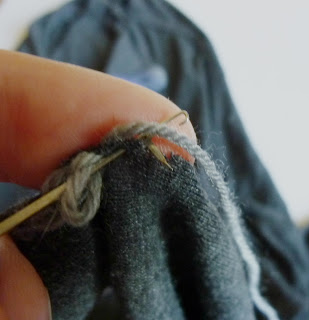
Push it through the fabric.  It goes through the t-shirt material really easily!

Put your yarn though the hooked end, and make sure that the latch is closed...

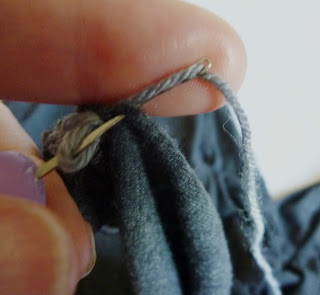
Then, gently pull it through.  Sock yarn works really well with this technique!

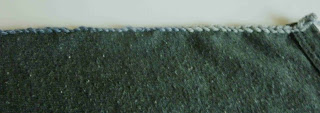
This is what your knit-picked edge should look like...


Use the button holes as a guide for where to sew your buttons on!   Sew on the pocket!  I used the knit picker, but you could just use a tapestry needle.  I put my pocket on the left side, since I'm left-handed, but you could put yours on the right.  Or make two and put them on both sides!

Sorry about the weird picture. I forgot to take one earlier, and we were running out of light...  This is the best one we got. LOL!!!!

My awesome T-shirt Cardigan!  I loved it when it was a t-shirt, and I love it even more as a sweater.  I wore it all day, and it was a nice light-weight option to go over the top of my tank-top.
The math looks really complicated, but I promise that it isn't.  Give it a try!  If the shell-edging bogs you down too much, you don't have to use it.  It will look awesome without it.   Just leave R5 off of the button bands.  Done! Easy!

xoxo

Monday, September 24, 2012

Mad Crochet Lab: An Interview with Aunty Teeni


Happy Monday Dynamos!  I am super excited about today's post! I got to interview Aunty Teeni from Aunty's Tea Room and Mad Crochet Lab.com!  

A couple of weeks ago Aunty Teeni and I were commenting back and forth on Facebook (are you on Facebook?  Come join the party!!) and we sort-of stumbled upon the idea of doing cross interviews.  It was so much fun!   I am really impressed and inspired by Teeni's work, and I thought you guys might like it too!

Teeni very recently has moved the crochet portion of her blog onto it's own blog, MadCrochetLab.com where you'll find a bunch of fun patterns, and the home of the Yarndango!  Yarndango (it's just fun to write!) is a 52 week amigurumi challenge that Teeni set for herself, but has been gathering participants from all over the world!  You don't have to commit to doing an amigurumi project each week for a year to participate, a single month of amigurumi goodness earns you a button and bragging rights - not to mention an awesome shout-out from Aunty herself!

I really hope you enjoy this interview.  Now, go grab a cup of coffee, or a big ol' mason jar of iced tea and come hang out with us while I talk to Aunty Teeni! 

Mad Crochet Lab

Jaime: Why do you crochet?  There are lots of other crafts that you could do, so what is it about crochet that inspires you to create?

Aunty Teeni: Crochet is one thing I feel I do reasonably well.  I can’t draw or paint very well, can’t sing or dance, and I’m too short to be a model.  Haha!  It was one of the first crafts I learned how to do and is something so versatile that I never get bored with it.  Besides granny squares, afghans and ponchos, other garments can be made as well as home décor, and stuffed toys.  And crochet can be done with thread to make lace, filet, doilies, tablecloths, doll clothes, and miniatures.  Or you could use wire or elastic thread to make ornaments or jewelry with beads and fancy stitches.  I keep learning new things and still feel comfortable with my craft because it is something that you can grow with and build upon what you already know.  I can also knit but not as well as I crochet and I find it to take much longer.  I’m not patient enough for it. 

The Count finger puppet

Jaime: Who taught you to crochet?  Did you pick it up naturally or was it a struggle? 

Aunty Teeni: That’s an interesting story.  My grandmother and one of my aunts taught me to crochet at a young age.  At that time the only thing I knew you could make with it was afghans and I quickly got bored.  A few years later, I learned so many other possibilities with crochet that I took it right back up and haven’t stopped since.  However, the early learning was quite a trial for me.  I still remember how difficult it was to work into my first crochet chains – how stiff and sore my fingers became and how frustrated I would get.  On the other hand, crochet was something that allowed me to spend quality time with my grandmother.  She only spoke Portuguese and I only spoke English so most of my learning was by watching, tone of voice, and facial expressions, as well as an occasional swat when I did something wrong.   I went on to teach myself to read patterns and was soon teaching her new things!  She was a better learner than me, though.  J  But it just goes to show you that there ARE universal languages:  Love is just one, crochet is another and the love of crochet is still another!  
Severed Finger Lipbalm Holder!

Jaime: You are the Mad Crochet Scientist!!  You design patterns, you run an amigurumi challenge from your blog, and you create highly detailed fan art pieces.  Do you consider yourself an artist or a skilled craftsperson?  (This is a question that I struggle with personally, and I would love to hear your viewpoint and opinion on this subject.  I would call you an artist, by the way…)

Aunty Teeni: Aw, thanks for considering me an artist.  I used to think that I was more of a skilled craftsperson.  But I now think there is a lot more art involved.  As for the skills part, there will always be someone who is better than me at stitch consistency, gauge, or speed or the math involved in a design.  But so much art is involved in fiber selection, color, texture, shape and finishing details that I think you need to be a little of both in order to have a successful piece or a successful pattern.  In the end, the final result is judged by others, so my favorite piece may not be the one that everyone else wants for themselves.  Beauty is in the eye of the beholder and since that is true of art, I think it applies equally with crochet and other yarn arts.  I now use that term “yarn arts” quite a bit since I am aware of all that goes into them.
Hummingbird pattern

Jaime: You and I are both cancer survivors.  That experience is different for everyone, but I think that everyone who has gone through it will agree that it’s a life-changer.  If you don’t mind telling us, what type of cancer did you have?  How has that experience changed your work?  

Aunty Teeni: First off, allow me to say how sorry I was to learn that you also had to deal with cancer, but I’m always glad to meet a fellow survivor, a fellow comrade and someone who understands the emotional rollercoaster!  I tend to be a bit private but the truth is that I came to think that opening up a little about that part of my life might be helpful to others so my policy on that is that if anyone has a question they should go ahead and ask.  If I can help someone else going through something similar, I will be happy to do so.  If I don’t know an answer I will simply admit that as well.  I had advanced breast cancer.  I went through chemo, radiation and a mastectomy.  Then I went through several attempts at reconstructing a new breast, which all failed.  It’s been a hell of a ride, but it definitely was a life-changer.  I think only another survivor can understand the fear and ice-through-the-heart-feeling of the initial diagnosis.  But honestly, a lot of good things came about in my life too.  I was also diagnosed with Hashimoto’s Thyroiditis and am being treated for that.  Knowing that there was a reason I was always tired and a reason for the many mood swings I used to have was like an “a-ha” moment for me.  Now I feel that I am much more clear-headed, more grateful for simple things, I can laugh at myself, I have different priorities and I think I’ve become a much more positive person and a happier person.  Funny that I have also noticed this in other survivors.  I think all of this allows me to be a lot sillier in my work and has allowed me to get over many fears.  I never dreamed I’d be making some of the little characters that I’ve been making recently.  But it is a lot of fun to try and make something that looks exactly like the original and it forces me to be creative and to keep learning.  It also allows me to use mixed media in my projects and that has been a lot of fun. 


Gubs @ Mad Crochet Lab on Facebook!

Jaime:  Was it always a dream of yours to design patterns?  What uniquely “Aunty Teeni” qualities do you bring to your patterns?  How did you learn to write them?  I have been surprised at the lack of information out there about how to properly write crochet patterns.  I think that learning pattern writing is like learning to write a short-hand version of a foreign language… 

Aunty Teeni:  You know, writing down my patterns for others to use is definitely new to me.  For my personal use, my notes are done in my own crazy type of shorthand, but when writing a pattern to share with others, my approach is to use patterns that I think were really well written and mimic the way those were written.  I totally agree that there is not a wealth of information on how to write a good crochet pattern.  And crochet is its own unique animal so a crochet pattern can’t really be forced into a boilerplate template very easily or without a lot of extra notes.  You know who I think would do a fabulous job of writing some guidelines to creating a well-written pattern?  YOU!!!  (Jaime: Aww.  Thanks Teeni!)

Very Hungry Caterpillar
Jaime: I had 2 (very, very small) blogs before I started Crochet Dynamite.  Those first blogs are embarrassing to look at now (well, okay, just the one that I haven’t deleted) but they were great learning experiences for me.  Aunty’s Tea Room and Mad Crochet Lab aren’t your first blogs either, although your previous blog was far more successful than mine ever were.  What did you learn from your previous blog that has helped you this time around? 

Aunty Teeni: I did have some rules then that I still enforce on my present blogs.  It is simply that you must be kind and respectful when participating.  If not, you are out.  Period.  Nobody will ever be denied service at the tea room or any of my blogs based on their diet, faith, color, ethnicity, sex, orientation or political views, even if they aren’t in alignment with my own views. So long as you are kind and respectful, participation is highly encouraged!  I’ve only ever had to deny service to one blogger in my experience, so it’s been a wonderful ride for me and I’ve been blessed.
Gossamer (Big Red!)

Jaime:  You have created a beautiful and supportive community within your blog and your facebook page.  Do you have any advice for new bloggers (and not so new bloggers) on how to create an environment that makes people feel welcome and comfortable sharing?  Your blog is very funny, do you think that your sense of humor helps you to turn visitors into friends?

Aunty Teeni:  It’s possible.  Everyone’s sense of humor is different but I try to keep mine (at least on my blogs) family safe and harmless towards others.  I want to have fun as long as I am alive but I don’t want it to be at anyone else’s expense.  I try to treat others the way I’d like to be treated.  For this reason, there are certain types of humor you will not see me display at my blog.  I feel blessed to have met so many wonderful people through blogging.  My blog buddies really ARE beautiful and supportive, as you’ve said.  But I didn’t create them.  I just created a place at which they could come together.  So maybe thinking of it that way allowed me to retain friendships with like-minded people.  Because of my rules, a person who is out there simply to cause trouble isn’t really going to get far at one of my blogs so there is no need for them to visit.   That, I believe, is how I’ve really met only great people!


Jaime: What questions am I not asking?  :D  I am sure that there is something that you’d like to share, but I don’t know enough to ask you the right question! LOL!!!  Is there something fun and interesting in your background that helps your artwork? 

Aunty Teeni: LOL.  I think you’ve covered quite a lot of ground with your fabulous questions!  I only hope that people aren’t getting bored reading my long-winded answers!  There is one interesting thing I learned about myself and crocheting though.  I decided long ago that I will not crochet anything I don’t myself like.  If my sister were to beg me to crochet her some hideous looking purse or something, I would find a way out of it.  LOL.  I just feel like life isn’t long enough to waste on things you don’t like and I don’t want to put my time and effort into making something that I wouldn’t be proud to say I made.  I know, I’m horrible!  Fortunately, coming up with my own designs allows me to make what I think I want to make, although sometimes I change my mind if it starts coming out and looking awful.  Then it’s back to the drawing board and some frogging! 
GPS - Dangerous for Video Gamers
Jaime:  How does your love of games and gaming influence your crochet?  Your post about GPS not being a video game had me laughing so hard I was crying!

Aunty Teeni:  Wow, Jaime – you did your homework at my blog!  Thanks so much for liking that post.  I actually find that to be one of my favorite posts.  I love when I get into that kind of frame of mind where I can compare things like that and have fun with it.  Anyway, I think I was cracking up myself when I wrote that post so I only hoped others would find it as funny as I did!  I really do not consider myself a gamer.  I only seem to like video games that are not too violent or bloody and that have cute characters in them (except for the rare occasion when I have a bad day and will come home and tell my husband to load up a particular game because I have a need to shoot the crap out of some zombies or something).  When I do fall in love with a game, I usually feel like I just want to reach into the screen and give the cute characters a squeeze!  So I had to create them physically in order to do that.  But I’m actually more into family board and card games than video games.   A classic example is my GUBs card game character doll.  To be honest, I surprised myself that I could make something like that and I hope to do more for other characters that I love. 
Chocolate Chip
Jaime:  Your cat, Chocolate Chip, is very much a part of the tea room and the Mad Crochet Lab.  How has his influence affected your crochet work?  How is your fundraising going? What can we do to help your efforts?

Aunty Teeni: Yes, Chip is very much a part of the tea room and the Mad Crochet Lab. He has become a big part of my life.  When I found out that our little stray had feline HIV, I was devastated at first.  Then I thought, “He’s actually kind of like me – has a chronic condition but is not showing signs of it right now and seems to be able to live a relatively normal life.”  So, fortunately, since Chip is also the most lovable and affectionate cat I’ve ever known, it was easy to persuade the hubby that we had to keep him.  After all, hubby kept me even though I had health issues!  The fundraising for Chip’s medical bills was given a big boost by the sale of a few of my GUBs dolls.  I guess the best way to help is to keep your eyes open at my sites regarding my patterns and finished objects.  I would much rather sell a pattern or finished object than ask for outright donations.  I don’t want to feel like I’m getting handouts. But I do love the feeling that someone likes my work enough to pay for it so I feel like I am also donating my time to help Chip too and people are getting something for their money!  So keep your eyes peeled for future patterns and finished objects that I will be putting up for sale.  Anything you buy will be helping Chip out.  I’ve also decided that if we raise enough to cover Chip’s medical bills then anything beyond that will be used to help out other animals and shelters.

Aliens!  Can you guess what their spaceships are made of? 

Jaime:  My last question:  As a relatively-new (this time around) blogger, I find that I struggle with finding balance in my life.  I try to maintain an at-least-every-other-day posting schedule, but social media and design work seem to take over my days.  How do you find balance between your life online, and your life at home?   Or have I just asked the unanswerable, like, what is the meaning of life? 

Aunty Teeni:  Oh, the question of the elusive and unattainable life and social media balance, ah yes.  I struggle with that a lot too.  I am super fortunate in that I have a husband who has supported me from day one as he was the one who got me blogging in the first place.  Right now, I find that I spend more time online, but I hope to curb that as I set things up to make things easier for myself in the future.  I think what it boils down to is that you should strive to keep a routine, but you also have to be flexible and forgiving of yourself.  If you don’t meet your schedule then that is okay because life happens regardless of what you’ve planned to accomplish today. You have to be able to jump on and to enjoy the ride when real life opportunities come up!  Those are the things you will never regret later.  I mean, how many people do you hear of who get to their deathbed lamenting all the time they DIDN’T spend in front of the computer, right?!  LOL.   Life is a journey, a constant learning process, and I am so glad to be a part of it, each and every day!  Thank you so much for being interested enough to interview me!  Hugs to you Jaime and hugs to everyone who read through my long-winded drivel. J

Jaime:  Thank you so much Teeni. This was just an absolutely delightful experience.  I am so glad that we did this.  xo

And thank you Dynamos!  I've got a cool project based on something I saw on Pinterest coming up on Wednesday (so cool!  and perfect for Fall!!) so come back soon!

(And seriously, come hang out with Teeni and me on Facebook!  Click the 'Like' button over there on the right!)

xoxo

P.S.  Want to see my interview?  Go to Mad Crochet Lab and check it out!  I'll give you double Dynamo points for leaving her comments!  xo Jaime

Saturday, September 22, 2012

Lining the Tardis!


Today we're going to line the Tardis bag that we've been working on all week.  If, by some chance, you are not a super-huge Doctor Who fan and have chosen not to make a Tardis bag (gasp! the horror! LOL!!) stick around anyway, because this is how you line any flat-bottomed bag.  I am thrilled with how this turned out, and I know you're going to be too! Let's get started!

Supplies:
Lining fabric - 35" x 12 3/4" (I used white cotton)
Thread to match
Magnetic purse snaps (1 set)
Knit Picker
Yarn to match bag (leftovers!)
Yarn needle
White worsted weight yarn (I used Red Heart Super Saver 100% acrylic in White)
Size F crochet hook
Scissors

Fold fabric in half to make a 17 1/2" x 12 3/4" rectangle. Sew the two long sides closed using a 1/4" seam allowance.  Open bag and flatten bottom corners into triangles.  Measure across the triangles and mark your fabric where is measures 3" across.  Sew across the triangle at your mark.
Repeat for the other side.


Cut the extra tip of the triangle/corner off, leaving 1/4" seam allowance.


Turn the lining right side out.  Turn the completed Tardis Bag (without buttonhole) inside out.


Slide the Tardis bag inside the lining so that the wrong sides are together.  There will be a significant overhang of lining fabric. :D


Tuck the extra lining fabric in between the lining pouch and the outer crocheted bag.  You want to tuck it in so that the lining comes up to 1/8" or so from the top of the bag.  This makes a really nice, neat edge for the lining.


Get out your magnetic snaps.


We only need one set of snaps today, so get the pieces out of the package.


This is the hardest part of the whole thing.  You need to measure where to put the snaps into place and then (gasp!) cut your lining fabric for the snap prongs to go through.  My measurements were 13 3/8" in from the side seams and 1" down from the top edge of the lining.  Your measurements might be slightly different (although they'll be close!), because you really want to make sure that your snaps are centered.

Make 2 tiny snips in the top lining fabric (don't cut through both pieces! We need that folded-over behind/inner lining part to keep the snap tabs from poking through the crocheted outer bag).  Slide the 2 prongs of the snap through your tiny incisions.


Unfold the lining so that you can put the flat metal back on the snap.  Fold the tabs back so that the snap is attached to the fabric and the flat metal backing piece.  Re-fold the lining back into place.


Repeat on the other side.  Pretty cool, huh?

Now get out your leftover yarn scraps from when you crocheted the Tardis Bag.  Separate the yarn into halves.  It's just too thick to use the knit picker with (ahem, I know this from personal experience because I pulled the tip off of my knit picker trying to pull the 4-ply yarn through my double-thickness lining fabric.  Ooops!  So, after I got a replacement knit picker, I used 2-plies of the yarn and it worked perfectly without any snags or pulling or frustration.)

Using the same technique that we used to make the Ruffle-Butt Onesie, crochet the lining into the bag.


Once you get all the way around, you can weave the ends in to the outer crochet bag (so it doesn't show.  Don't try to weave them in to the knit picked edge on the inside.

This is what your bag should look like at this point.


You can turn it right-side-out now.


See, the snaps line up and everything!

I missed the light on the top of my bag, so I made a small light that I sewed to the top edge of the front of the bag.

Tardis Light
R1:Using white yarn and F crochet hook, make 6 sc in a magic loop, pull loop tight, sl st to first sc to close round (6 st)
R2: ch 1, 2 sc in each st around, sl st to first sc to close round (12 st)
R3: ch 1, sc in each st around, sl st to first sc to close round (12 st)
R4: ch 1, (sc next 2 st tog) 6 times, sl st to first sc to close round (6 st)
Fasten off.  Flatten the piece with your fingers.  Use tail end to tack the light together in several spots and then sew it to the top edge of the front of the bag.  Use the double center posts on the front as a guide to center the light.


I hope you have a wonderful weekend, Dynamos!  Now, go watch Doctor Who on your streaming Netflix!
xoxo

Tardis Bag - 3 versions - Part 1
Tardis Bag Straps - also 3 versions! - Part 2 
Related Posts Plugin for WordPress, Blogger...