Google+
Showing posts with label Fancy Pen. Show all posts

Tuesday, October 16, 2012

Bat Pen


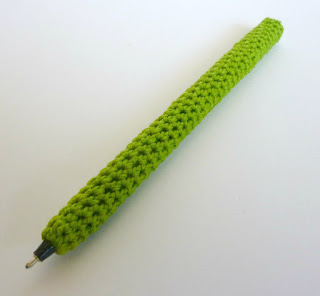
Since we're officially halfway through the month of Halloween October, I thought I'd better make some fun pens before I run out of time.  I was going to make some witch-y finger pens, hence the green, but for the life of me I just couldn't get the knuckles right.  Honestly, the bony knuckles are what sells it as a finger; without them the pen with a witch fingernail just looks like a double-sided implement of torture... Perhaps that is Halloween-y in it's own way, but not MY kind of Halloween...


I used embroidery floss to make the cover for these pens.  If you've ever crocheted with embroidery floss before, you know it doesn't behave the same way that crochet threads do... But it comes in such wonderful colors, I just can't help it!

The pattern is very similar to the Fancy Pen pattern.

Embroidery Floss Pen Cover (It becomes the Bat Pen when you add the bat!!!)
Supplies:
2 skeins of lime green (or any other color you like!) embroidery floss (It only takes 1.5 skeins of floss for each pen, so if you get 3 skeins, you'll be able to cover 2 pens!  Thrifty!)
Size C crochet hook (I am usually a Boye hook girl, but for this project try a Susan Bates hook because it doesn't seem to split the floss the same as the Boye hooks do.  Embroidery floss WANTS to separate, so using the right hook will mean the difference between a project that you love and a project so frustrating you throw it in the trash... Uh, not that I know this from personal experience... Ahem...)
Tapestry needle (Sharp please, not a big blunt yarn needle, okay?)
Scissors
Ball point pen (You can use any type of ball point pen that you like.  I personally like the Bic Stic pens, but pretty much any pen will work.  Cheap pens are awesome for this project!)
Super Glue (This is new.  When I first started making these pens, I just stitched the cover tight and hoped for the best.  Unfortunately, these pen covers have a tendency to slide around a little.  So I experimented a little and I've discovered that using a little super glue keeps them in place! It's optional, but I think it's worth it.)

R1: make 9 sc in a magic loop. Don't pull the loop tight, but close it enough that you can sl st the last sc to the first to join the round. (9 st)
R2-?: (from now on, the rounds are going to be done amigurumi style, continuously in one long spiral without joining) sc in each stitch (9 st)

Make the tube long enough to cover your pen (between 35 and 40 rows).  Try it on the pen to make sure! :D When you know it's the right length, fasten it off.  Leave a 5" tail (approximately, no need to get out a ruler) for the next part.  Get out your super glue and tapestry needle.


Put the cover on the pen with the magic loop end at the writing end, and the open end at the back end of the pen.  Pull magic loop end tail really snug and weave the end in.  Use a running stitch and weave the back-end tail through the last row of stitches.  Pull the tail so that it gathers the stitches together, don't weave the tail in yet.  Just stick the needle in the end stitches (out of the way) while we do this next part.


Put a few drops of super glue at the tip end of the pen.  Be careful.  If you add too much it will saturate the fibers and cause them to discolor.  Use it sparingly!  Let it dry before you do the other end (less than a minute, and you'll be good to go).


Now to glue down the back end! There may be a small space where you can slide the super glue nozzle in between the crochet casing and the pen.  If there is, use it! Otherwise, loosen your stitches a little and go in from the top.  You're going to have to work fast, because super glue dries faster than you think.  Put a few drops of glue on the back end of the pen and then quickly push the stitches down on top of it.  Hold it in place for a few seconds, so that the glue attaches to the cover.  Once it's attached, it will be hard as a rock.  You may have to use your embroidery floss tail end (that you have not woven in yet!  Yay!) to cover any open spots in the end of the cover.  It should look uniform and lovely, but if you get a little too crazy with the glue and end up with a discolored section, we'll just cover it up!  So no worries!


At this point, your embroidery floss covered pen is finished.  If you love it just the way it is, you can stop at this point.  This pen reminded me of Rita Skeeter's Acid Green Quill Pen (minus the quill, of course...).

Or you can turn it in to an awesome batty pen!

Okay, let's do it!!

Bat Pen
Supplies:
Freshly made embroidery floss covered pen (okay, it doesn't have to be freshly made...)
Purple felt (You don't need much. I used eco-felt, but I'm sure it would look gorgeous with a wool felt, if you've got some scraps around.  You can also use a different color.  Gray, black, navy, blood red... I could even see using orange or hot pink, if you're a sassy sort of gal...)
Glow-in-the-dark fabric paint
Scissors
Half Bat template 

This part is easy.  Start with the felt.  I found it easier to manipulate when I cut it into 1"x3" rectangles (approximately).  Fold the rectangle in half to make an almost square 1"x1.5" piece. Now get out your scissors (your good scissors will make this project easier, your kid's blunt paper scissors are going to make it harder.  Just sayin').

These bats are pretty tiny.  I scanned the template below from a drawing I did that is the right size, but honestly, I think you'll be better off not printing it out, and just using it as a starting guide.  Think of these bats like snowflakes, you want them each to be a little different.  That's what gives them their personality!  So, you can pin the template to the felt and cut along the template lines, but  I think that you will find that it makes the cutting harder and fiddley.   Okay, back to the project.

If you want to print this out, right-click to save it,
and print it out with whatever software you use to print pictures. 

Line the template up with the felt, making sure that the folded edge is along the bat-body side of the pattern. Cut out your little bat!  Adorable.  Cut out 2 more to put on bobby pins for your neighbor's daughter.  Cut out another one and tape it to the cat's collar.  Aww.  Isn't he cute?  Take a picture and put it on Facebook.  Now, go grab the glow-in-the-dark fabric paint so we can finish the pen already.  Sheesh!


I tried using super glue (it was out from earlier, don't judge) to attach the little battys to the pens, but alas, I couldn't make the felt stick to the cotton cover.  So I ended up using a little blob of the glow fabric paint and that stuck them on with no problem.  If you are the type that fires up your glue gun as you're starting your coffee maker in the morning, you could totally hot glue these on as well... I would probably say no Elmers, but Alene's Tacky Glue is the bomb and would also work... and it will be dry by tomorrow... :P  This is totally the time to cover up any discolorations that the super glue caused when you glued the top of the pen cover down.  Just slap a bat over the top of it and Voila! It's perfect and you're amazing!  (I love it when it works out like that!)

The eyes are also glow-in-the-dark fabric paint.  Mine was a little runny, so I ended up doing a 2nd coat because the first coat soaked into the felt. I'm going to blame myself and say that I didn't shake the bottle the first time (woops!) because the 2nd coat (after I remembered to shake the bottle) turned out awesome!  It does need to sit for a few hours after you apply the paint, so if you don't have that kind of time, the itty-bitty google eyes you can get at the craft store would be a better choice.  And waaaay more fun at corporate meetings...

Now, you may ask WHY do you need glow-in-the-dark anything (especially bat eyes) on a pen... so I will tell you:  Because glow-in-the-dark is awesome, and it's Halloween!  Duh!  Plus, if you leave one on the bookcase in the hall, it will scare the bejeezus out of your boyfriend when he gets up in the middle of the night and sees two little glowing eyes staring at him...

xoxo

Monday, July 23, 2012

Wedding Wishes

Happy Monday Dynamos!

Remember how I was talking about that book on DIY weddings that I had checked out from the library?  It inspired the wishing stars, which I originally put on this soap dispenser cover.  I was so happy with how it turned out that I've gone ahead and made a whole wedding set.  My Wedding Wish set includes ornament favors, a guest book pen, and comfy wedding flip flops for the reception/honeymoon.

Like I mentioned before, I just adore the idea of making an ornament favor to give to wedding guests.  I love the hand-crafted aspect of the favor, and I love that it's something that guests could treasure for years to come.

Wedding Wishes Star
Supplies:
Small amount of worsted weight yarn (I used Bernat Handicrafter 100% cotton in White)
Size G hook
6mm plastic pearl beads
4mm plastic pearl beads
Size 6/0 glass seed beads
Tulle netting (I used white)
Sewing thread (I used white)
Yarn needle and Sewing needle
5/8" ribbon (I used white organza)
Fiberfill

Make a Wishing Star  using the worsted weight yarn and size G hook.  Before you sew the 2 sides together, decorate the front piece with the tulle and beads.  I began by cutting a small circle of tulle and tacked it to the center of the star piece.  Then I hand sewed an assortment of plastic pearl beads and glass beads to decorate the star on top of the tulle using a sewing needle and thread.  Hide knots on the back of the piece.  Then using yarn and yarn needle, whip stitch the two sides of the star together, leaving the top point of the star unstitched.  Weave in end and fasten off yarn.  Stuff the star with fiberfill.  I used a 3" piece of ribbon for my hanger, but you are welcome to use a longer piece if you would like.  Make a loop with your ribbon and insert the ends in the open top of the star.  Pin in place if desired.  Using a needle and thread, stitch the top point of the star together, being careful to catch the ribbon in your stitches to attach the hanger to the star.   Fasten off the thread with a small knot and hide the ends invisibly.  Snip off any excess thread.

Of course, if I'm completely honest, I really just wanted a wishing star ornament for the medicine cabinet in my bathroom.  I am beyond thrilled.  But I still think it would be neat as a wedding favor, especially with a "A Wish Come True! Jaime and Jake Maraia 10/7/00" type tag.  You can feel free to use your own names and wedding date...

Wedding Wish Guest Book Pen
When I first envisioned my pen covers, I imagined that a covered pen would make a gorgeous guest book pen at weddings.  I also am enamored with the idea that it's a special pen the bride could use afterwards as a special reminder of her special day.


Supplies:
Size 3 crochet thread (I used Aunt Lydia's Fashion 3 Crochet Cotton in White)
Size D hook

6mm plastic pearl beads
4mm plastic pearl beads
Size 6/0 glass seed beads
Sewing thread (I used white)
Yarn needle and Sewing needle

I made a the cover with my Fancy Pen pattern.  I finished the pen completely, weaving in all the ends, before I began sewing the beads on to the top inch and a half of the pen.  I used a doubled piece of thread, since I wanted the beads to be stitched on sturdily.  I randomly attached the beads, using the pearls beads as the focal pieces, and filling in with the small glass beads.  Fasten off the thread with a small knot and hide the ends invisibly.  Snip off any excess thread.


The Wedding Wishes Flip Flops
Okay, this is my favorite project from my wedding set.  There are a ton of tutorials all over the internet on how to cover the straps of your flip flops in single crochet.  I knew that if I wanted to make some flip flop covers, I needed something special.  Something a little more glamorous.  The crochet design is simple, and the same as everyone else out there, but what we're going to do afterwards is what's going to take it from "Uh..." to "Ooooh!!!"  Trust me.

Supplies:

Small amount of worsted weight yarn (I used Bernat Handicrafter 100% cotton in White)
Size G hook
6mm plastic pearl beads
4mm plastic pearl beads
Size 6/0 glass seed beads
Sewing thread (I used white)
Yarn needle and Sewing needle
Pair of flip flops

I used the worsted weight yarn and single crocheted around the strap of the flip flop.  I really smooshed the stitches together to make sure that no part of the strap would show, and to give myself a good base to stitch the beads on to.
 I used the larger pearl beads and sewed them to the top of the strap with a doubled piece of thread so that they were extra sturdy.  I used about two dozen of the large beads.  I alternated which edge I stitched them to, and I sewed them about a 1/2" apart.  I added extras at the toe-strap V, since that part is going to show the most.

Next I sewed the smaller pearl beads to the top of the strap.  I added a small pearl bead between each large pearl bead, and one on each end, which will give it a sort of zig-zag effect.  It took 26 small pearl beads.

Then I went in with the glass beads and just added them wherever there was an empty space.   I really wanted to create the illusion that the top of the flops were jewel encrusted.   I paid special attention to making sure that the single crochet edge of the cover was included in the beading to break the line up and make it more difficult to figure out how the flip flops were made. When you feel like the flops are adequately bejeweled you can fasten off the thread with a small knot and hide the ends invisibly.  Snip off any excess thread. 

 These are my finished flip flops.  You don't have to feel limited to the bead choices that I made.  If your budget allows, I would highly recommend adding Swarovski  crystals to the mix.  It would be super cute to add a blue crystal as a something blue, if you need one.

I think that it would be super sweet to make pairs of reception flip flops for your bridesmaids and The Moms.   Everyone's feet hurt from pinchy shoes by that point of the day.  I made the black pair the same way as I made the white, except I used black yarn to cover the straps.  You could make them to match your wedding colors, and your bridesmaids would be super grateful!

Of course, you don't have to be planning a wedding to make these.  I pretty much live in flip flops, so I'm planning to wear these as just regular footwear.  Cheapy dollar flops aren't really my style, but these are so well disguised I would be comfortable wearing them everywhere.

Okay, Dynamos, I'm off for the day.  But I'll be back on Wednesday, with a giveaway!!!  So come back to get in on the fun!

xoxo


Tuesday, May 1, 2012

My First Giveaway!

Happy May Day to you all!  I am so excited that today my blog is being featured on Craft Gossip.  I want to share the love and happiness with everyone that comes by today, so I think it's time for a Crochet Dynamite Giveaway!
I recently purchased a metal punch, which has solved the problem that I was having with my mason jar lids  (unsurprisingly, a crochet top just doesn't protect the carpet very well when your jar of iced tea gets kicked over, assuming that the crochet lid doesn't fall into the tea all on it's own.).  Amazingly enough, if you punch a straw-sized hole in a canning lid, you get all of the convenience of a fast-food cup, but it's super eco-responsible (except for the straws, but that's something we'll address at a later date...).
So I would like to giveaway a set of 4 punched lids, so that you can enjoy Playdoh-free iced tea all summer long, with no worries about what will happen if the dog knocks over your jar...
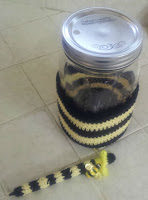
I think you need a Jar Sock (still not sure about that name...) to go with the lids.  I'm not going to actually send the wide mouth quart-sized canning jars because I don't want them to break, and I have no confidence in my shipping skills.

I made the bee set to go together, so I have to send a Fancy Pen to go with the Jar Sock and lids!  It would be weird to separate them. I really like how the pen turned out with the bee charm.  Very fancy!

If you would like to be entered in the giveaway drawing, please leave a comment below.  Of course, I would love it if you wanted to follow my blog, so I will enter you twice if you follow me (and become a Crochet Dynamo!). If you want a third entry, you could like it on Facebook, +1 it on Google Plus, or blog about the giveaway.  Let me know in your comment which of the things you have done!

I am going to keep this giveaway open until 11:59 pm Friday, May 4th, so let your friends know (I bet they would share the prize with you!).  I will do the random drawing on Saturday morning. Please make sure that you leave an email address so that I can contact you if you win.  

I am so grateful that you've taken the time to look at my blog.  I hope that my patterns are fun and easy to follow, if they aren't, please leave me a comment or send me an email (CrochetDynamite@gmail.com) so that I can update the pattern to make the instructions more clear.  I would also love a picture if you actually make something from one of my patterns! I would love to post it, so everyone can see what you made (with your permission, of course)!  Thank you so much, Crochet Dynamos, you have made my day!
xoxo


Related Posts Plugin for WordPress, Blogger...