Google+
Showing posts with label Birthday Gift. Show all posts

Thursday, August 23, 2012

Nyan's Scarf

It's been so hot and humid lately, that all I want to do is sit in my room with the air-conditioning blasting (intermittently, since it's on energy saver, yo) and crochet... and watch Buffy the Vampire Slayer on Hulu.

I've been crocheting a lot!

Last week, my friend Nyan over at NyanPon's Knits and Crochet posted the cutest scarf pattern.  I absolutely had to make it!  She gives you the instructions for an average width scarf, but suggest that if you'd like a chunkier scarf you can double the foundation chain when you start.  Chunkier scarf?! I am all over that!  (Crossing my arms and nodding my head like I Dream of Jeannie) Done!


This was a perfect project for four reasons:
1. I already had the yarn (Bernat Handicrafter 100% cotton worsted weight yarn in Country Red) and hook (size H).
2. One of my friends has a birthday next month and I've been agonizing about what to make her.  She'll love this.
3. Chunky scarves look really good on those of us that don't wear size 4 jeans.  The proportions make us look good, especially if the scarf is a little long.
4. This pattern is fun and quick, even as large as I made mine.  It's also a little brainless (in a really good way) which means you can crochet and watch a movie at the same time without worrying that the pattern will get all messed up.

The finished measurements of my scarf ended up being 16" wide by 84" (that's 7 feet long, peeps!).  You, of course, wouldn't have to make yours this big.  Or, you could make it even larger!  I think I'm going to make a 2nd scarf this size for myself, and triple the foundation chain stitches (up to 60) and make a scarf/wrap.  Perfect for SoCal winters!

Okay, so I have to tell you a funny story about the 'photo shoot' for this scarf.  I don't look super happy in the picture, but I swear it's not the scarf (in fact, everyone who has seen the scarf 'in person' has wanted one)!  It's the fact that it was 102 degrees out.  Did you notice my dead lawn?  It's reverting back to desert, people!!!

Also, that shirt was too hot.  I had the perfect shirt on earlier, when I went to my oncology check-up (No sign of the lymphoma in my bloodwork! All my stats were normal. Yippee!), which was the one I wanted to wear for the picture.  But I did something dumb involving dry shampoo and couldn't wear it...

Has Pinterest suckered you in to making your own dry shampoo yet? No? Give it time...


My batch was approximately 2 cups cornstarch, with about 1/2 cup baking soda added in.  I use about a tablespoon on the days between washings (my hair is a little pretty damaged from switching back and forth between blue-black hair and blonde hair... twice...).  So I get the super bright idea today that I should 'refresh' my hair so it would look good in the picture.  It was so hot, and I was a little sweaty and my hair was looking a little flat, so I figure that it needed a little boost from the dry shampoo.  Uh, I'm going to blame the heat for this synaptic misfire...

So I get my hair loaded up in cornstarch and baking soda, not giving a single thought about my shirt, or my makeup or the fact that I had already done my hair this morning and used hairspray...  Epic fail.  I got it everywhere...  I had to change my clothes...  I had to wear a too-hot shirt...  I think that this would be really funny if it had happened to my sister... but since it's me, not so much.


The only redeeming thing is that I was right.  My hair did look really good afterwards, 'cause that stuff works really, really well...

Okay, Dynamos, go make some scarves and your own dry shampoo today!

xoxo


Saturday, May 19, 2012

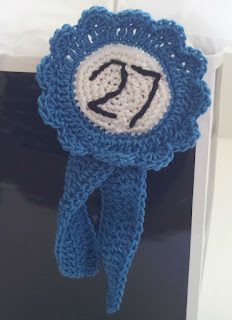
Birthday Award Button

Yesterday was my sister's birthday.  We all went out to dinner and then came back here and I made brownies for dessert. It was fun.  

I had put together a The Night Circus themed gift (remember this?) for her, but I wanted to make her something that she could wear to dinner, to let everyone know it was her birthday.  I also wanted to make her something that she would be happy to wear during her birthday festivities...

I've been playing around with the idea of doing a county-fair-style award ribbon, which seemed like a good place to start for my birthday button.  Of course, she would get the blue ribbon, but I wasn't exactly sure what to put in the center.  A miniature birthday cake?  Spell out Happy Birthday?  Her age?!  That got me to thinking about a story from a couple of weeks ago, one that has been cracking me up every time I think of it:

My sister is a teacher, and at her school they have a big birthday party at the beginning of each month for all of the teachers at the school that have birthdays that month.  So, 2 weeks ago, my sister walked in my back door with her arms full of birthday presents, and flowers, and balloons.  My dad asked her what all the stuff was for. She replied,  "It's my birthday presents!"
He looked at her quizzically.  "Is today your birthday?" he asked.
She put her presents down and narrowed her eyes.  "No," she replied.  "Dad? Do you know when my birthday is?"
He paused for a few moments.  "Your sister's is March, so you're May.  It's not the 15th, it's the 18th. May 18th." he said.
She gave him a smile. "You got it right.  But, do you know how old I am?" she teased.
This time he didn't hesitate at all. "You're twenty-seven!" he declared.
My sister, who is now well into her thirties, delightedly replied, "Yep, Dad, you got it right again."

So, when I handed her the present at the restaurant, she delightedly put her birthday award button on.  
"You knew just the right age for it!" she told me.
"Well, of course!  I asked Dad." I replied.

xoxo

Wednesday, April 25, 2012

The Fancy Pen and a Pencil Grip

I like fancy pens.  I like pens that don't look like you bought them 10 for $2 at Target.  Don't get me wrong, I like buying pens for 10 for $2, I just don't like them to look like that's what I did.  Fancy pens don't get accidentally stolen when you lend them out.  They might get purposefully stolen, but it's never an accident, and it's not very often.

I have made a lot of fancy pens in my day.  I have made dozens of polymer clay covered pens for myself and my family.  I have made my fair share of floral-tape-covered-flower-topped pens for shower gifts. I was passing a Dollar Tree the other day and the big bunches of fake flowers made me think about fancy pens, and then my brain got going on the idea of a fancy crochet pen...

I grabbed my hook and started experimenting.  What I discovered is that making pen covers is really, really fun!

They are a little bit tricky, and I found that I had to count the stitches in each row to keep them from narrowing on me.  There's not much leeway with the diameter of the small hollow tube, too big and it slides off, too small and you can't wedge the pen inside. There's also a lot of flexibility in the pattern, since there isn't a set number of rows to cover a pen. Some colors look good stretched along the length of the pen, some you have to smoosh the rows together to keep the pen barrel from showing and so they require more rows to get to the end.  I found that I needed 35-40 rows to cover each pen.
I also discovered that the same hollow tube pattern worked as an awesome pencil grip, if you stopped after 10 rows.  Mims has been having trouble gripping her pencils properly, and I'm hoping that putting a fancy new grip, in her favorite color, will inspire her to want to hold her pencil in a way that the school system will find appropriate.

If you want to start crocheting your own Fancy Pens, I would highly recommend leaving a long tail when you make your magic loop to start, and a long tail when you fasten off at the end.  I ended up using the long strands to help snug the case around the pen at the  tip, and to finish stitching the top together, and then tighten it into place at the top.  It was really helpful to have long pieces of yarn to work with, since it's such a small area to try to connect a new piece of yarn.

The Fancy Pen
I used size 3 super-fine crochet cotton and a size D hook and covered a Bic Stic pen. I also used a sharp tapestry needle with a large eye to weave the ends in, and a large eyed yarn needle for weaving ribbons.

R1: 7 sc in a magic loop, sl st to first st to join round. Do not pull loop closed. (7 st)
R2: ch 1, sc in each st, sl st to first st to join round. (7 st)
R3- 40+ : Repeat row 2 as necessary to cover pen (between 35 and 40 rows, check by sliding work onto pen occasionally as you work) (7 st)
Final Row: Put pen inside cover before your start the last row.  (Sc 2 st tog) 3 times, finish off.  That seventh stitch is tiny and there's no need to connect it to the last row.  Leave a long tail and stitch across the last row together, covering the top end of the pen.

The Fancy Pencil Grip
Make it just the same as the Fancy Pen, but finish at Row 10, without using the final row.  Finish off and weave in ends.  Your hollow tube is now perfect for making boring pencils fancy and keeping your fingers from cramping.

If a plain cover isn't fancy enough for you, you could add stripes.  I started my stripes at the 27th row, but you could make stunning pens if you started your stripes from the beginning.  I think that candy cane stripes would be fun, and black and white stripes are classic.  I used Mim's favorite colors on the red and turquoise striped pen, and I made the Captain America Pen for Jake.  I can imagine doing the stripes in school colors, or for your favorite sports teams.  I'm planning to make some Angels and Lakers pens for Christmas gifts...

 These last pens are Extra Fancy.  The off-white pen I wanted to weave a ribbon into. At Row 30, I chained 2 and did a row of dc, followed by 5 more regular rows.  Once the pen was covered and the ends were woven in, I used a large eyed yarn needle and wove my grosgrain ribbon through the dc row.  I used ribbon that I had, but I think it would look amazing with a white organza ribbon, which would make a big, fluffy bow.  I can imagine that it would be perfect for a wedding guest book pen, or if you used your wedding colors, it would make a great bridesmaid gift, or a special pen for the bride...
The crochet flower is just tied on to the green pen, but I think it's so fun and girly and just cute, cute, cute.  I have a cousin who is in 6th grade, and I think it would be right up her alley.  I also think it would make a cute May Day gift.  In fact, I think all of them would make cool Mother's Day gifts.  I know I would be thrilled to get one, but then again, I really love Fancy Pens...
xoxo

A Return to My Favorites

So, it's been nearly two weeks, and my Minor Awards Ceremony headband is still my favorite accessory, probably since it doesn't slip off, and it does a great job keeping my awkward length hair out of my eyes.  I have also trimmed two inches off the bottom of my hair (I don't know how else to word that, but I do realize that it would be ridiculous to trim anything but the bottom of your hair.  I guess I should change it to "I cut my hair") so now all of it is a similar length.  It still pulls back into a ponytail, but it's about as long as Julia Louis-Dryfuss's hair in Veep... Yeah, I'm going to need more headbands.
Both of these are made out of fine weight crochet cotton, the size 3 Aunt Lydia's kind, but the black one I used with a size D hook, and the ivory one was made with a size G hook for a lacy look.  They're both just as amazing as the bronze one I fell in love with, but neither are as stretchy, since cotton isn't a stretchy yarn in the first place, so I would highly recommend you chain a little loosely, and then work that first row in the back loop of the chain, since you don't want to end up with one edge of your headband that's super tight (not that I know that from personal experience with the black one, ahem).  The blue flowers I just tied into the black band, since I wasn't sure I was going to like them (they're not centered, they sit jauntily off to the side), but I may go back and stitch them on more permanently, now that I know that I'm comfortable rocking the look.

I've also been keeping busy with my jar cover coaster thingies.  I want to call them Jar Socks.  Is that too lame?  My sister requested one for her birthday, so I've made her a The Night Circus themed one. I'm planning to get her a copy of the book to go with it.  I might also crochet a rose for the top?  Have you read the book? What do you think?
Okay, you caught me, I haven't woven the ends in on this one yet, but  I didn't realize it would show through the jar so obviously.  I may redo this picture.  Well, you get the point.  Black and white, with a touch of red, I think she's going to love it once she's read the book.  And if you haven't read the book either, I highly recommend it.  I hope you will fall in love with it the way I did.
This is the collection of Jar Socks (hmm, not sure I'm crazy about that afterall) that I've done in the last couple of days.  My sister's Night Circus jar, a green and pink one for my mom for Mother's Day, and then the crazy checkered one is mine (protecting my Pepsi Max) which matches the top that I made for my previous post about the jars.  I like the way the finer gauge crochet cotton looks, and it seems to be as absorbent as the worsted weight cotton, but it doesn't get saggy and heavy like my previous one did.  I'm still working out a lid system, but overall, I feel like this is becoming something I'm pleased with.  I think I like the look of the single crocheted ones better than my cover which I used half double crochet stitches on.

My vase.  I love the idea of my vase so much, but lordy, I am having a challenge figuring out what to do with the idea now that I know it works.  I'd like to create vases that would be art pieces, or would be appropriate for selling in high-end boutiques, and worsted weight yarn was just not doing it for me.  They looked thick and clumsy and, worst of all, serviceable. Not the Gift-For-Someone-Who-Has-Everything I wanted.  So, I tried size 10 crochet cotton with a size 6 steel hook.  This bowl represents two days of my life: 
That's not even the worst part. This is the worst part:

I look at all those threads to be woven in, and I see another two days of my life.  I don't think this one is going to make it to full vase shape. Maybe I will seal it up and use it to hold M&Ms, or keys, or something precious and amazing, because I just can't bear to finish it or to throw it away...  Do you know what I should do with it, my Crochet Dynamos?
xoxo

Related Posts Plugin for WordPress, Blogger...