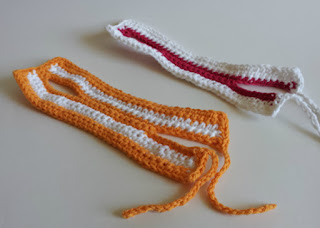
I live in an old farmhouse. My grandparents moved it onto this property in the 1950's. It was built in the 1920's though, and moved here when they realized that their smaller house was not going to have enough room for their growing family. It was quite a hassle, apparently, since the city that the house originally was from only allowed houses to be moved during the night, and the city that the house was moved to only allowed houses to be moved during the day. So they split the house in half, put it on wheels, and towed it to the city limit, on a bridge over the riverbed, where they waited for daybreak. Then they got it moving again and towed it to it's new home.
I love the house, but it's nearly 100 years old, which means it's drafty and quirky. My grandparents remodeled the kitchen by removing walls between several rooms to make one big room. Which is really great, but they didn't add any extra counter space, so there's not enough room for two people to prep food for parties, despite the fact that twenty people could sit around in the kitchen and watch. And there are three interior doors that lead to the kitchen, and a back door, which means that there's a door on every wall. Did I mention that it's drafty? It's really drafty, and the air pressure makes the doors slam shut when winds blow.
We put a spongy foam door stopper on the swinging door, in an effort to protect Mims when she was a toddler. My sister and I consider getting our fingers smashed in that door a rite of passage, but Jake and I felt like we'd be happier if Mims waited until she was older to have that experience. The foamy stopper has worked like a charm, so we've just left it on, even though she's probably old enough/responsible enough to handle the door now.
But the other doors are being constantly banged around, even when the wind isn't blowing. Mims slams them, Mema slams them when she pushes them out of the way to get into the cupboards (quirky detail!), and the back door is on a spring, so it slams anytime we come in or go out. I wanted something that would stop all the banging. Maybe not keep the door from shutting entirely, the way the foam stopper does, so I needed another idea. Maybe just a bumper, something that could be removed easily, something that would look cute...
Kitchen Door Bumper - version 1
Supplies:
Small amount of worsted weight yarn (I used Bernat Handicrafter 100% cotton, and the pink smelled like fruit punch, very summery!)
Size G crochet hook
Yarn needle
Chain 35
R1: sc in 2nd ch from hook, sc in each ch sp across, ch 1, turn (34 st)
R2-4: sc in each sc across, ch 1, turn (34 st)
R5: 2 sc, ch 9, skip 9 sc, 14 sc, ch 10, turn (35 st)
R6: sc in 2nd ch from hook, sc in each ch sp, 14 sc, sc in each ch sp, 2 sc (34 st)
R7-9: sc in each sc across, ch 1, turn (34 st)
R10: 33 sc, 3 sc in next st, turn and 8 sc evenly across short side, 3 sc in corner, turn and 32 sc across long side, 3 sc in the corner, 4 sc across very short end, chain 20. Fasten off.
R12: (continued) With a new piece of yarn, chain 20, 4 sc across remaining very short end, fasten off.
Weave in ends.
(The white stripes were done on rows 2-3 and on 7-8)
I looped the closed side of the kitchen bumper around the door knob and then tied the open side around the door knob on the other side of the door. It fit! It would keep Mims from slamming the door as she runs through the house! I took pictures. I showed it to Jake. My parents came by. I showed them too. But, I wasn't sure it was spunky and cute enough.
I've been admiring the colorful projects over at
Attic 24, so I decided that the bumper needed some flowers. I grabbed a hook and some size 3 crochet cotton and whipped some out.
Ah! Fun! I love it now!
So, I think that I learned a bunch on this project. The next time I make one of these, I think I'm going to swap out rows 5-6 with this:
R5: 2 sc, ch 9, skip 9 sc, 12 sc, ch 9, skip 9 sc, 2 sc, ch 1, turn (34 st)
R6: 2 sc, 9 sc across the chain, 12 sc, 9 sc across the chain, 2 sc, ch 1, turn (34 st)
I discovered that it isn't stretched too tightly when it's on the door, and I won't have to untie it to remove it, so I don't see any reason to go to the extra effort to do the ties.
If you're thinking you'd like to make some too (whether your house is quirky and drafty and old, or not!) I would highly recommend that you measure the space between your door knobs, and adjust the pattern accordingly, so that you get a perfect fit.
xoxo