Google+
Showing posts with label Kitchen. Show all posts

Sunday, July 15, 2012

Thrilling Conclusion...

Well, I don't know about you, but for me this week has been challenging and exhilarating and so exciting.  It's the first time that I've tried to tackle a theme week, and I love it!  Today is the last day of my SOAP DISPENSER WEEK 2012!!  So today I'd like to share a little love to the periphery of the soap dispenser world.  Like the antibacterial gels, and the hand towels...

I know that antibacterial hand gels are a little controversial.  We don't use them on a regular basis, but for the occasional use they are really convenient.


Purell Advanced Refreshing Gel (8 oz bottle) Cover
Supplies:
100% cotton worsted weight yarn, approx. 40 yards (I used Lion Cotton in Purple)
Size G hook
Yarn needle

ch 28, sl st to first ch to join round (28 st)
R1: ch 1, sc in each ch around, sl st to first sc to join round (28 st)
R2-17: ch 1, sc in each sc around, sl st to first sc to join round (28 st)
R18: ch 1,[(sc 2 st tog) 4 times, 6 sc] 2 times, sl st to first sc to join round (20 st)
R19: ch 1,[(sc 2 st tog) 2 times, 6 sc] 2 times, sl st to first sc to join round (16 st)
Fasten off.  Weave in ends.
  

Skull Applique
Supplies:
100% cotton worsted weight yarn, approx. 15 yards (I used Bernat Handicrafter 100% Cotton in White)
Size G hook
Yarn needle

ch 5
R1: sc in 2nd ch from hook, sc in each ch across, ch 1, turn (4 st)
R2: sc in each st across, ch 1, turn (4 st)
R3: 2 sc in next sc, 2 sc, 2 sc in last st, ch 1, turn (6 st)
R4: 2 sc in next sc, 4 sc, 2 sc in last st, ch 1, turn (8 st)
R5-6: sc in each st across, ch 1, turn (8 st)
R7: sc 2 st tog, 4 sc, sc 2 st tog, ch 1, turn (6 st)
R8: sc 2 st tog, 2 sc, sc 2 st tog (4 st)
Fasten off.  Weave in ends.

Skully eyes:
Size 3 crochet cotton (I used Aunt Lydia’s Size 3 Fashion Crochet Cotton in Plum)
Size D hook
Yarn needle

Small Eye
5 sc in a magic loop, sl st to first sc to close round. 
Tighten loop.  Fasten off.  Weave in ends.

Large Eye
10 sc in a magic loop, sl st to first sc to close round. 
Tighten loop.  Fasten off.  Weave in ends.

Using photo as reference, stitch eyes to skull.  Embroider three lines across rows 1 and 2 of the skull, to define the teeth.

Stitch the Skully to the cover at a jaunty angle!

Or, if skulls aren't really your thing, the ribbon/button that we made yesterday also would look really cute.  I think this would make a cute back-to-school gift for teachers, especially in your school's colors.  


The other thing that I made today were some towels.  I found some dish towels at Target that I thought needed some decoration.  I chose colors that I love.  You can choose colors that match your kitchen, or your favorite soap dispenser cover! 


The turquoise/red towel was made by making 4 three-color circles.  I made it in Mims's favorite colors, so that she could use it as a face/toothpaste towel in the bathroom.  

Three-Color Circle Towel
Small amount size 3 crochet thread in 3 colors (I used Aunt Lydia's size 3 bamboo thread)
Size D hook
Yarn needle
Sewing needle
Sewing thread to match 
Hand towel/Dish towel

(make 4)
R1: Using Color A: 5 sc in a magic loop, sl st to first sc to join round (5 sc)
R2: ch 1, 2 sc in each sc around,  sl st to first sc to join round (10 sc)
R3: Switch to Color B: ch 1, (2 sc in next st, sc) 5 times,  sl st to first sc to join round (15 sc)
R4: Switch to Color C: ch 1, (2 sc in next st, 2 sc) 5 times,  sl st to first sc to join round (20 sc)
Fasten off.  Weave in ends.

I would recommend pinning the circles in place before you start sewing them on.  That way you can try out the spacing of the circles before you commit to their final placement.  Hand stitch in place.

The Star Towel was made by making 4 of my mini stars using size 3 crochet thread and a size D crochet hook.  I sewed them onto my dish towel the same way that I sewed the circles onto the Three-Color Circle Towel.

I hope you enjoyed my first theme week, and of course, I hope you found at least one soap dispenser (or idea) that you found appealing.  If you'd like to look over them again, I've added a Theme Collection tab to my side bar and I've included all of the free pattens that I've shared this week.

xoxo

Saturday, July 14, 2012

Odor Neutralizing Fun!

Oh yeah, SOAP DISPENSER WEEK Bonus Day!!!  5 was just not enough! When I say a week, I mean a week!

I've learned a few things, spending this week decorating soap dispenser bottles.  I think, of course, the biggest thing being that I could do one of these weeks a year for the next decade and never repeat a bottle shape.  The other thing has to be that covered soap bottles are super cute and super cheap to make.  Which makes me think that this week should really have been labled PRACTICALLY PERFECT GIFTS FOR EVERYONE YOU KNOW!! week.

This is the last soap bottle for this series, but I think I might have saved the best for last.  I made it to go in my kitchen, but you can make it in any color that you like.


Softsoap Odor Neutralizing Kitchen Fresh Hands Hand Soap Cover
Supplies:
100% cotton worsted weight yarn, approx. 40 yards (I used Peaches & Creme in Sunshine)
Size G hook
Yarn needle

ch 27, sl st to first ch to join round (27 st)
R1: ch 1, sc in each ch around, sl st to first sc to join round (27 st)
R2-3: ch 1, sc in each sc around, sl st to first sc to join round (27 st)
R4: ch 1,( 5 sc, sc 2 st tog) 3 times, 6 sc, sl st to first sc to join round (24 st)
R5-19: ch 1, sc in each sc around, sl st to first sc to join round (24 st)
R20: ch 1, (2 sc, sc 2 st tog) 6 times, sl st to first sc to join round (18 st)
R21: ch 1, (sc, sc 2 st tog) 6 times, sl st to first sc to join round (12 st)
Fasten off.  Weave in ends.


I hot glued a button to the top of a ribbon, and then glued the button/ribbon to a bobby pin!  It's so simple, but it's absolutely adorable in person.  I'm not a cutesy cutesy kind of person, but I literally squealed with delight when I finished this soap cover.   

Okay, so even though this was the last soap dispenser cover, I do have a surprise for you tomorrow.  The last day of my SOAP DISPENSER WEEK extravaganza is going to be filled with hand sanitizers and hand towels.  So enjoy your lovely Saturday, Dynamos!  Come back tomorrow for this week's thrilling conclusion!

xoxo

Friday, July 13, 2012

Day Five of Soap Dispenser Week 2012!

Happy Friday the 13th everyone!  If you celebrate by enjoying some horror movie fun (might I suggest the 1992 classic, Army of Darkness?), you're going to need to scrub all that fake blood off with some good soap... Or perhaps just use the soap to get the popcorn smell off your fingers...  Luckily, I'm here with another awesome cover for SOAP DISPENSER WEEK 2012!!!

Today's soap dispenser cover is for my mom, because she requested one.  Her favorite color is green, and she loves turtles, so that's why we're doing this today.  I wish that there was more to it than that... but there isn't.  LOL!!!


Dial Complete Foaming Antibacterial Hand Wash Cover
Supplies:
100% cotton worsted weight yarn, approx. 40 yards (I used Peaches & Creme Scents in Soothing Aloe)
Size G hook
Yarn needle

ch 30, sl st to first ch to join round (30 st)
R1: ch 1, sc in each ch around, sl st to first sc to join round (30 st)
R2-5: ch 1, sc in each sc around, sl st to first sc to join round (30 st)
R6: ch 1,(4 sc, sc 2 st tog) 5 times, sl st to first sc to join round (25 st)
R7-9: ch 1, sc in each sc around, sl st to first sc to join round (25 st)
R10: ch 1, (3sc, sc 2 st tog) 5 times, sl st to first sc to join round (20 st)
R11-19: ch 1, sc in each sc around, sl st to first sc to join round (20 st)
Fasten off.  Weave in ends.


If you'd like to add a toy turtle to the front of your soap dispenser as well, I hot glued two bobby pins between two circles of felt, and then attached them to the underside of the turtle, making sure that the bobby pin by the turtle's head was in line with it's neck.  Once the glue cooled, I slid the bobby pins in between the crocheted stitches of the cover to attach the turtle.  This way, it's easy to remove, but the turtle won't just fall off onto my mom's kitchen counter.

I wanted to talk just a little bit about foaming hand soaps.  I adore them.  That's all we use around here.  But they can get a little pricey, since (for my family) they don't seem to last as long as the bottles of non-foaming soap.  Plus, until Bath & Body Works has some sort of return/recycling program, it just kills me to throw the barely used empties away (even if it's in the recycling bin).

I was browsing on Pinterest the other day and ran across a link to this post about how to make your own foaming soap refills (btw, Stephanie at Full of Great Ideas really is full of great ideas.  Someone called her the Mythbusters of Pinterest, and I have to agree!).  Anyhoo, I thought that I really should pass along the 'recipe' (which I have since seen on several other blogs too!) and maybe we can all save a few bucks.

Everyone in blogland seems to be in agreement that you should aim for a 2:1 to 3:1 ratio of water to liquid soap.  Some suggest using hot water.  Lots of people use yummy smelling expensive soaps, since it makes them last longer.  Other people use dish soap, and shampoos.  I am especially interested in the dish soap idea, since I think the extra yuck-removal power that those cleansers have might be beneficial for my family, particularly in the kitchen.  Everyone agrees, do not get creamy non-clear soaps since they will clog up your foaming dispenser.

I refilled one of my old Bath & Body Works dispensers with B&BW's Pink Chiffon-scented body wash, with fantastic results.  I filled the bottle about 1/4 of the way with the soap, and then filled the rest of the bottle with hot tap water.  I gently swirled the bottle until the soap was mostly mixed in, but I wasn't too worried, since I know that eventually it will dissolve.  It works perfectly, and I am really happy, since it isn't a fragrance that they offer in their hand soap line (and it is currently my signature scent!).  So, I feel spoiled and happy, and I don't feel guilty that my empty foaming bottles are going to waste anymore.

Have a happy Friday, Dynamos!  Come back tomorrow for Day Six of soap dispenser goodness!

xoxo

Thursday, July 12, 2012

Blue Pearls

I can hardly believe that we're already on day FOUR of my Soap-tacular SOAP DISPENSER WEEK!!!


Mimsey is participating in our library's summer reading program.  Jake and I have been putting her in it since the first year she was eligible.  I like it, because it makes us prioritize library trips, and we read waaay more books to Mims (says her mom, hanging her head in shame).


The last time we were at the library, Jake wanted to get some books on shed construction, so we all walked over to the adult section of the library.  Mims and I wandered into the crafty section where I made a shocking discovery.  There were 3 books on crochet in my local library.  3!  Now, perhaps the library had just had a massive run on crochet books and these were the only 3 left, but I doubt it.  There were 3 large stacks (the bookcase kind) of craft books, and at least 4 shelves devoted to knitting books. Yet, there were only 3 crochet books?!  What's up with that?!
** to be fair, our library is part of a very large library system, and they do have a large selection of crochet books, they're just spread out between 40 different library locations, but I can order them to be delivered to my local library for a quarter** <-- That weakened my argument a little.  But I wanted to browse, so I say my argument is still valid...


So, I grabbed a DIY wedding book, since there were bound to be some fun and different ideas in there, and a book on jewelry making, and we went on our merry way.  Much later, when I finally got around to looking through my borrowed books, I found that while there wasn't anything in them that directly appealed to me, I did find myself inspired to create something wholly new based on some of the ideas in the books.


Particularly, I found myself drawn to the idea of handcrafted wedding favors.  There's just something so precious and intimate about creating something that you know your guests will treasure as much as you treasure their participation in your special day.  For days I've been dreaming about what I might create for my guests if I was planning a wedding (which I am not).  What I came up with was an idea for an ornament.  Certainly it could be hung on a tree at Christmastime, but I think it would be pretty hung in the home as well.  I was going to make one to hang from the glass knob of the medicine cabinet in my bathroom, and then I realized that I could use it to decorate the front of one of my hand soap covers!  Two birds, one stone!  


I still am planning on making my wedding favor ornaments, but I'm glad that I got a chance to try one out before I committed to making a dozen of them.  I think the cover turned out really pretty.  If you'd like to make one too, here's the pattern:


Softsoap Hand Soap Cover
Supplies:
100% cotton worsted weight yarn, approx. 40 yards (I used Peaches & Creme in Bright Blue)
Size G hook
Yarn needle

ch 25, sl st to first ch to join round (25 st)
R1: ch 1, sc in each ch around, sl st to first sc to join round (25 st)
R2-7: ch 1, sc in each sc around, sl st to first sc to join round (25 st)
R8: ch 1,(2 sc in next st, 4 sc) 5 times, sl st to first sc to join round (30 st)
R9-14: ch 1, sc in each sc around, sl st to first sc to join round (30 st)
R15: ch 1, (4 sc, sc 2 st tog) 5 times, sl st to first sc to join round (25 st)
R16: ch 1, sc in each sc around, sl st to first sc to join round (25 st)
R17: ch 1, (3 sc, sc 2 st tog) 5 times, sl st to first sc to join round (20 st)
R18: ch 1, (2 sc, sc 2 st tog) 5 times, sl st to first sc to join round (15 st)
R19: ch 1, sc in each sc around, sl st to first sc to join round (15 st)
Fasten off.  Weave in ends.


To add the fancy-schmancy star on the front, I crocheted a mini version of my star pattern out of white worsted weight cotton yarn.  I sewed two layers of tulle and some plastic pearls and glass beads in the center.  Then I used white cotton yarn and stitched it on the front of the cover.  If you turn it wrong side out, I think it will go through the wash with no problems, but I wouldn't recommend putting it in the dryer.


Mini Star Pattern:
You can use any weight yarn, with an appropriately sized hook.  It also looks really cute in size 3 crochet thread... I made my star out of worsted weight yarn and a size G hook.


R1: 5 sc in magic loop, sl st to first sc to close round (5 st) 
R2: ch 1, (2sc in next st) 5 times, sl st to first sc to close round (10 st)
R3: [(hdc, dc, trc, dc, hdc) in next st, sl st] 5 times
Fasten off.  Weave in ends.


Come back tomorrow for some more good clean fun!!!  (Ahahahaha, I know it's dumb, but I crack myself up!)


xoxo


Sorry about the all white text background today on this post.  I can't for the life of me figure out how to make it go back to normal... LOL!!!!

Wednesday, July 11, 2012

Dial L for Love

It's day three of my SOAP DISPENSER WEEK extravaganza!  Who knew covering soap bottles in crochet could be so fun?!  Wait, I think I got that confused with drag racing... Anyway, today's soap is a classic, non-foaming household staple:


Dial Antibacterial Hand Soap with Moisturizer Cover
Supplies:
100% cotton worsted weight yarn, approx. 45 yards (I used Peaches & Creme in Oasis)
Size G hook
Yarn needle

ch 27, sl st to first ch to join round (26 st)
R1: ch 1, sc in each ch around, sl st to first sc to join round (26 st)
R2-14: ch 1, sc in each sc around, sl st to first sc to join round (26 st)
R15: ch 1,(3 sc, sc 2 st tog) 5 times, sc, sl st to first sc to join round (21 st)
R16-21: ch 1, sc in each sc around, sl st to first sc to join round (21 st)
R22: ch 1,(sc, sc 2 st tog) 7 times, sc, sl st to first sc to join round (14 st)
R23: ch 1, (2 sc, sc 2 st tog) 3 times, 2 sc, sl st to first sc to join round (11 st)
Fasten off.  Weave in ends.

The finished cover reminded me of our last beach trip.  The beach sand had been warm and darkly speckled from summer-barbecue charcoal.   The seagulls had just finished feasting on muscles that had washed up on the shore, the empty seashells littering the damp sand at the water's edge.  The shells were so beautiful, deep blacks and purples, sometimes tipped in white.  I picked several up, and rinsed them in the tide, amused that the open shells resembled a heart.  I carefully carried them home, knowing that I wanted to do something special with them.


I decided that I wanted to use the shells to decorate my cover.  I cut out two felt pieces about the shape of the open muscle shells, and hot glued a bobby pin between the felt.  I then, carefully, split the two shells apart.  I glued the felt to the backside of the shells, working on one side at a time.  Now, I could attach my shell heart to the soap dispenser cover simply by sliding the bobby pin between the crocheted stitches.  


I love that the heart is removable, and that I can wash (and dry!) the cover when it gets yucky.  Because while this project wasn't expensive, to me it holds a pretty special memory...

xoxo

Tuesday, July 10, 2012

Up & Up...

Welcome to day two of my SOAP DISPENSER WEEK!!!! (yay!!!)

Here's the deal:  I love to crochet.  I love to spend hours working out crochet design problems.  Most of the time I can rip it out three or four times and then, finally, solve the problem.  But sometimes it just doesn't work.  Like this time:


See, I wanted to do a happy sun  for the cover.  Odd numbers look better for most things, so I made five points (ahem, 3 versions of 5 points, to get them pointy enough...) Do you know what a 5 pointed sun is?  A star.  Yep.  A happy faced star shining brightly in the cloudy daytime.

So, back to the drawing board.  I had wanted this cover to be for a kid's bathroom, which made me think that I usually create my kid projects for Mims.  I should do something different!  I just recently got to hang out with my nephew, DC, and so I took some inspiration from him and decided to re-do the cover for a little boy's bathroom (or a really hip kitchen).


up&up (Target Brand) Foaming Hand Wash Cover
Supplies:
100% cotton worsted weight yarn, approx. 35 yards (I used Peaches & Creme in Bright Aqua)
Small amount of 100% cotton worsted weight yarn for clouds (I used Bernat Handicrafter 100% Cotton in White)
Size G hook
Yarn needle
Small toy airplane
Hot glue gun and glue sticks

ch 29, sl st to first ch to join round (29 st)
R1: ch 1, sc in each ch around, sl st to first sc to join round (29 st)
R2-12: ch 1, sc in each sc around, sl st to first sc to join round (29 st)
R13: ch 1,(4 sc, sc 2 st tog) 4 times, 5 sc, sl st to first sc to join round (25 st)
R14: ch 1, (3sc, sc 2 st tog) 5 times, sl st to first sc to join round (20 st)
R15: ch 1, (3sc, sc 2 st tog) 4 times, sl st to first sc to join round (16 st)
R16: ch 1, sc in each sc around, sl st to first sc to join round (16 st)
Fasten off.  Weave in ends.

Clouds 
Sm cloud
ch 9
R1: sc in 2nd ch from hook, sc in each ch across (8 st)
R2: -do not chain- skip 1 sc, sl st in next 2 sc, 5 dc in next sc, skip 1 sc, sl st , skip last sc
Fasten off.  Weave in ends.

Lg cloud
ch 11
R1: sl st in 2nd ch from hook, sl st, 7 sc, sl st (10 st)
R2: ch 1, skip 1 sc, sl st in next st, 3 sc in next st, sl st, skip 1 st, 4 dc in next st, 2 sl st, skip last 2 st
Fasten off. Weave in ends


I got out my trusty hot glue gun and glued the airplane and the clouds to the cover.  I know what you're thinking, "But I'm never going to be able to wash it when it gets dirty and gross!" and to that I say, "Yup."  

I love recycling and reusing and keeping handcrafted treasures as much as anyone else, but I was faced with a challenge that made me question my priorities, and after careful contemplation, here's what I've come up with:  I spent fifteen minutes crocheting a cover for a $1.50 bottle of soap, with $1 worth of yarn.  I glued a $0.50 toy to the front (two for a buck at the dollar store! score!).  So really, including the soap, we were dealing with $3.00 in materials.  And, not to toot my own horn or anything, I think it turned out super cool.  If I had seen that in a baby boutique, I would have expected to pay $35 or more for it EXACTLY THE WAY I GLUED IT.  We have a very generous family friend that, if I had received that as a present from her, I would have assumed that she had spent at least $50 on it... Once again, glued exactly the way that I glued it.  

I get really hung up on the idea that the things I create need to stand the test of time, but in this case, sometimes it's more fun to just finish the project and move on.  I am confident that my sister-in-law is going to change the decor of DC's bathroom at least two times before he'll even be old enough to be able to stand at the sink and wash his hands on his own.  This isn't an heirloom.  It's a really cute soap bottle cover.

By the way, I really think you would knock the socks off of any baby shower by making this.  It's so stinkin' cute in person, I hate to give it away...

xoxo

Monday, July 9, 2012

Soap Dispenser Week 2012!

It was recently brought to my attention that my foaming soap dispenser cover only covered the one (slightly pricey) type of Bath & Body Works bottle.  "Well," I thought to myself, "that's just not going to do." So I took a trip to Target, because I wanted my Dynamos to be able to cover any soap that they wanted to cover.  I got to the handsoap aisle, and I had a massive soap bottle revelation.  How had this escaped my notice?!  There are, like, three different bottle designs (or more!) for each brand of soap that Target carries.  It was crazy!

I get it.  The foaming dispensers have to look different from the odor-neutralizing soaps which have to look different from the just plain hand soaps or we all might get confused.  LOL!!!  So I picked out a few different  types of bottles, since clearly I was not going to be able to design a one-size-fits-most cover.  But, the silver lining is that we now get to have:

SOAP DISPENSER WEEK 2012!!!
(and the crowd goes wild!! Yay!!!!)


I kept these simple, and in the same style as my previous covers, because I think that these covers are just a perfect neutral background for a really cool focal point accessory.  And since they don't use a ton of yarn, they are quick to make!

So, let's get started!


Softsoap Pampered Hands Foaming Hand Soap Cover

Supplies:
100% cotton worsted weight yarn, approx. 50 yards (I used Peaches & Creme Scents in Rose Garden)
Size G hook
Yarn needle

ch 30, sl st to first ch to join round (30 st)
R1: ch 1, sc in each ch around, sl st to first sc to join round (30 st)
R2: ch 1, sc in each sc around, sl st to first sc to join round (30 st)
R3: ch 1, (4 sc, sc 2 st tog) 5 times, sl st to first sc to join round (25 st)
R4-5: ch 1, sc in each ch around, sl st to first sc to join round (25 st)
R6: ch 1, (3 sc, sc 2 st tog) 5 times, sl st to first sc to join round (20 st)
R7-25: ch 1, sc in each ch around, sl st to first sc to join round (20 st)
Fasten off.  Weave in ends.


I hot-glued a bobby pin to the back of a flower I got at the Dollar Tree, to use as an embellishment.  You can, of course, put anything you like on the front, or leave it plain!  I like being able to wash the covers, which is why I didn't directly attach the flower.  The covers get surprisingly grubby! Or is that just me, because I live with a 5 year-old??

Okay!  I'll see you tomorrow for Day Two of Soap Dispenser Week!

xoxo

Friday, June 22, 2012

Life at the Old Farmhouse

I live in an old farmhouse.  My grandparents moved it onto this property in the 1950's.  It was built in the 1920's though, and moved here when they realized that their smaller house was not going to have enough room for their growing family.  It was quite a hassle, apparently, since the city that the house originally was from only allowed houses to be moved during the night, and the city that the house was moved to only allowed houses to be moved during the day.  So they split the house in half, put it on wheels, and towed it to the city limit, on a bridge over the riverbed, where they waited for daybreak.  Then they got it moving again and towed it to it's new home.

I love the house, but it's nearly 100 years old, which means it's drafty and quirky.  My grandparents remodeled the kitchen by removing walls between several rooms to make one big room.  Which is really great, but they didn't add any extra counter space, so there's not enough room for two people to prep food for parties, despite the fact that twenty people could sit around in the kitchen and watch.  And there are three interior doors that lead to the kitchen, and a back door, which means that there's a door on every wall.  Did I mention that it's drafty?  It's really drafty, and the air pressure makes the doors slam shut when winds blow.

We put a spongy foam door stopper on the swinging door, in an effort to protect Mims when she was a toddler.  My sister and I consider getting our fingers smashed in that door a rite of passage, but Jake and I felt like we'd be happier if Mims waited until she was older to have that experience.  The foamy stopper has worked like a charm, so we've just left it on, even though she's probably old enough/responsible enough to handle the door now.

But the other doors are being constantly banged around, even when the wind isn't blowing.  Mims slams them, Mema slams them when she pushes them out of the way to get into the cupboards (quirky detail!), and   the back door is on a spring, so it slams anytime we come in or go out.  I wanted something that would stop all the banging.  Maybe not keep the door from shutting entirely, the way the foam stopper does, so I needed another idea.  Maybe just a bumper, something that could be removed easily, something that would look cute...


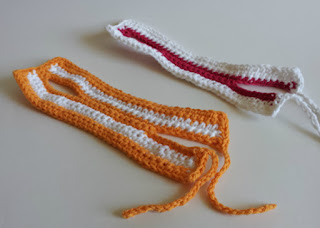
Kitchen Door Bumper - version 1
Supplies:
Small amount of worsted weight yarn (I used Bernat Handicrafter 100% cotton, and the pink smelled like fruit punch, very summery!)
Size G crochet hook
Yarn needle

Chain 35
R1: sc in 2nd ch from hook, sc in each ch sp across, ch 1, turn (34 st)
R2-4: sc in each sc across, ch 1, turn (34 st)
R5: 2 sc, ch 9, skip 9 sc, 14 sc, ch 10, turn (35 st)
R6: sc in 2nd ch from hook, sc in each ch sp, 14 sc, sc in each ch sp, 2 sc (34 st)
R7-9: sc in each sc across, ch 1, turn (34 st)
R10: 33 sc, 3 sc in next st, turn and 8 sc evenly across short side, 3 sc in corner, turn and 32 sc across long side, 3 sc in the corner, 4 sc across very short end, chain 20.  Fasten off.
R12: (continued) With a new piece of yarn, chain 20, 4 sc across remaining very short end, fasten off.
Weave in ends.

(The white stripes were done on rows 2-3 and on 7-8)

I looped the closed side of the kitchen bumper around the door knob and then tied the open side around the door knob on the other side of the door.  It fit! It would keep Mims from slamming the door as she runs through the house!  I took pictures.  I showed it to Jake.  My parents came by.  I showed them too.  But, I wasn't sure it was spunky and cute enough.  

I've been admiring the colorful projects over at Attic 24, so I decided that the bumper needed some flowers.  I grabbed a hook and some size 3 crochet cotton and whipped some out.

Ah! Fun!  I love it now!

So, I think that I learned a bunch on this project.  The next time I make one of these, I think I'm going to swap out rows 5-6 with this:

R5: 2 sc, ch 9, skip 9 sc, 12 sc, ch 9, skip 9 sc, 2 sc, ch 1, turn (34 st)
R6: 2 sc, 9 sc across the chain, 12 sc, 9 sc across the chain, 2 sc, ch 1, turn (34 st)

I discovered that it isn't stretched too tightly when it's on the door, and I won't have to untie it to remove it, so I don't see any reason to go to the extra effort to do the ties.  

If you're thinking you'd like to make some too (whether your house is quirky and drafty and old, or not!) I would highly recommend that you measure the space between your door knobs, and adjust the pattern accordingly, so that you get a perfect fit.  

xoxo

Monday, April 16, 2012

Soaptastic Fun!

I love Bath and Body Works foaming soaps.  I have them in every bathroom of the house, and next to the kitchen sink.  I am a huge fan.  What I am not a fan of, however, is how much my daughter Mims loves these soaps.  Granted, she is five, and I adore the fact that she is in love with washing her hands, but she has this ridiculous habit of adding water to a soap bottle that is getting low so I won't know how much soap she's used.  Yes, she gets in trouble for using more that two pumps of soap.  I hate that she has given me a good reason for that rule.

If it was just me and Jake, I wouldn't care so much about the watery-ness of the soap in the bathroom.  But we live with my NINETY-ONE (when you get that old, you get your age in all capitals. Seems cruel, but I didn't make that rule.) year old grandma (Mema, to you that might know her).  Mema is very nearly blind from Macular Degeneration, and relies on the single pump of soap to provide for her hand washing needs.  When Mims waters down that single pump, we run into issues.

Bath and Body Works sells beautiful silver covers for their soaps, but you can still see the bottle through the cover.  I admit, for most people, knowing when you're about to run out of soap is a good thing.  But I have a stockpile, and I don't need to know until the pump pumps no more!  So I have come up with a pattern for a soap bottle cover that will solve my needs.  Plus, I used cotton yarn so I can throw them in the washer and dryer when the covers get gross.

 FOAMING SOAP COVER
I used worsted weight 100% cotton yarn and a size G hook.

Chain 32. Using a sl st, join the ends to form a ring.
R1: Ch 1, sc in each ch space, sl st in first sc to join round. (32 stitches)
R2-12: Ch 1, 32 sc, sl st in first sc to join round. (32 stitches)
R13: Ch 1, (sc 2 st tog, 14 sc) 2 times, sl st in first sc to join round. (30 stitches)
R14-15: Ch 1, 30 sc, sl st in first sc to join round. (30 stitches)
R16: Ch 1, (sc 2 st tog, 13 sc) 2 times, sl st in first sc to join round. (28 stitches)
R17-21: Ch 1, 28 sc, sl st in first sc to join round. (28 stitches)
R22: Ch 1, (sc 2 st tog, 12 sc) 2 times, sl st in first sc to join round. (26 stitches)
R23: Ch 1, 26 sc, sl st in first sc to join round. (26 stitches)
R24: Ch 1, (sc 2 st tog, sc 2 st tog, sc 2 st tog, 7 sc) 2 times, sl st in first sc to join round. (20 stitches)
R25-29: Ch 1, 20 sc, sl st in first sc to join round. (20 stitches)
Fasten off, weave in ends.  Slip over your soap dispenser and enjoy!


If you would like to add a flower to the front of your cover, I would highly recommend attaching the flower to a bobby pin and then using the bobby pin to hold the flower on the cover.  That way you can detach the flower easily for washing (or if your hair styling needs require a flower for the evening).  If you like the poppy and peony flowers that I made, I was delighted to find the instructions here. (via Craftgawker)
xoxo

Update 12/4/12:  So, I have had a lot of trouble with this pattern, because I don't seem to be crocheting as tightly as I used to, which is making these covers come out HUGE for me.  Weird.  I've updated the pattern HERE so if you're a normal-to-loose crocheter (or anyone who likes to work in dc, instead of sc stitches - 15 rows and you're done, yo!) go check it out.  I think you'll like it much better.
xo Jaime
Related Posts Plugin for WordPress, Blogger...