Google+

Thursday, October 25, 2012

Think Pink - Part 4

Today's the day we start putting this thing together!  The first step is to put an edging on all of the blocks so that they all have the same number of stitches along each side. 


Block Edging:
Size G crochet hook
NEW skein of worsted weight yarn so that you don't run out during this process.  **The rest of the blanket can be crazy and non-matchy, but being really picky about this part means that the blanket looks expensive and handmade.  If you were to make this quilt in crazy rainbow colors, it would all still come together as long as you do all of the edgings from the same skein of yarn.**  I used a giant one pound skein of pink Red Heart acrylic, just to make sure I had enough.  It turns out that a whole pound was overkill, and I'm going to have pink yarn forever, BUT all of my edgings look the same!  Overkill is sometimes just right.

My edging is very simple:
42 dc across each side, 3 dc in each corner, sl st to first st to close edging
Repeat with all 9 blocks.


Because of the number of blocks that I had you make, you're going to put a granny square block in each corner, and the center, with the embellished blocks filling in between the grannys.  I probably played around with placement for 20 minutes, making sure I liked the way that the blocks looked together.  I flipped them around, tried them upside down and sideways, shuffled them until I was really happy with the way that it looked.  Please take the time to make sure that you love the placement of your blocks before you move on from this part.


So, do you adore the way it's looking?  Great!  Let's stitch it together.  Grab your G hook and your edging yarn.

Single crochet your blocks together.  It should be really fast and fun, since all of the hard work of making sure that your blocks have the same number of stitches was done in the last part.  It will go really quickly.  I single crocheted the two vertical lines first, and then went back and did the 2 horizontal lines.  The stitch lines should look really clean and neat, which is a great contrast to the whimsy that we've got going in the blocks.

That's enough for today!  Tomorrow we're going to finish it up!

xoxo


Want to see the rest?  Click on the links below!
Think Pink Lapghan - Part 1
Think Pink Lapghan - Part 2
Think Pink Lapghan - Part 3
Think Pink Lapghan - Part 5

Wednesday, October 24, 2012

Think Pink - Part 3

Today we're going to embellish the blocks that we made yesterday.  I really like the funky, whimsical color changes, but I think we can make them even more fun and special.

So grab your giant tote bag full of all of your yarn colors, a crochet hook (I used a G hook to do ALL of my embellishing, but you're welcome to switch it up if you'd like), some scissors and a yarn needle.

Oh yeah, and grab a 'blank' block too:


This is the fun part.  Attach your yarn, and crochet as your heart leads you.  I like to add swirls and squiggles.  You can use slip stitches (which will add an additional line of stitching that looks a little like a dashed outline), single crochet, and double crochet stitches (which add a nice flare to the lines).  Switching the type of stitch that you do as you embellish your block will add more texture, and (repeat it with me:) More Texture equals More Visual Interest (it looks WAY cooler!).

You can weave in your ends right away after each color.  No need to leave them out like I did. 

Now, grab another yarn color/texture and add some more!


This block needed a focal point, so I decided to add a rose to the corner.  If you'd like to add a rose to your blocks, this is how I did it.  Like all of my instructions on this project, try it my way, and then use it to jump off and experiment on your own!

Think Pink Rose Embellishment
Supplies:
Worsted weight yarn in any color that makes your heart happy
Size G hook

Pick the spot that you want to put your rose.  Just go for it!

For the first petal:
Attach yarn, ch 1, 5 dc, 1 sc


You're going to want to made a circle of petals, so move to the next spot and go for it!

For the 2nd petal (and each additional petal):
sc, 5 dc, sc

Add more petals in the same manner, placing them so that they form a ring. Connect the last petal to the first petal with a slip stitch to finish the first "round" of petals.


Now, add a second (smaller) circle of petals in the center of the outer ring.  There will be a little hole in the center, add a petal right in the middle for the center bud of the rose.

I would recommend doing an outer ring of 5 petals, a center ring of 3 petals, and 1 petal in the center.  If you wanted to do a larger rose, made the outer ring 7 petals, 5 petals for the center ring, and 3 petals for the bud in the very center.


 Now, grab another yarn color/texture and add some squiggles and swirls around the rose!


Now, look at your block.  Does it need more?  Are you done?  How does it make you FEEL?

Mine made me feel like it needed more embellishment!!


Once I got those corner squiggles in, I assessed it again.  It looked interesting and fun and complete to my artistic aesthetic.  So I moved on to the other 3 plain blocks that I had made.  Here are the before and afters for all 4 of my blocks:

Block 1

Block 2.
It had so much texture, I really didn't need to add much.
I liked how the rose had added a focal point to the first block, so I decided to add roses to all of my blocks.
It created a theme, which I hadn't intended, but was unexpectedly delighted by.  

Block 3.
I added 3 roses to this block.  I experimented with leaf-like squiggles. 

Block 4.
I really liked that little bump of ribbon yarn near the bottom, and I knew I didn't want to cover it up.
I added a very large rose near the center and added swirled squiggles that reminded me of octopus tentacles.
I like how the ribbon yarn bump extends the design at the bottom of the square.
Tomorrow I'll be back to start the process of putting this whole thing together.  I'll see you then!
xoxo


Want to see the rest?  Click on the links below!
Think Pink Lapghan - Part 1
Think Pink Lapghan - Part 2
Think Pink Lapghan - Part 4
Think Pink Lapghan - Part 5

Tuesday, October 23, 2012

Think Pink - Part 2


Welcome to day two of my 5 part tutorial on the Think Pink Blanket (Lapghan? I really can't make up my mind... Leave suggestions in the comments if you've got an opinion on this...).  If you missed yesterday's post, start HERE.

So now that I've gotten the blanket put together, I can put up the pictures!  Mims thinks it's super cozy and has tried to take it to her room twice.  The finished measurements on it are 41" x 41".  Nice and square!

Today we're starting our four 'fancy' blocks in the blanket.  The base of the block is randomly striped double crochet, so that's what we're starting with.


Think Pink Fancy Squares - Part 1
(make 4)
approx 12" square
Supplies:
Use all of the pinks that you've got! Switch colors on a whim!  Don't worry if your yarn has slubs or funky bits, it adds texture and interest, and if you really hate it, you can cover it up tomorrow when we add decoration to the front of it.
I used a G hook


ch 44
R1: dc in 4th ch from hook, dc in each ch across (42 st)
R2-21: ch 3 (counts as first dc), dc in each st across (42 st)
Finish off.  Weave in ends.

The piece should be about 12" square.  Adjust your stitches/row count if you need to.


These are the 4 squares that I made.  They don't look like much right now, but they'll look amazing when we embellish them tomorrow.


I particularly liked this last square.  There was something about the little pouf of ribbon yarn at the bottom of the piece that just made me happy.  Experiment with funky combinations on your squares!  You may be delighted by yourself too!

Come back tomorrow and we'll make these extra fancy!
xoxo


Want to see the rest?  Click on the links below!
Think Pink Lapghan - Part 1
Think Pink Lapghan - Part 3
Think Pink Lapghan - Part 4
Think Pink Lapghan - Part 5

Monday, October 22, 2012

Think Pink Lapghan - Part 1

I have been wanting to do a Crochet-A-Long for a while now, but when I was looking at other CALs I discovered something wonderful.  Most of the CALs I looked at were just multi-post tutorials.  Hey, we've already done that!  Several times!  So, having a big CAL lost some of it's shiny fun excitement.

On the other hand, I do love having giant multi-post projects, so I'm going to go ahead and spend the week on this project.  I spent a lot of time trying to decide what we could do that really NEEDED more than one or two dedicated posts.  I knew that I wanted to do something to celebrate Breast Cancer Awareness Month, and I wanted to make something special to celebrate my grandma's struggle with breast cancer this year.  

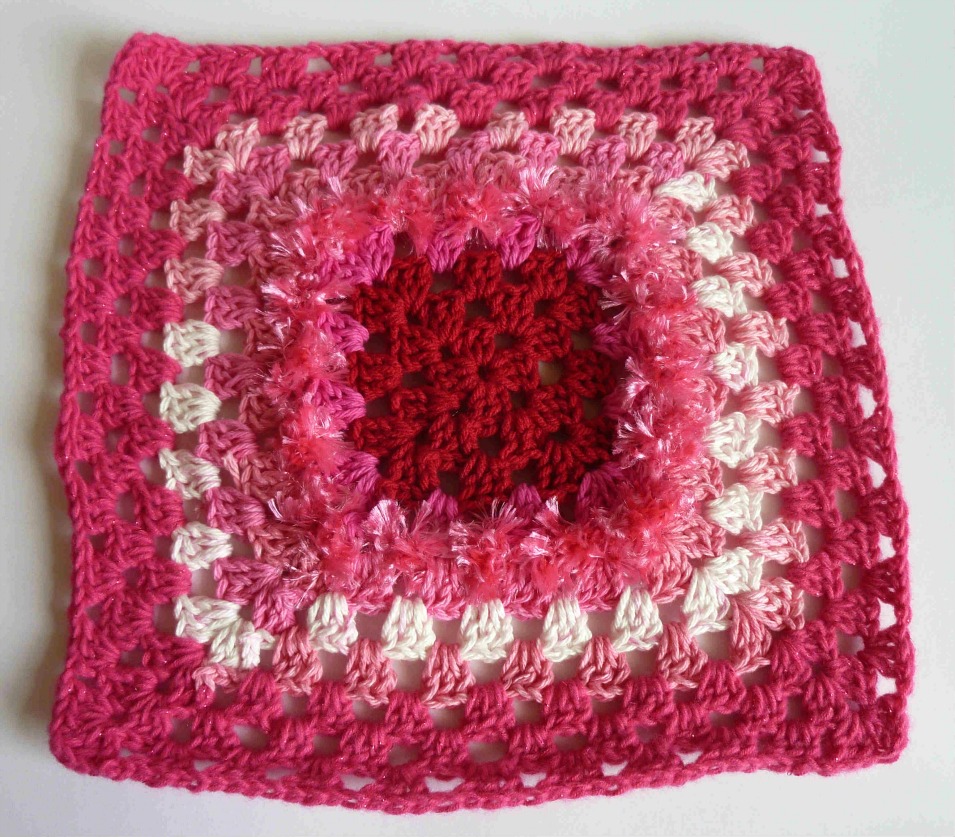
Think Pink! Finished blanket measures 41" square.

Once I decided to make a small blanket, it all kinda fell into place.  I have been crocheting like a mad woman, trying to get this done in time for today's post.  I've got to finish the edging still, so I'll post a picture of the finished project when I get it done in tomorrow's post.  (edit: Picture added!)

**I feel like I need to put a disclaimer on this project, because it's a lot more advanced, and art-y than my usual projects. So if you like clean lines and 'quick and easy' projects, this isn't going to be the project for you.  I used a dozen different shades of pink on this one, so it's not a cheap or 'one skein wonder' type of project either.  It's a lot of expense and time.  I've spent about 30 hours on it.  Also, it is a wonderful project to express your creativity, so I am NOT going to show how to make the exact blanket in the pictures.  It will be up to you, and your own interpretation of the instructions.  You will end up with your own version, one that you created from your own vision, and it will be lovely.  This one is an art class, not a recipe.  Okay?  Okay!**

Now that I've scared off pretty much everyone, let's get to the fun stuff!  My Think Pink blanket (can I just call it a blanket?  It's a small blanket.)  is made up of 9 squares.  We're going to work on the first 5 squares today (I'll end the post with a preview of the 4 squares we're going to do on Tuesday and Wednesday).  These are easy 11-row granny squares, so have fun with them.  


Each one should be different.  When I bought the yarn for this project, I picked a wide variety of worsted weight (size 4) pinks.  I picked pink acrylic yarn, pink cotton yarn, pink eyelash yarn, pink ribbon yarn and pink wool-blend yarn.  I even got some pink sparkle yarn.  I looked for lots of different shades and textures, so that there would be lots of contrast between the colors to create more visual interest.  (Basically, the more shades and textures you use, the better this thing looks, and the more fun you have coming up with cool combinations of yarn in your squares.)  No, you don't have to use 10, or more, different yarns to make this project, but it will look better if you do.

If you are a compulsive yarn-stash type of person, go raid your stash first before you head to the store, okay?  This is the PERFECT project if you've got weird lengths of yarn left over from something else.  You can use as little as a single yard in this project.  Stick to pinks, although I added a little red to the mix which added a pop of interest that I couldn't have gotten with an all-pink-palette.


Think Pink Basic Granny Square
12" square
(Make 5)
I used a variety of yarns, and switched colors on my whims.  Don't do more than 4 rows in a single color.  Eyelash, boa and ribbon yarns are fun for this, but may throw your gauge off a little.  If it's only one or two rows, don't worry about it.  If you do a whole square in fun textured yarns though,  just make sure the square is 12".  The size is more important than the row count.
I used a G hook

 ch 4, sl st to first ch to form a ring
R1: ch 3 (counts as dc), 2 dc, *ch 1, 3 dc* three times,  ch 1, sl st to 3rd chain from beginning of the row to close round.
R2: work 2 sl stitches so that your hook is next to the next chain space, (3 ch, 2 dc, ch 1 to form a corner, 3 dc, ch 1) in chain space, [*3 dc, ch 1 to form a corner, 3 dc, ch 1* in next chain space] three times, sl st to 3rd ch from the beginning of the row to close round.
R3:  work 2 sl stitches so that your hook is next to the next chain space, [3 ch (counts as dc), 2 dc, ch 1] in chain space, [(3 dc, ch 1 to form a corner, 3 dc, ch 1) in next chain space, (3 dc, ch 1) in next ch space] three times, (3 dc, ch 1 to form a corner, 3 dc, ch 1) in next ch space, sl st to 3rd ch from the beginning of the row to close round.
R4:  work 2 sl stitches so that your hook is next to the next chain space, [3 ch (counts as dc), 2 dc, ch 1] in chain space, (3 ch, ch 1) in next chain space, [(3 dc, ch 1 to form a corner, 3 dc, ch 1) in next chain space, (3 dc, ch 1) in next ch space, (3 dc, ch 1) in next ch space] three times, (3 dc, ch 1 to form a corner, 3 dc, ch 1) in next ch space, sl st to 3rd ch from the beginning of the row to close round.

Continue in pattern, adding one 3 dc cluster to each side in each round, until the piece measures 12" square (approximately 11 rows)

Uh, I'm sure this could be more elegantly written, but writing a granny square pattern is really damn hard.


Okay, so check out this last 'square' with me.  I got all fancy with a bulky ribbon row near the end. If you notice in the other squares, the bulky ribbon rows in the center don't really effect the square-ness of the squares like my experiment with an outer-edge ribbon row did.  This is okay, it will get less ruffled and more 'in shape' as we add our edging on Thursday, and put it together with the other squares.  No worries if the squares get wonky.  The goal is to have fun and express ourselves artistically.  It will all work out, I promise!


And a quick preview of what's to come (so you don't go out a buy a ton of yarn before you know if you like my artistic aesthetic or not) :


See you tomorrow!

xoxo

Want to see the rest?  Click on the links below!
Think Pink Lapghan - Part 2
Think Pink Lapghan - Part 3
Think Pink Lapghan - Part 4
Think Pink Lapghan - Part 5

Saturday, October 20, 2012

Saturday Showcase: Kristy Belton Bleau

Welcome to my 2nd Saturday Showcase!  Today I am so excited to get to introduce you to my friend, Kristy Belton Bleau!  We've been friends for about 14 years, although Facebook has made it much easier in the last couple of years to talk more often.  She recently moved back to California (from Texas!) with her daughter, and I am so happy that I get to actually see them now!

That's not the reason why you need to know Kristy, though.  You need to know her because Kristy is doing some really cool things working with two really great organizations.  


The first one is called Saddleback Santa Ana Breakfast Together.  It's an outreach program for the homeless and motel families in the Orange County, CA area.  This is what she had to say about it:

Kristy:  We basically set up in a parking lot in downtown Santa Ana and offer the community a warm meal. We also gather local job postings and community event postings. Once a month, or so, we do a clothing distribution for those in need. 

The people we help are some of the most grateful and amazing people I know. They thank me every week for going to serve, not knowing that they are making a bigger difference in my life than I am in theirs. My goal is to show them that even though they are feeling worthless and low, people DO care. 


The other organization that Kristy works with is called Kristie's Foundation.  In fact, she's going to be doing a 5k walk today to support this amazing program.  


Kristy:  It was founded by a mom that lost her daughter Kristie at age 7 from leukemia. In the process of watching her daughter pass away, Laurie saw there was a huge need for end-of-life care for children. That is why she started Kristie's Foundation. We work with families that have critical and terminal illnesses. We do hospital visits, offer emergency financial assistance, and offer resources for people nationwide in regards to end-of-life care. We help the kids that most people try not to think about until they are directly affected.

Hospice has been a passion of mine since I helped take care of my grandfather for 6 months before his death in 2009. I held his had for 48 hours until he passed.  That was when I really understood the transition to death. It was the most amazing experience I have ever had and I knew that God was there with us. I am such a believer in hospice and what they do for both the patients and the families... Many people don't understand hospice... so I have made it a goal to help bring awareness to hospice. I love volunteering and going to sit with hospice patients and listening to their stories.

I am also huge on cancer awareness... especially childhood cancer. I have networked with people all over the country that have kiddos fighting childhood cancer. The strength these kids have is amazing.

My goal is to someday have my own foundation so I can help all these people... whether it be transitioning from life to death, or transitioning from homelessness to stability. I want to help people by bringing a smile and happiness to their lives. A smile can do wonders and change a stranger's day... Random acts of kindness can change someone's life... 


Kristy and I have been talking for a couple of months about things that I can do to help her with this work.  As some of you know, I went through my own battle with a critical illness about 7 years ago, so these organizations really speak to the place my heart is in.  I have been the recipient of generosity and love from strangers.  I am excited that I'm cancer free and now I can be on the other side of the giving.

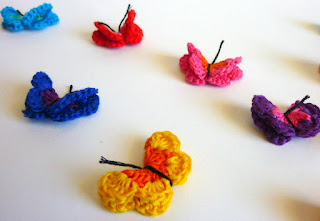
Kristie's Foundation uses a butterfly in its logo, and so I made a batch of butterflies (the ones in the pictures, there were about 15) for Kristy to take to the kids that she visits in the hospital, and the kids that she'll be seeing tomorrow at the outreach breakfast.  It didn't take very much time, and it was fun to work on something small while I waited for Mims to get out of school last week, but Kristy was overwhelmed when she saw them.  She told me that even though it seemed like such a small thing, it was going to mean so much to the kids that she works with.

So, here's what I'm doing, Dynamos.  I've decided to do more.  I'm going to pick one pattern a month to make for Kristy and the charities she works with.  I'll donate as many as I can make, and I'm going to act as a hub if any of YOU want to participate.  Kristy and I are partnering up on this, and I love that I can use crochet to help make the world a better place.

This month is butterflies.  We're using my Jaime's Butterflies pattern.   If you'd like to join me, I know that EVERY donation will be given to someone who will really appreciate it.  You can send them to me at:

Jaime Maraia
13210 Harbor Blvd. #371
Garden Grove, CA 92843

And if you'd like to support Kristy on her 5k walk for Kristie's Foundation, here's the donation link:

http://www.crowdrise.com/thebutterflywalk/fundraiser/kristybleau/1/return/success/success

I know that some of my Dynamos crochet just to keep busy, so if you would like to work on something that would be really meaningful to someone in crisis, then please consider joining me as part of this project.

I love you all!
xoxo Jaime

update 10/21/12:  There is no need to add a backing pin or bobby pin to the butterflies before you mail them.  Thanks!
xo J

Thursday, October 18, 2012

Frankenstein's Monster Hopscotch Marker

Hopscotch is ALIIIIIVE with the Kindergarteners at Mimsey's school.  It's not just the girls either, at her school it's an activity for the boys too!  They don't play exactly by the rules (give 'em a break, they're 5) but they LOVE throwing the markers even if they don't exactly know why they're doing it.  Unfortunately, unless a someone brings markers (one super cool dad at her school let them use his keys once *shocked face*) they don't get to do it too often.  

I looked into getting some Chinese Jacks, which was what we used when I was in elementary school.  Do you remember them?  Little plastic rings that we hooked together to make a donut shaped marker (and necklaces, earrings, bracelets... they were pretty awesome!). I found a package  of 200 rings on Amazon for $30 and almost fell out of my chair... That package used to be $2 at the drugstore (and a loaf of bread only cost a nickel, and they paid YOU to haul the gasoline away...).  200 rings would make about 5 hopscotch markers, so the cost was just not worth it to me.

But it did make me think that I could make something else they could use.


Frankenstein's Monster hopscotch markers!


They don't have to be Frankenstein's Monster, of course, but it's fun and Halloween-y and hey, boys would dig it and I never make anything boys like...

(also, these are fun little beanbags, and you don't have to use them solely as hopscotch markers.  Mims has been throwing them around in the living room, and Jake used them to juggle, so they're just fun to play with without having to hop around...)

Hopscotch Markers (Frankenstein's Monster version)
Supplies:
Embroidery floss (Green, Black and Pink.  Don't split the floss, just use all 6 strands)
Size C crochet hook (use a Susan Bates hook if your Boye hook splits the thread too much)
Tapestry needle (for embroidering and weaving in ends)
Scissors
Poly-pellets for filling the marker (you know, the filling they use for hackey-sacks... You can get it at big box craft stores... You only need a little, so print a coupon before you go...)

Using green embroidery floss ch 20, sl st to first ch to form a ring (be careful not to twist your stitches)
R1: ch 1, sc in each ch space, sl st to first st to finish round (20 st)
R2-9: (from now on work without joining rounds, amigurumi-style) sc in each stitch around (20 st)
R10: change to black, sc in each st around (20 st)
R11-13: sc in each st around (20 st)
Fasten off.  Leave a 5" tail.


Using a small amount of pink embroidery floss, add a mouth to the front.  Use black embroidery floss to add the eyes.  Now you can sew the bottom of the head up!  Use a whipstitch to close the bottom.


Add the poly-pellets!  It won't take very many.  Then you can use the tail end that you left when you finished the hair to whipstitch the top of the head closed.  You're done!  Take them outside to play!


**A commentary on embroidery floss as used in a crochet project:  The Franken-marker on the left has been played with and is now soft and squishy.  The Franken-marker on the right has also been played with, but it seems to be still holding it's square shape...  The one on the left was made with cheap, bulk pack floss, and the one on the right was made with higher quality, but more expensive, DMC floss... For the Frankenstein Monsters it doesn't matter, but I thought it was interesting and worth pointing out...**
xoxo

Tuesday, October 16, 2012

Bat Pen


Since we're officially halfway through the month of Halloween October, I thought I'd better make some fun pens before I run out of time.  I was going to make some witch-y finger pens, hence the green, but for the life of me I just couldn't get the knuckles right.  Honestly, the bony knuckles are what sells it as a finger; without them the pen with a witch fingernail just looks like a double-sided implement of torture... Perhaps that is Halloween-y in it's own way, but not MY kind of Halloween...


I used embroidery floss to make the cover for these pens.  If you've ever crocheted with embroidery floss before, you know it doesn't behave the same way that crochet threads do... But it comes in such wonderful colors, I just can't help it!

The pattern is very similar to the Fancy Pen pattern.

Embroidery Floss Pen Cover (It becomes the Bat Pen when you add the bat!!!)
Supplies:
2 skeins of lime green (or any other color you like!) embroidery floss (It only takes 1.5 skeins of floss for each pen, so if you get 3 skeins, you'll be able to cover 2 pens!  Thrifty!)
Size C crochet hook (I am usually a Boye hook girl, but for this project try a Susan Bates hook because it doesn't seem to split the floss the same as the Boye hooks do.  Embroidery floss WANTS to separate, so using the right hook will mean the difference between a project that you love and a project so frustrating you throw it in the trash... Uh, not that I know this from personal experience... Ahem...)
Tapestry needle (Sharp please, not a big blunt yarn needle, okay?)
Scissors
Ball point pen (You can use any type of ball point pen that you like.  I personally like the Bic Stic pens, but pretty much any pen will work.  Cheap pens are awesome for this project!)
Super Glue (This is new.  When I first started making these pens, I just stitched the cover tight and hoped for the best.  Unfortunately, these pen covers have a tendency to slide around a little.  So I experimented a little and I've discovered that using a little super glue keeps them in place! It's optional, but I think it's worth it.)

R1: make 9 sc in a magic loop. Don't pull the loop tight, but close it enough that you can sl st the last sc to the first to join the round. (9 st)
R2-?: (from now on, the rounds are going to be done amigurumi style, continuously in one long spiral without joining) sc in each stitch (9 st)

Make the tube long enough to cover your pen (between 35 and 40 rows).  Try it on the pen to make sure! :D When you know it's the right length, fasten it off.  Leave a 5" tail (approximately, no need to get out a ruler) for the next part.  Get out your super glue and tapestry needle.


Put the cover on the pen with the magic loop end at the writing end, and the open end at the back end of the pen.  Pull magic loop end tail really snug and weave the end in.  Use a running stitch and weave the back-end tail through the last row of stitches.  Pull the tail so that it gathers the stitches together, don't weave the tail in yet.  Just stick the needle in the end stitches (out of the way) while we do this next part.


Put a few drops of super glue at the tip end of the pen.  Be careful.  If you add too much it will saturate the fibers and cause them to discolor.  Use it sparingly!  Let it dry before you do the other end (less than a minute, and you'll be good to go).


Now to glue down the back end! There may be a small space where you can slide the super glue nozzle in between the crochet casing and the pen.  If there is, use it! Otherwise, loosen your stitches a little and go in from the top.  You're going to have to work fast, because super glue dries faster than you think.  Put a few drops of glue on the back end of the pen and then quickly push the stitches down on top of it.  Hold it in place for a few seconds, so that the glue attaches to the cover.  Once it's attached, it will be hard as a rock.  You may have to use your embroidery floss tail end (that you have not woven in yet!  Yay!) to cover any open spots in the end of the cover.  It should look uniform and lovely, but if you get a little too crazy with the glue and end up with a discolored section, we'll just cover it up!  So no worries!


At this point, your embroidery floss covered pen is finished.  If you love it just the way it is, you can stop at this point.  This pen reminded me of Rita Skeeter's Acid Green Quill Pen (minus the quill, of course...).

Or you can turn it in to an awesome batty pen!

Okay, let's do it!!

Bat Pen
Supplies:
Freshly made embroidery floss covered pen (okay, it doesn't have to be freshly made...)
Purple felt (You don't need much. I used eco-felt, but I'm sure it would look gorgeous with a wool felt, if you've got some scraps around.  You can also use a different color.  Gray, black, navy, blood red... I could even see using orange or hot pink, if you're a sassy sort of gal...)
Glow-in-the-dark fabric paint
Scissors
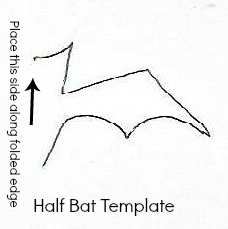
Half Bat template 

This part is easy.  Start with the felt.  I found it easier to manipulate when I cut it into 1"x3" rectangles (approximately).  Fold the rectangle in half to make an almost square 1"x1.5" piece. Now get out your scissors (your good scissors will make this project easier, your kid's blunt paper scissors are going to make it harder.  Just sayin').

These bats are pretty tiny.  I scanned the template below from a drawing I did that is the right size, but honestly, I think you'll be better off not printing it out, and just using it as a starting guide.  Think of these bats like snowflakes, you want them each to be a little different.  That's what gives them their personality!  So, you can pin the template to the felt and cut along the template lines, but  I think that you will find that it makes the cutting harder and fiddley.   Okay, back to the project.

If you want to print this out, right-click to save it,
and print it out with whatever software you use to print pictures. 

Line the template up with the felt, making sure that the folded edge is along the bat-body side of the pattern. Cut out your little bat!  Adorable.  Cut out 2 more to put on bobby pins for your neighbor's daughter.  Cut out another one and tape it to the cat's collar.  Aww.  Isn't he cute?  Take a picture and put it on Facebook.  Now, go grab the glow-in-the-dark fabric paint so we can finish the pen already.  Sheesh!


I tried using super glue (it was out from earlier, don't judge) to attach the little battys to the pens, but alas, I couldn't make the felt stick to the cotton cover.  So I ended up using a little blob of the glow fabric paint and that stuck them on with no problem.  If you are the type that fires up your glue gun as you're starting your coffee maker in the morning, you could totally hot glue these on as well... I would probably say no Elmers, but Alene's Tacky Glue is the bomb and would also work... and it will be dry by tomorrow... :P  This is totally the time to cover up any discolorations that the super glue caused when you glued the top of the pen cover down.  Just slap a bat over the top of it and Voila! It's perfect and you're amazing!  (I love it when it works out like that!)

The eyes are also glow-in-the-dark fabric paint.  Mine was a little runny, so I ended up doing a 2nd coat because the first coat soaked into the felt. I'm going to blame myself and say that I didn't shake the bottle the first time (woops!) because the 2nd coat (after I remembered to shake the bottle) turned out awesome!  It does need to sit for a few hours after you apply the paint, so if you don't have that kind of time, the itty-bitty google eyes you can get at the craft store would be a better choice.  And waaaay more fun at corporate meetings...

Now, you may ask WHY do you need glow-in-the-dark anything (especially bat eyes) on a pen... so I will tell you:  Because glow-in-the-dark is awesome, and it's Halloween!  Duh!  Plus, if you leave one on the bookcase in the hall, it will scare the bejeezus out of your boyfriend when he gets up in the middle of the night and sees two little glowing eyes staring at him...

xoxo
Related Posts Plugin for WordPress, Blogger...