
I love the house, but it's nearly 100 years old, which means it's drafty and quirky. My grandparents remodeled the kitchen by removing walls between several rooms to make one big room. Which is really great, but they didn't add any extra counter space, so there's not enough room for two people to prep food for parties, despite the fact that twenty people could sit around in the kitchen and watch. And there are three interior doors that lead to the kitchen, and a back door, which means that there's a door on every wall. Did I mention that it's drafty? It's really drafty, and the air pressure makes the doors slam shut when winds blow.
We put a spongy foam door stopper on the swinging door, in an effort to protect Mims when she was a toddler. My sister and I consider getting our fingers smashed in that door a rite of passage, but Jake and I felt like we'd be happier if Mims waited until she was older to have that experience. The foamy stopper has worked like a charm, so we've just left it on, even though she's probably old enough/responsible enough to handle the door now.
But the other doors are being constantly banged around, even when the wind isn't blowing. Mims slams them, Mema slams them when she pushes them out of the way to get into the cupboards (quirky detail!), and the back door is on a spring, so it slams anytime we come in or go out. I wanted something that would stop all the banging. Maybe not keep the door from shutting entirely, the way the foam stopper does, so I needed another idea. Maybe just a bumper, something that could be removed easily, something that would look cute...
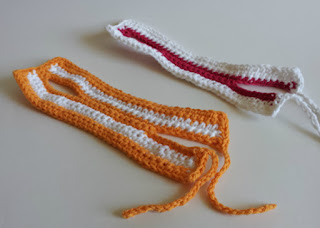
Kitchen Door Bumper - version 1
Supplies:
Small amount of worsted weight yarn (I used Bernat Handicrafter 100% cotton, and the pink smelled like fruit punch, very summery!)
Size G crochet hook
Yarn needle
Chain 35
R1: sc in 2nd ch from hook, sc in each ch sp across, ch 1, turn (34 st)
R2-4: sc in each sc across, ch 1, turn (34 st)
R5: 2 sc, ch 9, skip 9 sc, 14 sc, ch 10, turn (35 st)
R6: sc in 2nd ch from hook, sc in each ch sp, 14 sc, sc in each ch sp, 2 sc (34 st)
R7-9: sc in each sc across, ch 1, turn (34 st)
R10: 33 sc, 3 sc in next st, turn and 8 sc evenly across short side, 3 sc in corner, turn and 32 sc across long side, 3 sc in the corner, 4 sc across very short end, chain 20. Fasten off.
R12: (continued) With a new piece of yarn, chain 20, 4 sc across remaining very short end, fasten off.
Weave in ends.
(The white stripes were done on rows 2-3 and on 7-8)

I looped the closed side of the kitchen bumper around the door knob and then tied the open side around the door knob on the other side of the door. It fit! It would keep Mims from slamming the door as she runs through the house! I took pictures. I showed it to Jake. My parents came by. I showed them too. But, I wasn't sure it was spunky and cute enough.
I've been admiring the colorful projects over at Attic 24, so I decided that the bumper needed some flowers. I grabbed a hook and some size 3 crochet cotton and whipped some out.

Ah! Fun! I love it now!
So, I think that I learned a bunch on this project. The next time I make one of these, I think I'm going to swap out rows 5-6 with this:
R5: 2 sc, ch 9, skip 9 sc, 12 sc, ch 9, skip 9 sc, 2 sc, ch 1, turn (34 st)
R6: 2 sc, 9 sc across the chain, 12 sc, 9 sc across the chain, 2 sc, ch 1, turn (34 st)
I discovered that it isn't stretched too tightly when it's on the door, and I won't have to untie it to remove it, so I don't see any reason to go to the extra effort to do the ties.
If you're thinking you'd like to make some too (whether your house is quirky and drafty and old, or not!) I would highly recommend that you measure the space between your door knobs, and adjust the pattern accordingly, so that you get a perfect fit.
xoxo

I love Attic 24! just recently found and fallen in love with all the great, bright, happy colors of everything she seems to do!
ReplyDelete(btw - can't wait to see you again Sunday! - same time?)
xo!
Eliz
Yes! Same time, or earlier! Come after church! I want to see the ruffle purse!!! :D
DeletexoJaime
We'll be there! I'll actually eat lunch *before* coming, so I can have more crocheting/hanging-out-and-talking-WITHOUT-my-mouth-full time! ;P
DeleteI loved your blog, and I'm following you follow me too
ReplyDeletehttp://arteirassempredeplantao.blogspot.com.br/
Thanks Luana! I'm following you now too!!
Deletexo Jaime
We have misplaced the spongy foam gizmo meant to keep the cellar door from closing completely; it's to allow the cats (2) access to more area than just the main living quarters. (It's our son's fault. He wanted them restricted from cellar access during our latest vacation; he didn't want to have to go down to scoop the fourth litter pan. So, before we left, I put it away. Carefully. Somewhere!
ReplyDeleteNow, I know what to make to keep the door from accidentally locking a cat away from food and water. Thank you!
Hi Jessica-Jean! I don't know how I missed this!! Ours have kept our 5-year-old from smashing her fingers, so a big high-five to you for using these bumpers to protect our 'babies'!
Deletexo Jaime
just made this!! super easy to follow and do :) which is very appreciated as I'm just getting into crochet... LOVE your blog and will be back for sure!! come by and visit me sometime at pinbusting.blogspot.com
ReplyDeleteHi Steph! Your blog is AWESOME! I'm going to totally have to try the shower scrubber thing with the soap and vinegar!
Deletexo Jaime
Do you have a pattern for a knit door bumper? Unfortunately I do not know how to crochet.
ReplyDeleteThanks!
Do you have a pattern for making the little flowers to put on the door bumper?
ReplyDeleteWhat a good idea!
ReplyDeletegreats
Angeline
www.mijnplekkie.tk
What a great idea. There are several new additions to my family and the new mothers should like these. In fact, our neighbor just found out she is pregnant and I think this would be a unique gift for her as well.
ReplyDeleteI really love this project! I'm not a very strong pattern reader so I know it's my fault but I really just don't understand what's going on with row 10.If ever you make one again could you maybe take pictures of that row or something?
ReplyDeleteHi Christy! I'm going to try to explain it how I understood it to go! After you crochet the 3 sc in the same stitch in the corner, instead of flipping the work, it's more like you rotate it. Then along the short side of the work, crochet 8 sc sort of like doing a border around it. I ended up doing 9 stitches before I got to the next corner where you will do 3 more sc in the same stitch. Then rotate again and do 32 more sc to the next corner. Then 3 more sc in the same stitch, then 4 more sc along the short edge of the leg. The chain 20 is the part that is tied.
DeleteJaime Maraia posted an alternative to rows 5 and 6, though, that might be easier to follow!
R5: 2 sc, ch 9, skip 9 sc, 12 sc, ch 9, skip 9 sc, 2 sc, ch 1, turn (34 st)
R6: 2 sc, 9 sc across the chain, 12 sc, 9 sc across the chain, 2 sc, ch 1, turn (34 st)
I hope this make a little more sense!!!
This looks really fun, especially with Lucy-inspired flowers One thing, your modified instructions for rows 5 & 6, look wrong. I think you meant to say chain 9, 12 sc, chain 9, 2 sc, ch 1. You have chain 9, chain 12, chain 9..... That's a lot of chains. ;)
ReplyDeleteAhaha! Thanks for the catch. That's exactly what I meant! Big squishy e-hug for you! I'm going to fix it right now.
Deletexo Jaime
I have seen sewing patterns for these. Always wanted to make an attempt of crocheting one. What a perfect gift for new parents.
ReplyDeleteI stumbled on your blog and am so happy I did! I love your attitude and many of your comments. The patterns aren't bad either! :) About a week ago a strong gust of wind blew my open front door to the nearly closed position. My hand was in the path (holding onto the door frame) and I have a large bruise with some tenderness. OUCHIE!! It was difficult for me to knit or crochet until yesterday. Your pattern for the door bumper will come in handy. I'm pretty sure I won't have any trouble remembering to wrap the door bumper around the doors whenever I leave one of them open. Thank you!!
ReplyDeleteAlso, I'm looking forward to making the necklace for my glasses. I remove my glasses when doing needlework and fumble trying to find them when I need to see anything else. I am excited to look for more patterns that you have provided. Thanks again! :)
ReplyDeleteI used this pattern tonight (but used chunky yarn and a 5.00mm hook, chaining only 32 instead of 34) and it came out beautifully. Thank you for the pattern; I desperately needed it!
ReplyDeletehttp://instagram.com/p/rsgFm0lCVh/
So cool for you to think of that. It will be my next project (since I don't have a pet door) they can come in when they are ready.
ReplyDeleteYour pattern goes from Row 10 to Row 12 (continued). Is Row 12 supposed to be Row 11?
ReplyDeleteWhat are the chain for? I think I did mine wrong. On pic it looks like yours is open on 1 end. I closed my 2 ends in so I just slip both ends over door knob.
ReplyDeletevery cute idea,thankyou
ReplyDeleteGreet idea. My first one was to small. So the second one turn out perfect. On the open end i made on one side a buttonhole and on the opposite side i attached a button
ReplyDeleteI don't croquet. Can these be purchased?
ReplyDeleteThis is awesome! I just moved from my old farmhouse yet this is handy so that no one's fingers get smashed.
ReplyDeleteYour gutters may get heavy and clog as a result of continued debris buildup and neglected gutters. Then you need house washing west auckland immediately!
ReplyDelete