

Since we're officially halfway through the month of Halloween October, I thought I'd better make some fun pens before I run out of time. I was going to make some witch-y finger pens, hence the green, but for the life of me I just couldn't get the knuckles right. Honestly, the bony knuckles are what sells it as a finger; without them the pen with a witch fingernail just looks like a double-sided implement of torture... Perhaps that is Halloween-y in it's own way, but not MY kind of Halloween...

I used embroidery floss to make the cover for these pens. If you've ever crocheted with embroidery floss before, you know it doesn't behave the same way that crochet threads do... But it comes in such wonderful colors, I just can't help it!
The pattern is very similar to the Fancy Pen pattern.
Embroidery Floss Pen Cover (It becomes the Bat Pen when you add the bat!!!)
Supplies:
2 skeins of lime green (or any other color you like!) embroidery floss (It only takes 1.5 skeins of floss for each pen, so if you get 3 skeins, you'll be able to cover 2 pens! Thrifty!)
Size C crochet hook (I am usually a Boye hook girl, but for this project try a Susan Bates hook because it doesn't seem to split the floss the same as the Boye hooks do. Embroidery floss WANTS to separate, so using the right hook will mean the difference between a project that you love and a project so frustrating you throw it in the trash... Uh, not that I know this from personal experience... Ahem...)
Tapestry needle (Sharp please, not a big blunt yarn needle, okay?)
Scissors
Ball point pen (You can use any type of ball point pen that you like. I personally like the Bic Stic pens, but pretty much any pen will work. Cheap pens are awesome for this project!)
Super Glue (This is new. When I first started making these pens, I just stitched the cover tight and hoped for the best. Unfortunately, these pen covers have a tendency to slide around a little. So I experimented a little and I've discovered that using a little super glue keeps them in place! It's optional, but I think it's worth it.)
R1: make 9 sc in a magic loop. Don't pull the loop tight, but close it enough that you can sl st the last sc to the first to join the round. (9 st)
R2-?: (from now on, the rounds are going to be done amigurumi style, continuously in one long spiral without joining) sc in each stitch (9 st)
Make the tube long enough to cover your pen (between 35 and 40 rows). Try it on the pen to make sure! :D When you know it's the right length, fasten it off. Leave a 5" tail (approximately, no need to get out a ruler) for the next part. Get out your super glue and tapestry needle.

Put the cover on the pen with the magic loop end at the writing end, and the open end at the back end of the pen. Pull magic loop end tail really snug and weave the end in. Use a running stitch and weave the back-end tail through the last row of stitches. Pull the tail so that it gathers the stitches together, don't weave the tail in yet. Just stick the needle in the end stitches (out of the way) while we do this next part.

Put a few drops of super glue at the tip end of the pen. Be careful. If you add too much it will saturate the fibers and cause them to discolor. Use it sparingly! Let it dry before you do the other end (less than a minute, and you'll be good to go).

Now to glue down the back end! There may be a small space where you can slide the super glue nozzle in between the crochet casing and the pen. If there is, use it! Otherwise, loosen your stitches a little and go in from the top. You're going to have to work fast, because super glue dries faster than you think. Put a few drops of glue on the back end of the pen and then quickly push the stitches down on top of it. Hold it in place for a few seconds, so that the glue attaches to the cover. Once it's attached, it will be hard as a rock. You may have to use your embroidery floss tail end (that you have not woven in yet! Yay!) to cover any open spots in the end of the cover. It should look uniform and lovely, but if you get a little too crazy with the glue and end up with a discolored section, we'll just cover it up! So no worries!

At this point, your embroidery floss covered pen is finished. If you love it just the way it is, you can stop at this point. This pen reminded me of Rita Skeeter's Acid Green Quill Pen (minus the quill, of course...).

Okay, let's do it!!
Bat Pen
Supplies:
Freshly made embroidery floss covered pen (okay, it doesn't have to be freshly made...)
Purple felt (You don't need much. I used eco-felt, but I'm sure it would look gorgeous with a wool felt, if you've got some scraps around. You can also use a different color. Gray, black, navy, blood red... I could even see using orange or hot pink, if you're a sassy sort of gal...)
Glow-in-the-dark fabric paint
Scissors
Half Bat template
This part is easy. Start with the felt. I found it easier to manipulate when I cut it into 1"x3" rectangles (approximately). Fold the rectangle in half to make an almost square 1"x1.5" piece. Now get out your scissors (your good scissors will make this project easier, your kid's blunt paper scissors are going to make it harder. Just sayin').
These bats are pretty tiny. I scanned the template below from a drawing I did that is the right size, but honestly, I think you'll be better off not printing it out, and just using it as a starting guide. Think of these bats like snowflakes, you want them each to be a little different. That's what gives them their personality! So, you can pin the template to the felt and cut along the template lines, but I think that you will find that it makes the cutting harder and fiddley. Okay, back to the project.
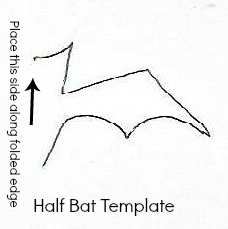 |
| If you want to print this out, right-click to save it, and print it out with whatever software you use to print pictures. |
Line the template up with the felt, making sure that the folded edge is along the bat-body side of the pattern. Cut out your little bat! Adorable. Cut out 2 more to put on bobby pins for your neighbor's daughter. Cut out another one and tape it to the cat's collar. Aww. Isn't he cute? Take a picture and put it on Facebook. Now, go grab the glow-in-the-dark fabric paint so we can finish the pen already. Sheesh!

The eyes are also glow-in-the-dark fabric paint. Mine was a little runny, so I ended up doing a 2nd coat because the first coat soaked into the felt. I'm going to blame myself and say that I didn't shake the bottle the first time (woops!) because the 2nd coat (after I remembered to shake the bottle) turned out awesome! It does need to sit for a few hours after you apply the paint, so if you don't have that kind of time, the itty-bitty google eyes you can get at the craft store would be a better choice. And waaaay more fun at corporate meetings...
Now, you may ask WHY do you need glow-in-the-dark anything (especially bat eyes) on a pen... so I will tell you: Because glow-in-the-dark is awesome, and it's Halloween! Duh! Plus, if you leave one on the bookcase in the hall, it will scare the bejeezus out of your boyfriend when he gets up in the middle of the night and sees two little glowing eyes staring at him...
xoxo

Yay! I didn't realize they had glow in the dark eyes! Too cool. I would rather get one of these in my treat bag than a tootsie roll, anyday! Sorry the witchy fingers didn't go so well, but I think you made the right decision if they were going to look like instruments of torture! Too scary! 0.0
ReplyDeleteSeriously. Maybe next year!
Delete(and I'd rather get one of these pens than candy too!)
xo Jaime
It's pretty hard to best candy but I think you did. Great job.
ReplyDeleteLOL! Thanks!
Deletexo Jaime
Love love love these! And they are way cuter in person than in the pictures :)
ReplyDeleteAww, thanks! And they're fun to write with!
Deletexo Jaime
They are sure to please; thank you for the pattern of the bat.
ReplyDeleteHi Line! I'm glad you like it!
Deletexo Jaime
These turned out really awesome.
ReplyDeleteHi ♥Piper♥! Thanks!
Deletexoxo Jaime
Nice gift idea for co-workers! I'm going to try with a flower on the top instead of the bat. That way they're usable anytime of year. the girls are sure to love them! Thanks!
ReplyDelete